Housing and outdoor area
Introduction
A well-constructed chicken house serves several important purposes. It protects the animals from predators such as rats, snakes, and dogs, as well as from theft. It also protects them from harsh weather conditions such as rain, cold, heat or storms, and serves as a place to rest and lay eggs.
The following sections explains how to build a chicken house which allows the animals to show their natural behaviour and improves production. It will also indicate what to pay attention to when designing the outdoor area.
The following aspects are of particular importance for organic poultry housing systems and will be elaborated in the following sections: fresh air, enough space, clean water and feed, perches, dry litter, nests, sand/dust bath, protection and occupation, and a well-constructed and accessible outdoor area.
Location and orientation
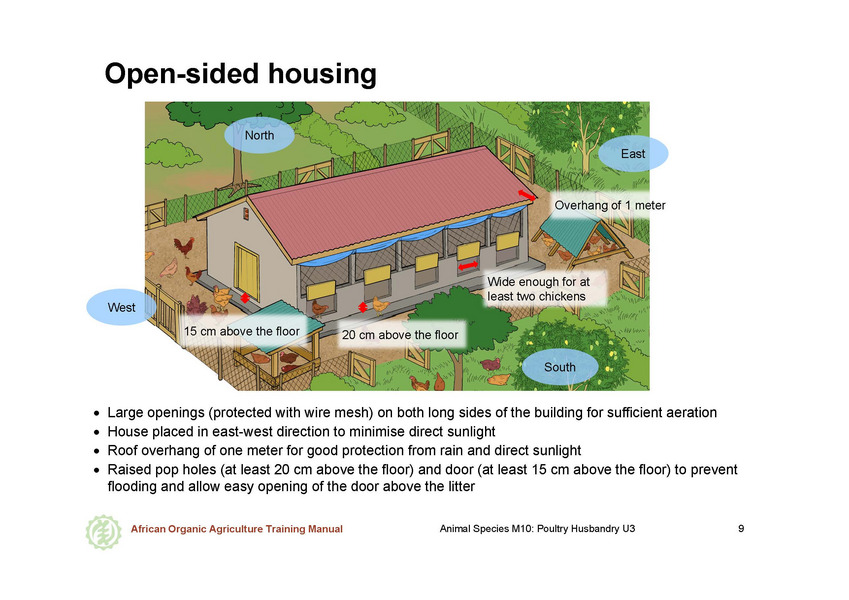
When choosing a site for a new chicken house, a shady, dry and not too noisy location is best. It should have good water run-off to prevent flooding during heavy rains. Smaller houses (for up to approximately 200 birds) can be raised off the ground on stilts if there is a risk of flooding, and a raised house has the advantage of better protection from predators. Farmers should consider building the chicken house near to the family house so that that animals can be heard at night in the case of predators or thieves. East-west orientation is recommended to minimise exposure of the birds to direct sunlight.
Types of housing
Open-sided housing
In warm climates, open-sided housing is recommended for medium to large flocks of 200 to 1500 birds. The house should have openings on two or more opposing sides or at the very least on one side for ventilation. Optimal ventilation can be achieved if the house is at least 8 m wide and the end walls are closed.
Conversion of an existing building
It may be more practical and cost-effective to convert an existing building or room into a chicken house. However, it must be assured that enough fresh air and light can be provided, that the room is easy to clean, and has an adjacent outdoor area. To ensure adequate ventilation, either a whole side is removed and replaced by wire mesh or large openings are made.
Construction
The following section provides details for an open-sided deep litter house, but most aspects can also be transferred to other housing systems. It is described as a facility for laying hens, but a house for meat production can look similar, only without the nests.
General requirements
The following recommendations are presented as a general example, and do not necessarily correspond to minimum standards from existing regulations, e. g. EU Organic Regulations. Regulations do not necessarily reflect best practice and may not be adapted to the different climatic and local conditions in different African regions. To produce in accordance with organic standards in a country, farmers must consult an organic certification body (see also chapter 8.2 on organic certification).
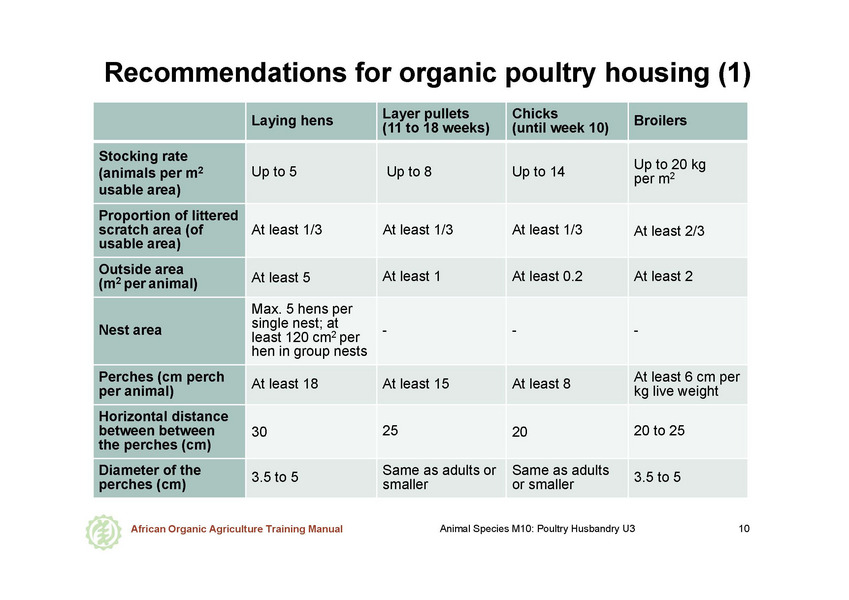
Stocking and space requirements
Chicken house
As detailed in the chart above, the stocking density in the house should not exceed five laying hens per square meter of the accessible floor. A maximum of 1500 animals are placed per house (if size allows): However, smaller groups of up to 500 chickens are recommended.
Outdoor area
The outdoor area should provide at least five square meters of space per animal. Learn more about recommendations for this area in the section “outdoor run”.
Material
Floor
The floor needs to be dry and flat with a layer of heavy gravel or wire mesh embedded to keep out rats. In organic agriculture, at least one-third of the walkable ground in the house needs to be covered with straw or an equivalent litter material. A deep litter floor system is recommended. In a deep litter system, an initial layer of litter is spread as scratching material for the animals and to absorb faeces. When the litter is soiled, it is replaced or new layers of litter are added on top. To provide increased ventilation in areas with humidity, the floor can be slatted underneath the perches (maximum 2/3 of the accessible surface).
Smaller buildings for up to 200 chickens can be raised on stilts for protection from flooding and predators. In this case, the same flooring requirements apply (maximum 2/3 can be slatted or made of wire mesh or other materials). The floor should be raised at least one meter to allow for cleaning and good ventilation, and the stilts should be rot-resistant or have stone/ concrete footings.
Litter
Any material like wood shavings, straw, wood chips or hay is suitable. Always keep in mind that litter particles are also eaten by some chickens. Therefore, only material which is not poisonous can be used, and wood shavings from poisonous trees must be avoided. If available, the litter material should come from organic production. The litter must be kept dry by bringing in new material regularly (if necessary daily) and needs to be replaced by new litter if it is getting too dirty or before a new flock of chickens is being brought in. Old litter can be composted for use as fertiliser, as it is nutrient-rich.
Manure management
A large volume of droppings will accumulate under the perches. Therefore, farmers should install either a dung pit or a dropping board under the perches. If the house is built on stilts, the droppings that accumulate under the house should also be collected regularly and can also be composted for use as fertiliser.
Roof
The roof should be stable and waterproof. It can be made of sheet metal, thatch or tiles. A thatched roof must be replaced approximately every three years or as soon as ticks or mites get into it. The optimal roof overhang of the walls is one meter. This provides the best protection from rain and sun.
Walls
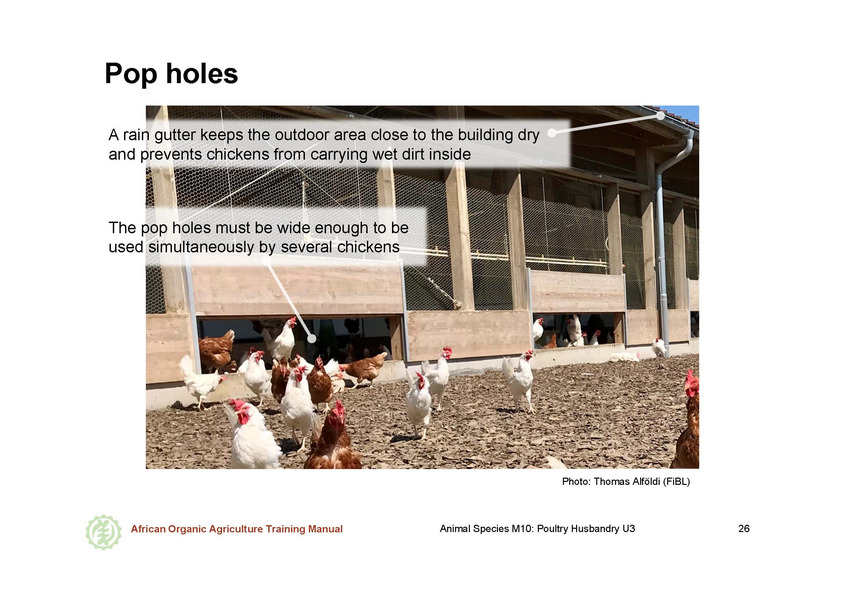
A wall of at least 60 cm should enclose the entire building to prevent flooding and to keep the litter inside. Then, the end walls should be fully enclosed, and the other walls should have windows and wire mesh for ventilation installed. To allow chickens access to the outdoors during the day, small hinged doors (e. g. “pop holes”) can be installed in the walls at least 20 cm above the floor. This allows the chickens to easily hop in and out, but also helps prevent flooding and keeps the litter inside. These small doors should be able to be closed firmly during the night for the safety of the birds.
Walls must be rat- and snake-proof and secure against wild predatory animals (e. g. fox, bobcats, weasel). This means that sturdy materials should be used for the walls, and the wire mesh used for the open sides must be fine enough to prevent entry by these predators. Walls should be smooth and easy to clean to prevent an invasion of bugs and mites. Local materials such as wooden slats, mud, bamboo slats, sheet metal, stone walls, concrete or palm fronds can be used for the walls. In colder regions, the walls need to be thicker or insulated.
Windows
The size of the windows depends on the climate but in general, the windows should be as large as possible because good ventilation is critical for chicken health. If possible, the windows should have shutters or curtains that can be closed to protect the animals from wind, rain, dust or sun.
Lighting
The chicken house should be very well lit, as light plays an important role for the growth, sleeping, laying and eating behaviour of chickens. Young chickens will reach sexual maturity more quickly if the length of daylight is slowly increased, as is natural when changing from winter to summer. Laying performance is also positively affected by good lighting, as is eating, as chickens identify food primarily by sight. As a general rule, during the daytime it should be bright enough to read a newspaper anywhere in the house.
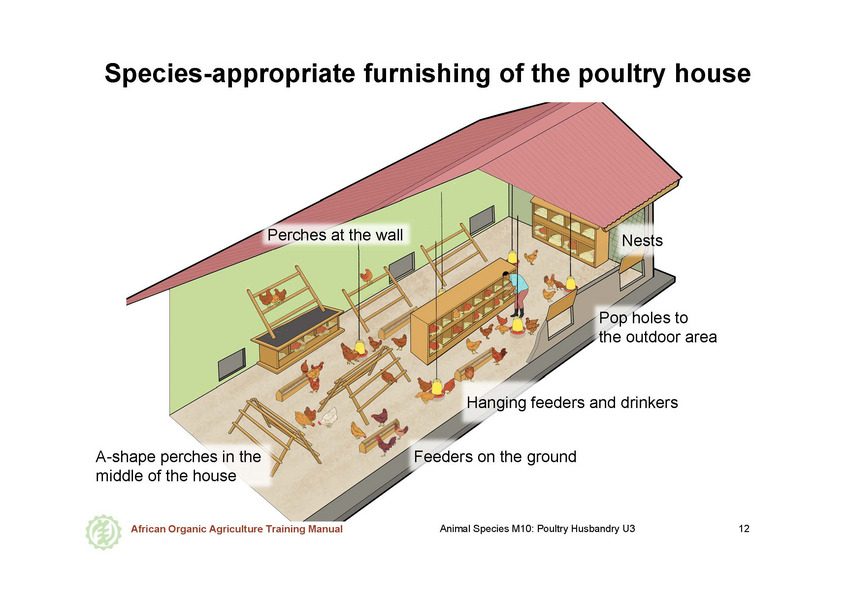
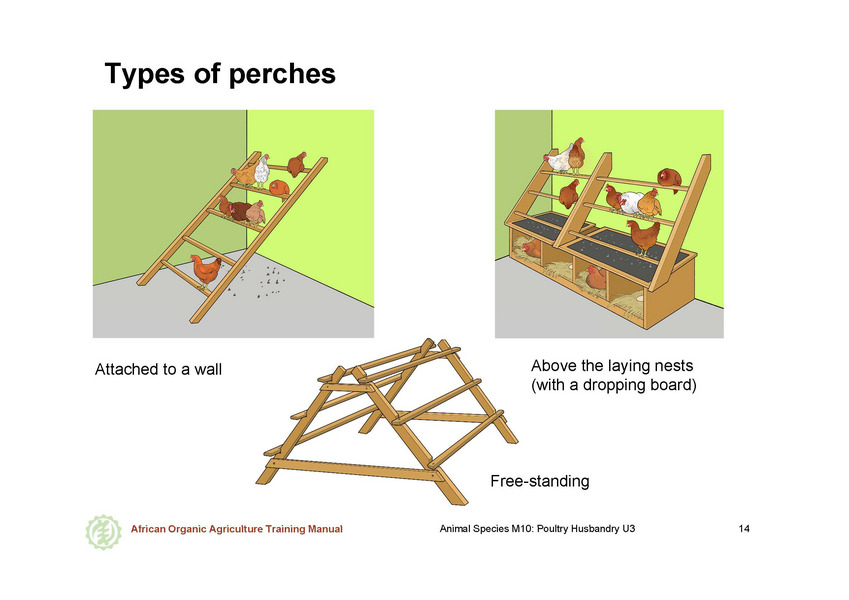
Perches
As previously described, chickens will preferentially choose an elevated roost/perch for safety and comfort while they sleep. Therefore, to support their natural behaviours, it is necessary to provide perching space for each bird in their house. Properly constructed perches also have the advantages of reducing the contact of the animals with their manure, and making the manure easy to remove from the house for use as fertiliser.
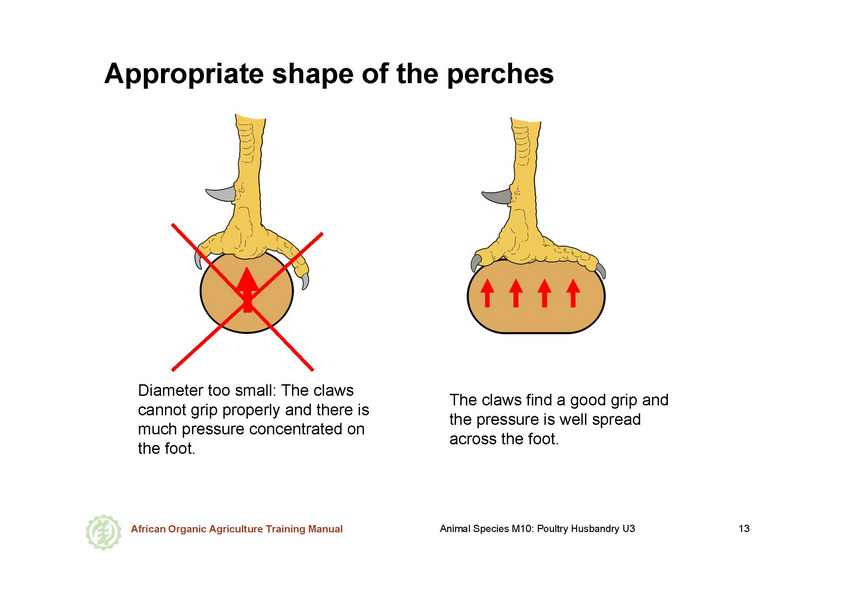
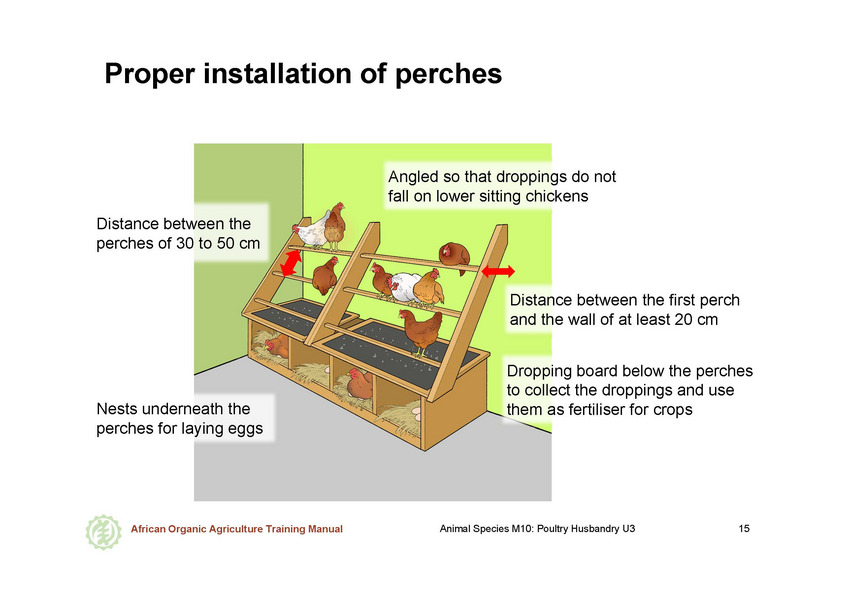
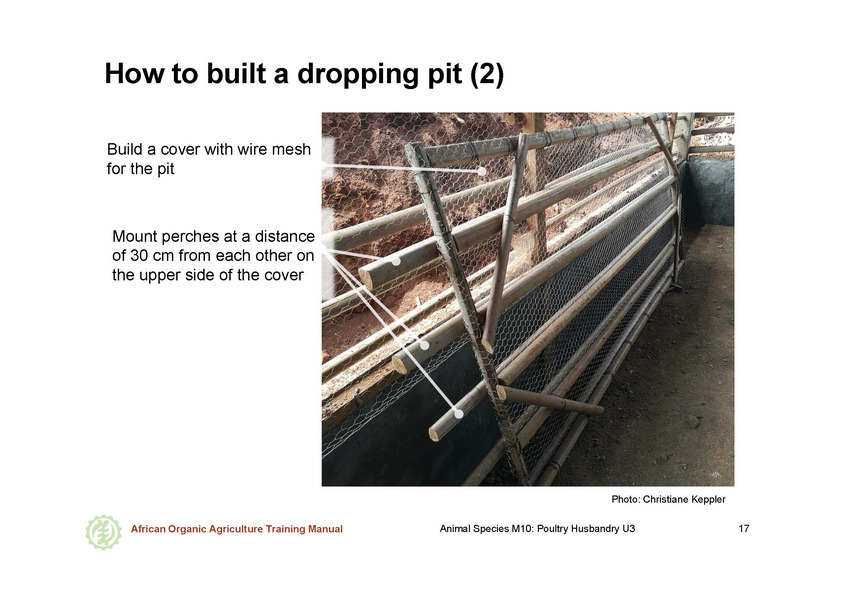
Perches can be made in various types. As a general rule, the lowest perch should be at least 50 cm above the floor. The distance between the perches should be 30 to 50 cm, and the distance between the wall and the first perch should be at least 20 cm. The perches should be angled so that the droppings of the chicken above do not fall on a chicken below.
Perches can be made from branches with the bark removed or any other smooth material with a diameter of 3.5 to 5 cm. As shown in the illustration, installing perches with the proper dimensions and shape allows comfortable perching and avoid injuries to the feet of the birds.
Manure management under the perches
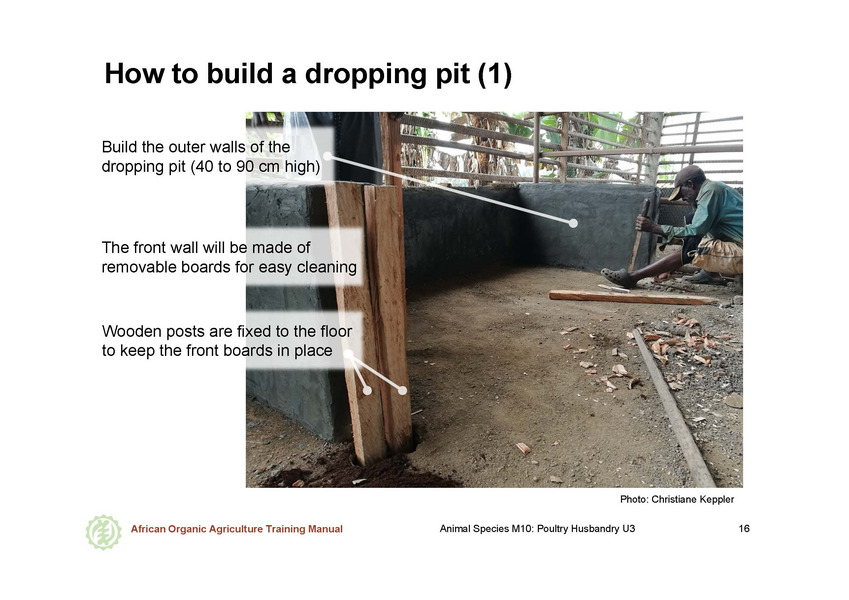
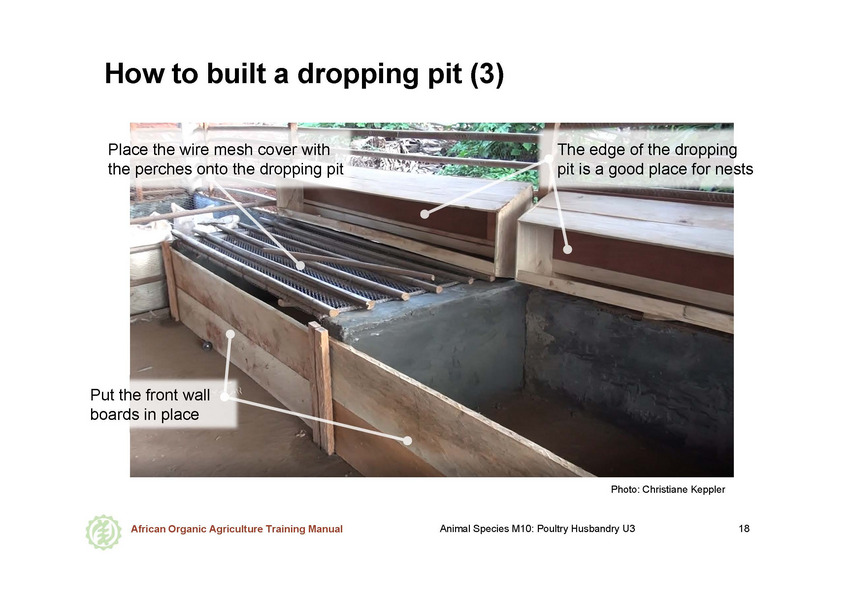
Chickens will deposit over half of their manure during the night while they are resting on their perches. Therefore, it is desirable to install a dropping board (first choice) or pit (second choice) below the perches to facilitate cleaning. Dropping boards are preferred because the removal of droppings is easier. Frequent removing of droppings highly increases the air quality in the house. In addition, dung pits may harbour mice and rats and offer hiding places to parasites such as the poultry red mite.
To install a dropping board, a wooden or metal board is placed about 20 cm below the perches that extends from the lowest perch to the wall. This board will catch the majority of the droppings, and make cleaning and removal of the droppings easier. If no dropping board can be installed, the floor under the perches should be slatted with a dropping pit underneath. Dropping boards or pits should be cleaned regularly (boards at minimum every week, pits at minimum every four weeks) to ensure good air quality in the house. The manure can then be dried, stored, and used as fertiliser for plants.
Nests
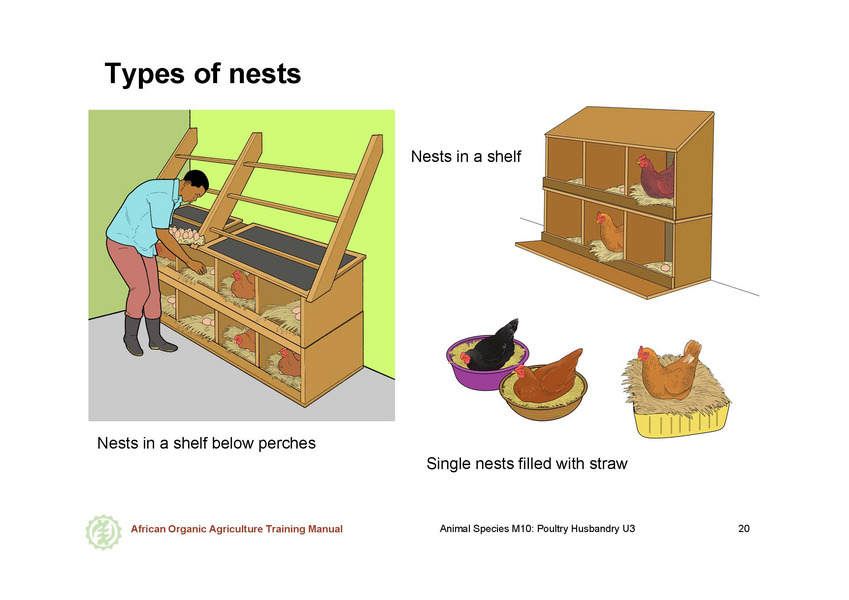
Various setups and materials can be used for nests. As a general rule, nests should be placed in a shaded place, give easy access for egg collection, and be removable for thorough cleaning of the chicken house. One nest for every five hens should be provided.
The nests can be either individual, or with several nests together on a shelf. One convenient setup is shown below, with the perches and dropping board installed over individual nests. One can also use baskets, cardboard boxes or pots.
To ensure that the hens use the nests, they must be kept clean, and filled with soft, deep, clean litter like husks, straw, hay or shavings. The litter should be softer and deeper than the litter used on the ground to encourage the chickens to lay their eggs in the nests and not on the ground. To make nests more attractive and prevent the chickens from laying on the ground or outside the hen house, it is also advisable to place nests at different levels. Some chickens prefer laying eggs at ground level, and others prefer to lay eggs higher up. If the chickens have support to reach a nest, e. g. a branch in front of the nest that they can fly to before entering the nest, the nests can be at a height of up to 1.5 m.
Ideally, hens should have to cross perches or a short surface of wire mesh or slats to get into the nests. This helps clean the feet of the hen before entering the nest. If one has a henhouse with a dung pit, it is therefore advisable to install the nests above the dung pit, so that the birds cross the wire mesh before entering the nests.
Feeders and drinkers
Sufficient and clean water and feed is essential for the productivity and health of chickens. Therefore, there should be enough feeders that all birds can eat at the same time, and enough drinkers distributed throughout the house to allow easy access to water for all birds.
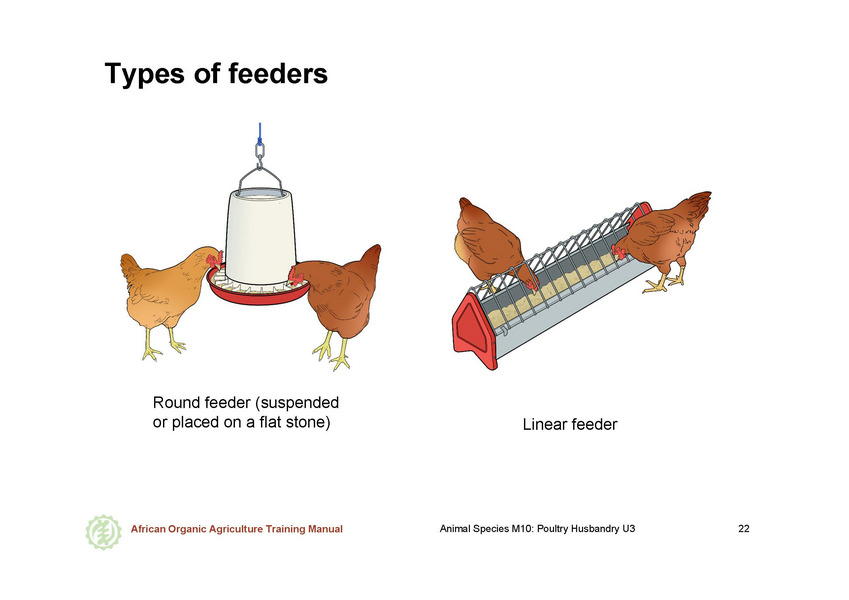
Feeders
Feeders should be kept clean, and should be located in the house rather than in the outdoor area. To avoid wastage, a feed trough should not be filled to more than 1/3 of capacity. Before putting new feed in the feeders, old feed and droppings musts be removed, and spilled feed must be cleaned up regularly as it can lead to moulding or attract unwanted animals.
Drinkers
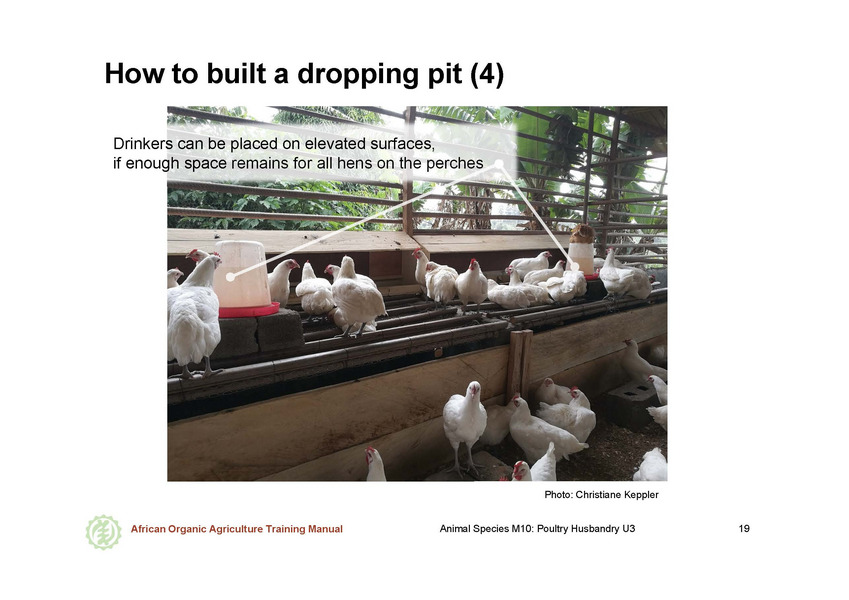
Drinkers should be kept clean, and should be located in the house. They should always be placed in the same location, as the birds get used to their placement. Design drinkers that the birds cannot sit on or in them, and so water does not run back into the tank or water pipe that supplies them. Drinkers supplied with water pipes or tanks will need the piping and tanks cleaned regularly. Additionally, position them high enough that litter is not scratched into them, but low enough that all chickens, even the smallest one, can easily reach the water surface.
Chickens should have the opportunity to drink from an open water surface. This is especially important in warmer regions, as chickens need to drink a lot to prevent heat stress. With only nipple drinkers, chickens have been found to drink less water, which can have negative effects on egg production and behaviour. Therefore, an open water surface should always be provided even when using nipple drinkers. It is worthwhile to spend the necessary time to provide the birds with constant, easy access to clean water.
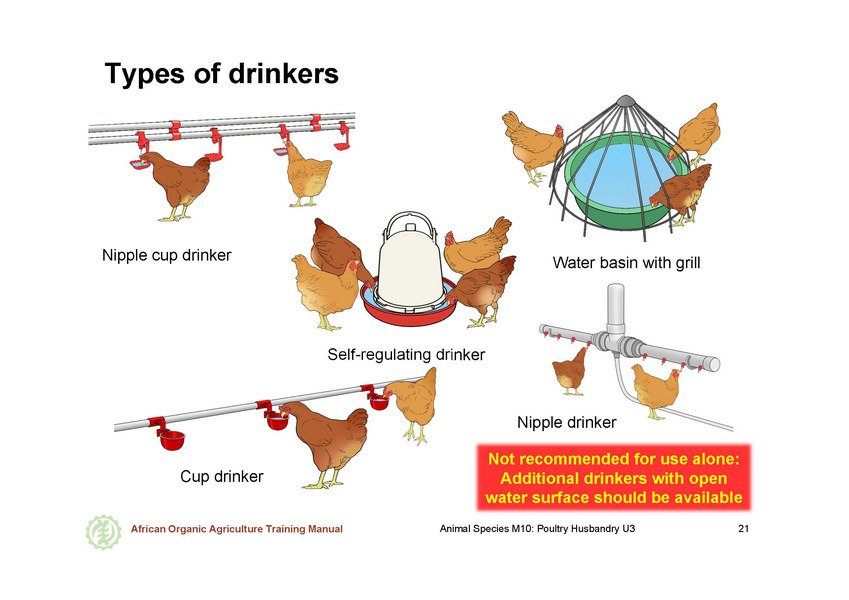
| Type of drinker or feeder | Pros and cons |
|---|---|
| Cup drinker | + Open water surface, the dirty water does not go back to the tube |
| – Regular cleaning of the cups is necessary | |
| Nipple-cup drinker | + Less wet litter compared to nipple drinker, the dirty water does not go back to the tube |
| – Regular cleaning necessary, difficult to clean | |
| Self-regulating drinker | + Self-regulating (with tank filled by hand or automatically per water pipe), open water surface, can be hung up |
| – Daily cleaning necessary | |
| Water basin with grill | + Open water surface |
| - The water becomes polluted very quickly and must be cleaned daily | |
| Nipple drinker (not recommended unless paired with another open source of water) | + Consistent delivery of clean water, no need of cleaning from litter or feed |
| – Requires stretching of the neck, no open water surface | |
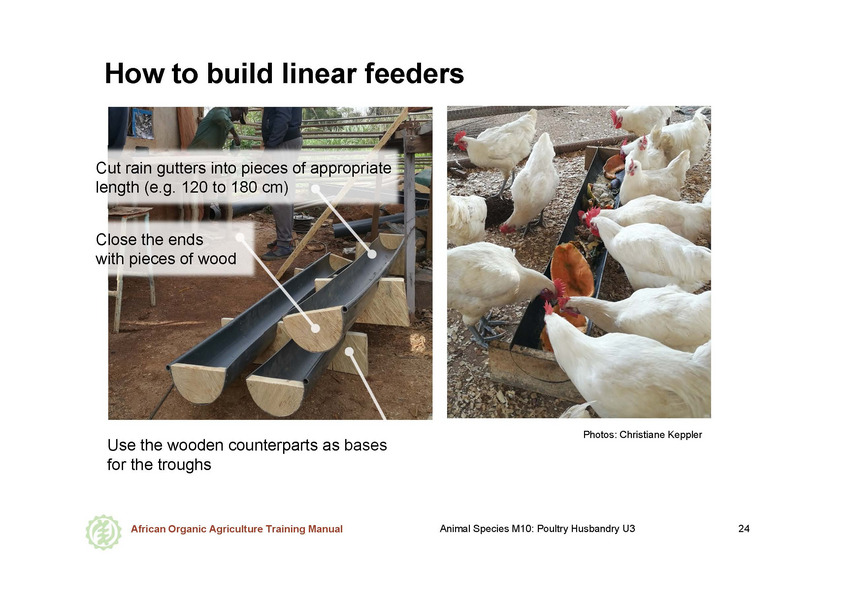
| Linear feeder | + Different sizes available, stable material, can be self-made |
| – Daily cleaning and filling |
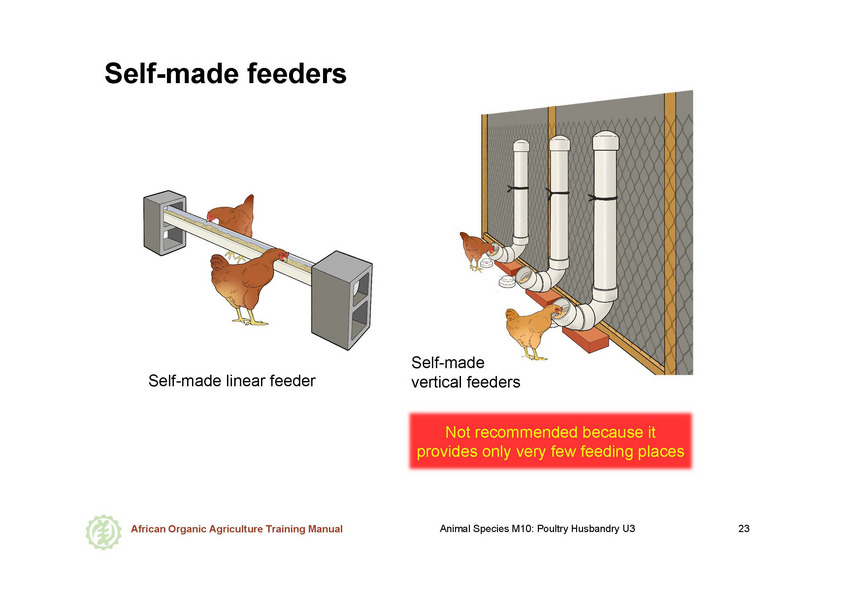
Note: Self-made vertical feeders are often shown on the internet as a cheap and easy way to make homemade feeders. Unfortunately, they do not provide sufficient feed access for all birds, therefore increasing the risk of pecking, stress, and weight loss if one has more than a few chickens.
Exercise: Building a poultry house
Ask the participants to draw a plan for a poultry house which would fit into his/her farm. Ask them to add to the plan:
- Specific material used and expected dimensions
- A list with feeders, drinkers, nests and perches (types and numbers)
- Types and numbers of birds (breed, gender, age)
- Design of the outdoor area (plants, dimensions, elements, other animals)
Ask the all participants to present their plans, ideas and thoughts to the group or to small groups of 4 participants. At the end all report back to the group for a larger discussion.
Cleaning and disinfection
Once the chicken house is properly constructed, care must be taken to keep it clean to protect both the birds and the investment made in the structure. Simple cleaning steps help prevent diseases and extend the life of the chicken house (image below).
Whether practicing all-in/all-out (all-in/all-out management is explained in the chapter “Health and diseases”) or simply preparing a space for new birds, the steps listed in the table below should be followed. Cleaning should begin several days before the new birds are scheduled to move in. To facilitate cleaning and drying, a dry and sunny day should be chosen. Cleaning and disinfection take time and require the completion before each of the following steps. Skipping or not completing a step can lead to failure, and the survival of harmful viruses, bacteria, fungi, and parasites that can harm the next flock.
However, not all farms require the full procedure, as this very much depends on the number of birds as well as on the intensity of management. Not all farms will have the resources to complete all the steps, so the best course of action is to do as much as possible. Steps 1 to 5 and 7 should always be carried out, step 6 (disinfection) is recommended in case of health problems in the previous flock. Disinfection without previous cleaning and drying is useless!
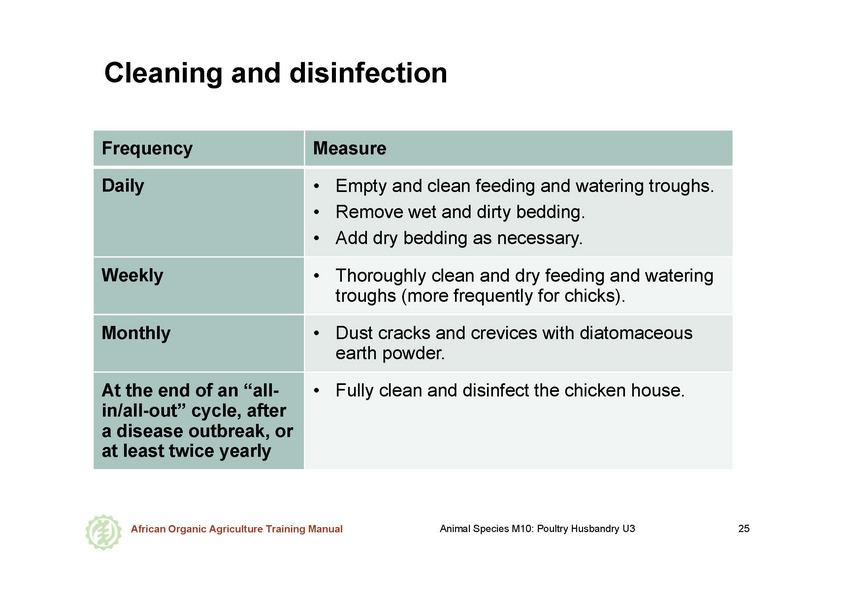
The steps to cleaning and disinfecting chicken houses and equipment:
| Step | Details | Equipment |
|---|---|---|
| 1. Removal of birds and equipment | Take out the removable feeders, waterers and perches to clean them separately (steps 2 to 6). | None |
| 2. Dry cleaning | Remove all feed, dirt, dust and litter from the house. | A scraper to remove caked-on manure, Dustpan and broom |
| 3. Wet cleaning | Remember to turn off power (electricity) to the building before starting! | |
| 3.1. Soaking | Soak the most heavily soiled areas like perches and roosts in order to soften any remaining manure. | Hose or bucket |
| 3.2. Washing | Thoroughly wash ALL surfaces including window sills, ceiling, walls, etc. | Hot water (ideally at least 70 °C/ 160 °F |
| 3.3. Rinsing | Rinse all surfaces to remove any remaining detergent. Hose or bucket | |
| 4. Drying | Mop up any remaining puddles of water, then air dry the building for 12 to 48 hours (depending on the weather). | Use a fan to speed the process if available. |
| 5. Repairs | Make necessary repairs (i.e. cracks in roof, walls, floor to prevent rain, wild birds and rodents to enter the building). Holes in the roof and rodent entry holes always need to be closed immediately if they occur. Construction materials | |
| 6. Disinfection with chemicals (best option in case of health problems in the previous flock) | Take proper safety measures. Identify a disinfectant and spray all inside surfaces. A rule of thumb is to apply one gallon of correctly diluted disinfectant per 150 to 200 square feet of surface area (= 2 to 2.7 liters per 10 square meters). | Garden sprayer (or larger for larger buildings) |
| 7. Disinfection of movable materials (if chemicals are not available) | If no disinfectants are available, finish step 3 of cleaning, then place all movable materials (feeders, waterers, perches, nest boxes) in the direct sunlight for one day to dry. Then, if black plastic bags are available, place the dry items in the bags, close, and leave them in the direct sunlight for one additional day. | No equipment needed. UV-light from the sun has some disinfecting power. In the sun, high temperatures develop inside the bags and can help to disinfect the items and kill mites. |
| 8. Control of external parasites like fleas, ticks, mites and lice | When the structure is completely dry again, dust cracks and crevices with diatomaceous earth to kill any fleas, ticks, mites or lice that remain after cleaning. | Diatomaceous earth powder (a substance that harms the exoskeletons of parasites like ticks and lice, causing them to die) http://npic.orst.edu/factsheets/degen.html |
Discussion on cleaning and disinfection
Invite the participants to discuss in small groups the following questions:
- What is your current cleaning and disinfection routine?
- What substances/
- chemicals do you use?
- What are you NOT doing that was presented and why?
- Do you consider adapting your current routine? Why or why not?
Safety measures for contact with chemicals:
- Wear proper protective clothing (i. e. mask and goggles for spraying and dusting, gloves for handling items in a bleach solution).
- Never mix disinfecting agents, as they may produce fatal chemicals.
- Some of the chemicals can be caustic to skin, eyes, and fatal if ingested. Use and store them carefully.
- Follow the directions carefully – if in doubt, ask a veterinarian or local animal health worker.
- Some of the chemicals should not be used on unfinished wood that will come into close contact with animals. Use caution in selecting the disinfectants if the nest boxes or perches are wooden, as the chemicals can be absorbed and harm the animals.
Lists of cleaning substances: The following lists are a general example of organic-approved substances. Other organic-approved and locally available substances may be used in collaboration with a veterinarian.
Surface disinfection
Surfaces should be sprayed with an organic-approved disinfectant using the dilution according to the directions. In case of doubt, the local organic certification body should be contacted before usage.
Examples of organic-approved disinfectants:
- Sodium hydroxide, calcium hydroxide
- Sodium carbonate
- Organic acids (formic acid, lactic acid)
For disinfection of feeders and waterers, they are soaked in a solution of an organic-approved disinfectant.
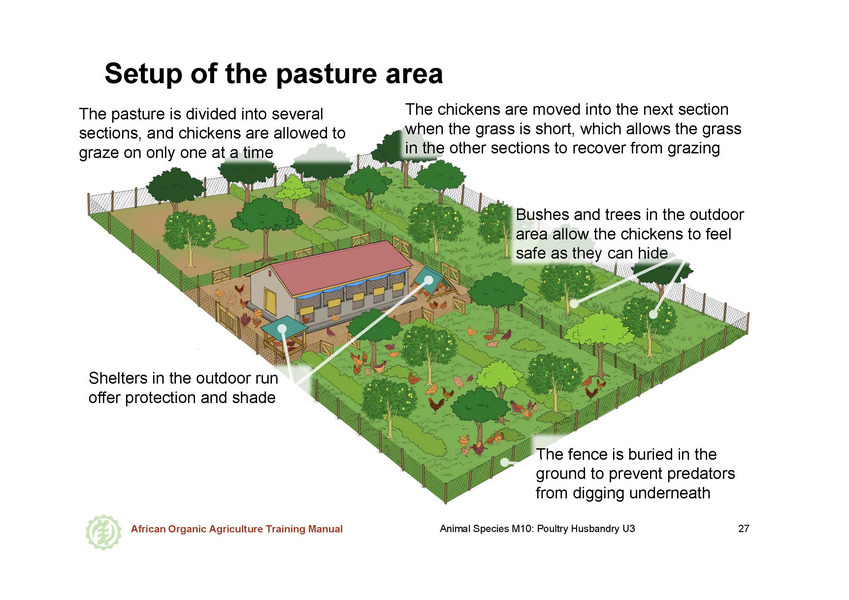
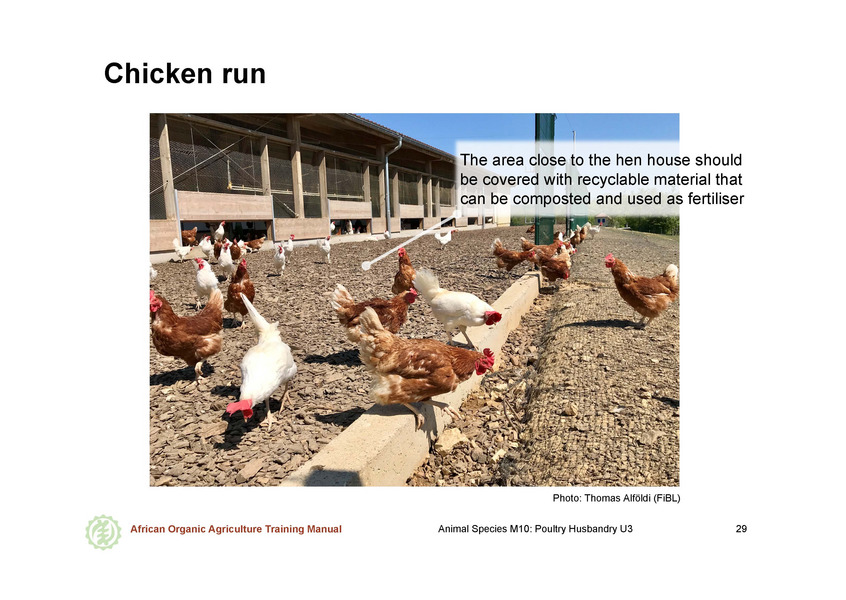
Outdoor run
The outdoor run that the chickens use during the day should be properly accessible, bedded, fenced, fitted with objects providing shade and sand baths, and well-maintained.
Access to the run
One option to give chickens access to the outdoor run during the day are small doors or “pop holes” in the walls of the house. These openings should be at least as wide as two hens sitting side-by-side to allow easy circulation of the hens. At night, the openings should be tightly closed to protect the chickens from predators.
Bedding
Ideally, the ground in the run is covered with compostable material like wood chips or other dry plant material. This material should be replaced and composted regularly as it accumulates nutrients from the faeces and worm eggs (parasites).
Fencing
General recommendations:
The fence should have a height of 1.2 to 2.0 m (depending on the breed) to ensure that the chickens do not leave the outdoor run.
The bottom of the fence is best buried at least 20 cm deep (ideally 60 to 80 cm deep) into the ground. Or, second best, the bottom of the fence is folded out at least 40 cm wide on the ground and weighted down with dirt or rocks. The predators that will try to dig directly at the fence will not be able to get through the folded-out fence material.
The fence should be checked regularly in order to detect and fix holes in a timely fashion.
Shading elements, sand baths and gravel
The outdoor run should have elements to provide shade and protection from predators, and offer access to a dust bath. The elements can be small bushes and trees or mobile elements like roof-covered sand baths. Roof-covered sand baths are especially suitable as the they provide shade, shelter and dry sand. Ideally, the different shading elements are situated not more than 20 meters apart from each other and equally distributed, even in the distant part of the run from the chicken house. This will encourage the hens to get out of the house and to spread evenly in the entire pasture.
In the outdoor run, chickens must also be able to find small gravel which they swallow to help crush the feed in their stomachs.
High grass in and around the run should be cut regularly, if not kept short by the chickens, to decrease survival of the eggs and larvae of poultry parasites.
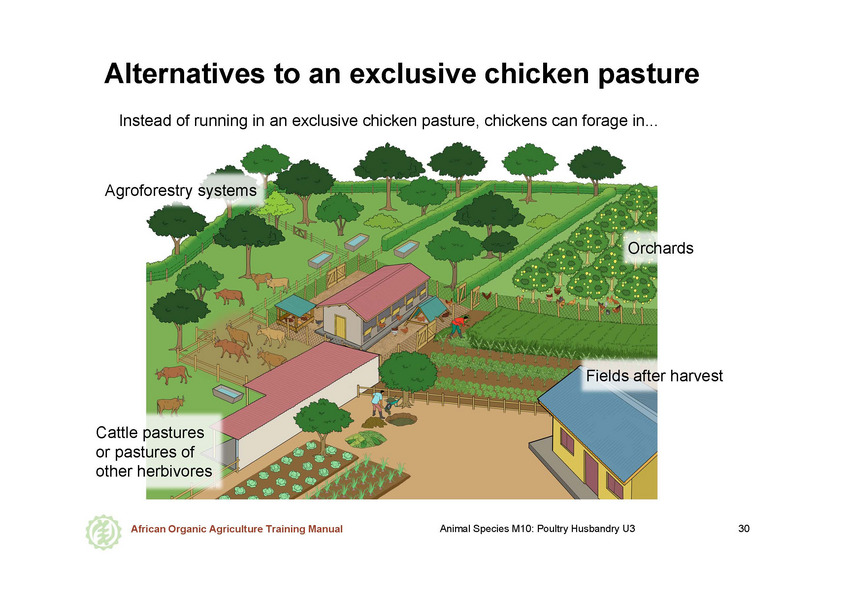
Pasture system
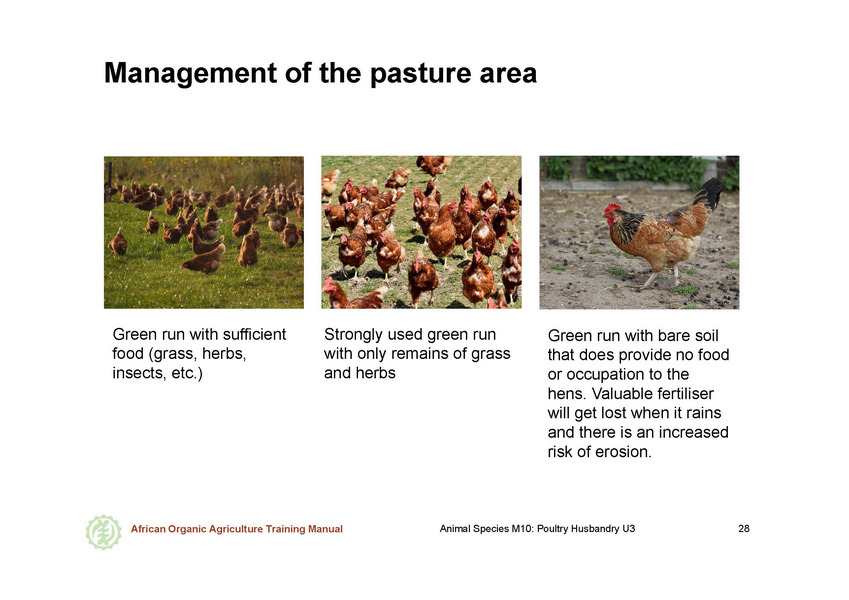
A well-designed pasture system outside the chicken run can provide benefits to the chickens and to the land. Chickens can engage in their natural behaviours, and receive nutritional benefits from feeding on insects and plants of their choice. Parasite pressure is reduced as birds are moved from one pasture to another. Chickens eat ticks and other harmful insects, and leave valuable, nitrogen-rich fertiliser behind in the form of droppings. Ideally, the pasture areas are fenced.
The available area should be split into several separate pastures. This allows for rotation of the flock to ensure recovery of the pasture. It prevents overgrazing and destruction of the vegetation. Furthermore, proper rotation improves the availability of feed and reduces parasite pressure.
Pasture selection and maintenance
As with other livestock species, selection and maintenance of the pasture areas are important. When selecting potential pasture areas, wet and humid areas should be avoided as they bear a greater risk of parasitic infection.
Pasture maintenance requires planning and resources. For example, cutting of grass and sowing new grass may be necessary.
Encouraging the birds to use the pasture
In the beginning, some movable elements may need to be placed close to the chicken house to encourage the birds to explore the new pasture. If the birds do not feel safe, they will stay near the entrances, both increasing parasite pressure and destroying the pasture in that area.
Scattering grains in the run can also be helpful to encourage the chickens to use the entire pasture. However, this can attract wild birds or other animals which can spread diseases. Therefore, only the amount of grains should be scattered which is immediately eaten by the chickens while under supervision.
Additional safety recommendation:
Adding some black chickens in the flock deters predatory birds, as the black chickens look like crows.
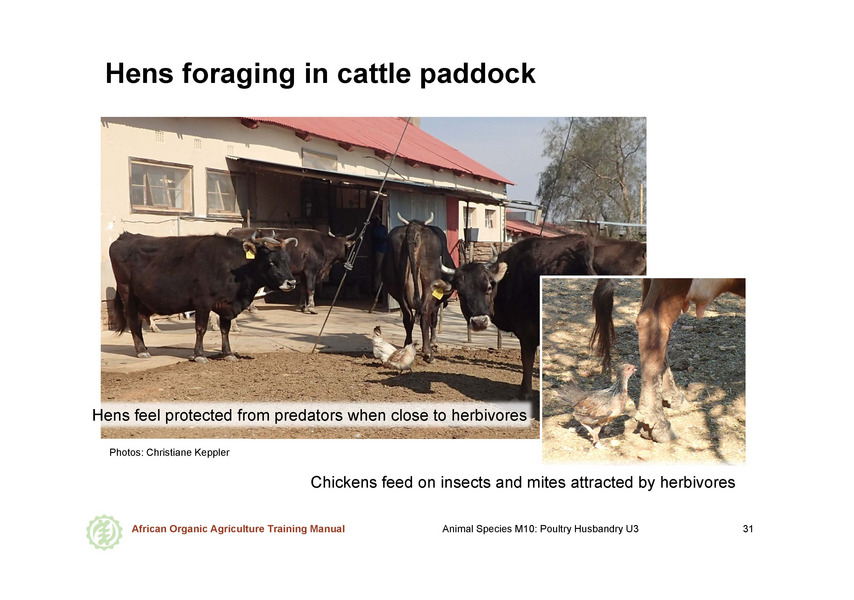
Co-grazing the flock with other livestock on the farm
Grazing the poultry flock in the same pasture with other livestock (e. g. cattle, goats, sheep, horses) offers multiple benefits. The dung of the livestock attracts insects, which provide valuable protein-rich nutrition to the chickens. Predators are deterred by the presence of the other animals. The other livestock benefit from fewer flies and ticks in the pasture, as these are eaten by the chickens.
Grazing the flock as part of an agroforestry system
Planned grazing of the poultry in an orchard or in an agroforestry system can offer benefits, too. Chickens can benefit from fallen fruits, whereas the trees benefit from the chickens eating harmful insects, and from the nutrients released from chicken droppings.
If there are no fenced-in pastures, the chickens can be released into areas with adequate shade and shelter. However, they need to be supervised as they graze. In the evening, they must be herded back into their run or chicken house. When the grass is becoming too short, the chickens should be assigned a new area.
Grazing the flock after a grain harvest
Chickens can also be grazed in grain fields after harvest. Residues from harvest can be a highly valuable feed for the chickens. The same rules apply as for other methods of unfenced grazing.
Exercise: building an outdoor run and pasture system
Invite the participants to draw a plan for an outdoor run and pasture system which would fit into his/her farm. The outdoor run can also be integrated in an agroforestry system or implemented as after-harvest grazing.
The plan should contain the following elements:
- Dimensions
- Indications on the material used for fencing
- Trees, bushes, sand baths, and other
- elements for protection and occupation
Ask then the participants to share their plans in small groups and to suggest improvements to each other.
At the end, all participants should report back to the entire group for a larger discussion on the benefits and the costs of the found solutions.
 tap and then scroll down to the Add to Home Screen command.