Crop production
Introduction to organic potato production
Sustainable organic potato production not only depends on appropriate management during crop growth, but also on creating favourable growing conditions. This requires some knowledge on the growth requirements of potatoes.
Growth requirements of potatoes
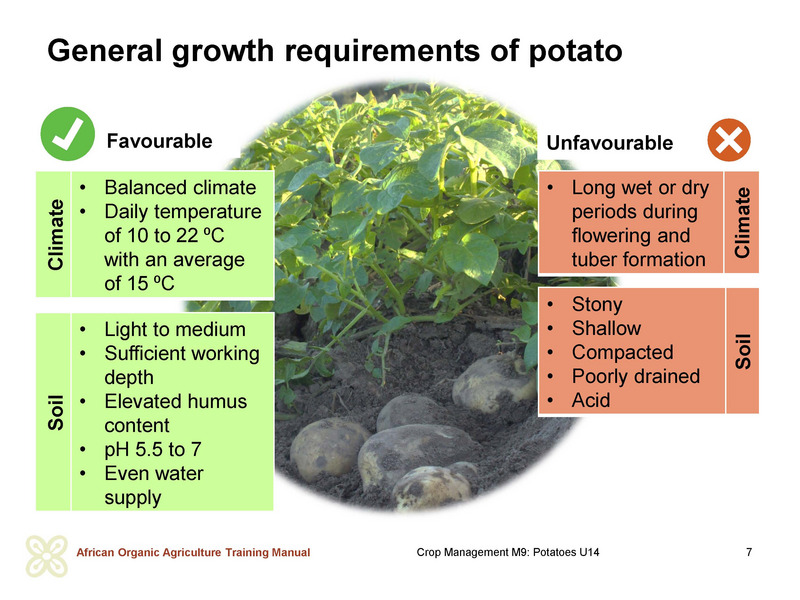
- Potato plants prefer temperatures between 10 and 22 ⁰C with an average of 15 ⁰C. This is why in Cameroon potatoes are cultivated in altitudes above 800 meters.
- Potato has a rather high water demand. The crop requires well-distributed rainfall of 500 to 750 mm through all growth stages during a period of 3 to 4.5 months. Potato is especially sensitive to long wet or dry periods during flowering and tuber formation. Waterlogging as well as dry soil are not favourable to tuber production. If potato is cultivated in dry periods or areas with low or irregular rainfall, irrigation is usually necessary.
- Light to medium, loose soils rich in organic matter, and with appropriate depth and a pH of 5.5 to 7 are ideal for potato. Soils for potato production should drain well to avoid waterlogging and at the same time have a good water retention capacity to ensure steady water supply. Too stony, shallow, compacted and poorly drained soils are not suited to potato production.
- On lighter soils, tubers usually develop a nicer shape and colour as well as flatter eyes. On heavy soils the tubers turn out more smooth-skinned and occurrence of scab is lower. Sandy, quick-drying soils lead to rougher skins and russeting as well as raised scab infection. Soils with a pH below 5.0 will produce poor quality tubers and abnormal growth, while a high soil pH will cause problems with common scab. Due to their low nutrient contents and low base-exchanging capacity, widespread acidic laterite soils are naturally low in fertility and have a low production potential. However, appropriate soil fertility management measures such as supply of organic matter to the soil, increasing soil pH by liming, application of compost, and irrigation make them suitable for growing crops.
Site selection and growing period
Site selection
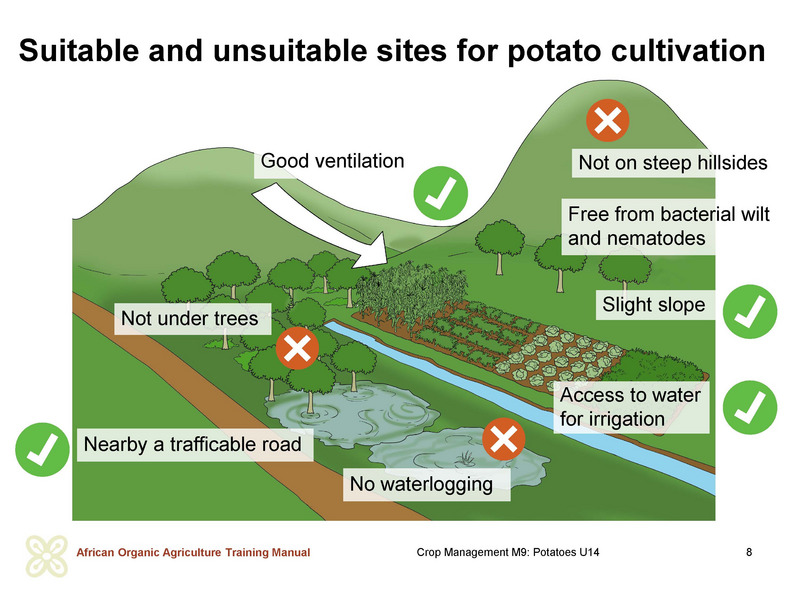
- Potatoes should be cultivated in open fields, and not under the shade of trees. Well-ventilated locations allow the crop to dry quickly after rain or dew, thus reducing the risk of infection by fungal diseases.
- Slightly sloping fields dry and drain quicker than fields in the valley-basin. Potato fields should not be too steep to avoid soil erosion. If grown on slopes, the ridges should follow the contour lines.
- Soils for potato cultivation should be free from bacterial wilt and nematodes (find information on symptoms here). Choosing a field where potato or other plants of the family of Solanaceae such as tomato and peppers have not been planted in the last 3 years ensures pest and disease-free soils in most cases.
- Access to water for irrigation allows for off-season production and is a big advantage in potato and vegetable production.
- Nearby trafficable roads simplify transport of the harvest.
Growing period and growing seasons
- The average production cycle of commonly grown potato varieties in Sub-Saharan Africa ranges from 90 to 120 days. The shorter the production cycle, the less is the risk of losses by late blight infestation and pest attack.
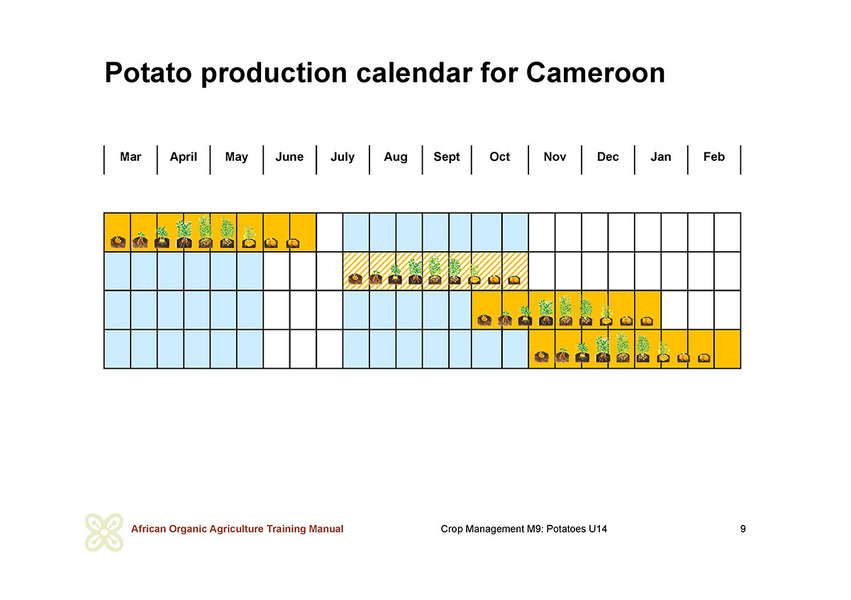
- If potato is cultivated without irrigation, the ideal season in Cameroon is from March to June, when moderate rainfalls ensure good growing conditions. In July and August, when heavy rains occur almost every day, disease pressure may be too high for organic potato production.
- It is also possible to cultivate potatoes from mid/end August until November.
- When irrigation is available, potatoes are best cultivated in the dry period from November to March, when pressure of late blight is low.
Discussion on the ideal growing period for potato
Discuss with the farmers advantages and constraints of different growing periods considering the climatic conditions, the relevance of potato compared to other crops, the placement of the crop in the rotation, the market price of potato tubers and other aspects.
Soil fertility management
Basic approach
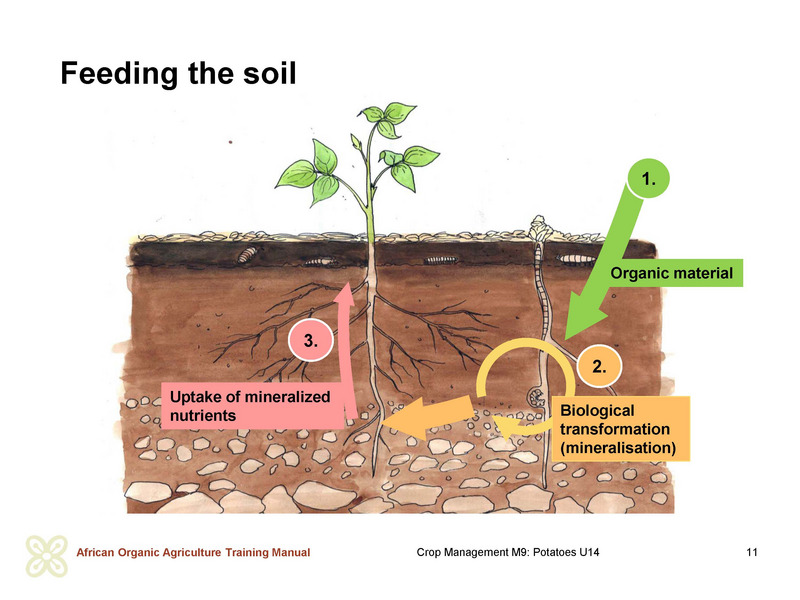
- Intensive conventional farming practices primarily rely on mineral fertilizers to supply nutrients to the crops. Soil fertility management, however, is neither limited to addition of fertilisers nor to achieving high crop yields alone. It is about building up a rich, stable and living soil. Therefore, organic farmers give much attention to building up medium to long-term fertility of the soil.
- Soil organic matter is a key element of natural soil fertility, as it drives the biological activity of the soil. Organic farmers speak of feeding the soil, so that the soil can feed the plants in a balanced way. To feed the soil, organic farmers apply “organic” materials to the soil. These include compost, animal manure, green plant material or other organic materials. Plant nutrition in organic farming ideally relies on a sound soil organic matter or humus management preserving or even building up organic matter content of the soil.
- Maintaining soil fertility can be a challenging task under subtropical and tropical climate conditions, where high temperatures and humid or dry conditions encourage rapid degradation of organic matter in the soil and where the risk of soil erosion is high.
- Organic farmers also aim at minimizing dependence on external nutrient sources such as commercial fertilizers. Therefore, they recycle all the plant material and animal manures from the farm to feed their soils. Efficient recycling of plant and animal materials is indispensable for crop cultivation in intensively cultivated land and on soils with low organic matter content.
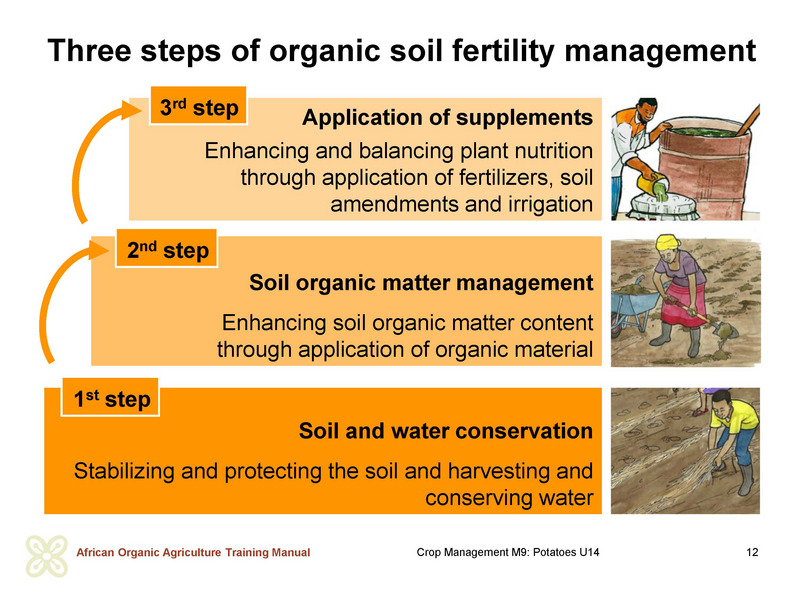
- Organic soil fertility management can be seen as a three-step approach, whereby each step builds the foundation for the next one. The aim is to encourage natural rejuvenation of the soil and to minimize application of foreign fertilisers, soil amendments and irrigation water.
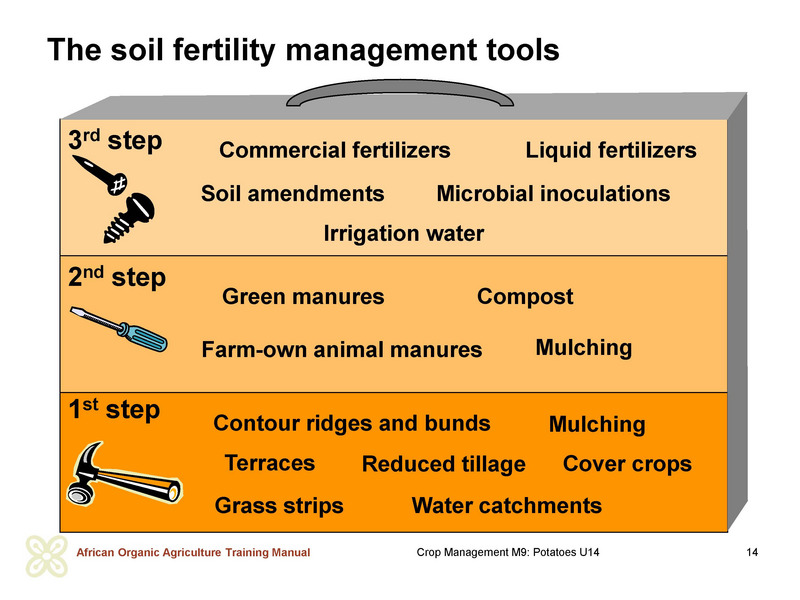
Step 1 - Conserving the soil, organic matter and water from loss.
Step 2 - Improving the organic matter content of the soil.
Step 3 - Supplementing the nutrient requirements as well as improving the growing conditions by applying some soil amendments.
Organic farmers ideally give a lot of attention to proper and efficient application of steps 1 and 2 in order to save on costs of fertilisers and other supplements and to prevent possible negative impacts on the farm ecosystem.
First step
In the first step, organic farmers aim to establish a stable and less vulnerable soil as the foundation to managing fertile soil. They do this by:
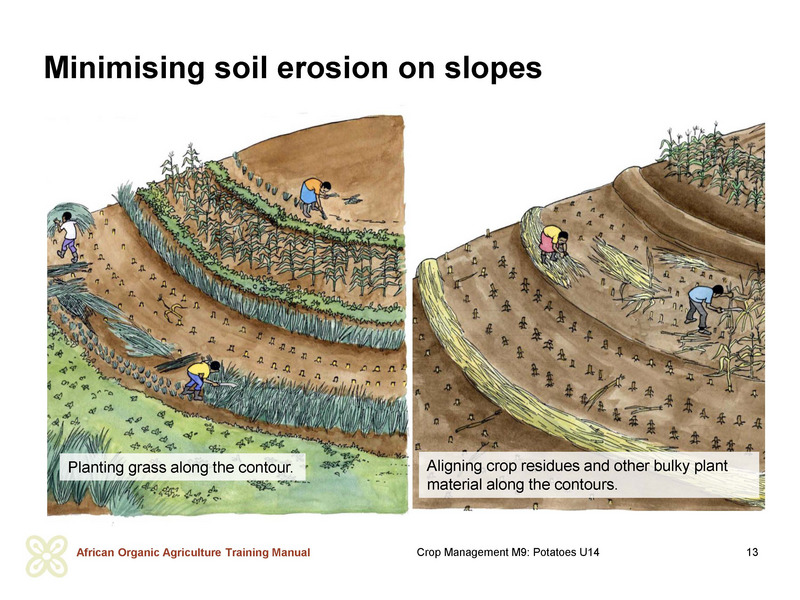
- Preventing the soil from being eroded by rainwater or winds by keeping it covered as much as possible. They cover the soil with living plants (called cover crops) especially within perennial crops or with dead plant material (called mulching). They also dig and construct barriers across the slope to reduce the speed of movement of rainwater down the slope.
- To minimise soil disturbance an increasing number of organic farmers throughout the world practise superficial soil cultivation, maintain a protective cover on the soil surface, and allow early land preparation before heavy rains. These practices conserve the soil structure, reduce the risk of soil compaction, increase water infiltration, reduce runoff and evaporation and thus improve water storage.
Second step
In the second step, the aim is to build an active soil with a good structure, which can store water and supply plant nutrients. Organic farmers achieve this by applying practices, which improve the organic matter content of the soil and enhance the activity of soil organisms. Such practices include:
- Growing green manures: Green manures, mostly legumes, are grown for the large quantities of fresh plant material, which they produce. These plants are then cut and incorporated into the soil to feed the soil organisms and provide nutrients to the crops that follow. Growing nitrogen rich plants for the primary use as farm-own fertilizer may seem unreasonable, but is a highly effective measure to improve soil fertility and the nutrition of the crops. The green manures can also be cut and fed to livestock as necessary, and the high quality manure composted later for crop production. The roots and litter from the green manures remain in/on the soil after cutting the above ground biomass and offer protection to the soil from the elements while also contributing to soil fertility improvement.
- Intercropping cover crops such as velvet bean, tithonia, lablab and others as living mulch. The cover crops are regularly slashed before they compete too much with the main crop.
- Mulching with especially hard-to-compost or woody materials, which break down slowly. These contribute to an increase in soil organic matter with time.
- Growing trees and shrubs for agroforestry: Trees and shrubs can be grown in the fields with crops, on the edges of crop fields, or on fallow plots, where they are regularly pruned and the branches used as mulch.
- Composting: Compost production is another typical organic method with a high value for soil fertility improvement. Crop residues and other plant materials, as well as animal manures are prepared in a specific way and transformed to highly valuable “soil” fertility amendments. Introducing livestock on the farm for regular supply of manure and bedding for compost production is encouraged to increase the sources of biomass. Additionally, crop and livestock farmers can obtain synergies through exchanging livestock fodder (from e.g. green manures or fallow vegetation or green manures) and manure from the livestock – a win-win situation.
- Applying animal manures: Animal manures can be applied to the soil directly without composting. However, experience shows that composting the manures first, together with plant residues, gives the best result for plant growth. Applying fresh animal manures to the soil has some risks, e.g. contamination of edible portions of the plants by potentially harmful bacteria, e.g. Escherichia coli, and the ‘scorching effect’ to the crops which could result.
- Using liquid manures to overcome temporary nutrient shortages and to stimulate plant growth. Liquid manures are made from animal manure, compost or nitrogen-rich green plant material such as tithonia and prunings from agroforestry trees.
Third step
In situations of heavy nutrient depletion or unfavourable growing conditions or specific nutrient deficiencies, organic farmers apply supplementary measures that are necessary to speed up the improvement of growing conditions for plants, such as:
- Using commercial organic fertilisers that do not contain chemical residues, if accessible and affordable, organic residues such as seed oil cakes, pelleted chicken manure, brewery by-products, fruit peels, coffee husks and plant ashes can be applied to the soil while wood shavings and dust, rice husks, etc. can be mixed with other materials for compost production.
- Amendments such as lime are used to correct low soil pH. Microbial fertilisers such as rhizobia, and potentially also mycorrhizal fungi, can enhance nitrogen fixation in the soil and nutrient mineralisation and thus improve nutrient availability of crops.
- Application of micro- or trace elements such as magnesium, boron and manganese can be important particularly on lighter soils that may not supply enough of these elements.
- Last but not least: water. Without water plants do not grow. Insufficient water supply limits mineralisation and transportation of nutrients in the soil and from the soil to the plant and thus plant growth and yield development are negatively affected. On the other side, too much water encourages nutrient losses through leaching, and may also cause root rots. In dry conditions appropriate use of irrigation to supplement soil water requirements can be essential to achieve good yields.

Discussion on soil fertility
Discuss with the farmers about soil fertility asking the following questions:
What is your understanding of soil fertility? Is the concept of feeding the soil “organic food” comprehensible to you?
What observations have you made in relation to soil fertility and soil fertility management? When do crops grow well, and in what situations have you observed poor plant growth? How do you consider the slash and burn practice on long-term soil fertility?
How could the three-steps-approach be applied on your farm? What could be potential challenges to implementing the 3-step approach on your farm?
Note the answers on a board. Then, introduce the farmers to the relevant characteristics of soil fertility including the functions of soil organic matter, and biological activity. Present the organic agriculture approach to soil fertility management in detail.
Green manures
What are green manures?
- Green manuring means growing plants with the primary purpose of incorporating their biomass into the soil to supply “organic food” and thus improve its nutrient content and its fertility. Cover crops and green manures are near synonyms. While the main purpose of growing cover crops is to cover the soil with a low vegetation cover to protect it from sun and rain as well as to suppress weeds, green manures are grown with the main purpose to build maximum biomass. Mostly, leguminous plants are used for green manuring, as they can collect considerable amounts of nitrogen from the air and fix it in their roots in addition to providing food for soil organisms. While grain legumes are grown for harvesting the grains, green manures are ideally harvested when they are still green and have produced maximum biomass.
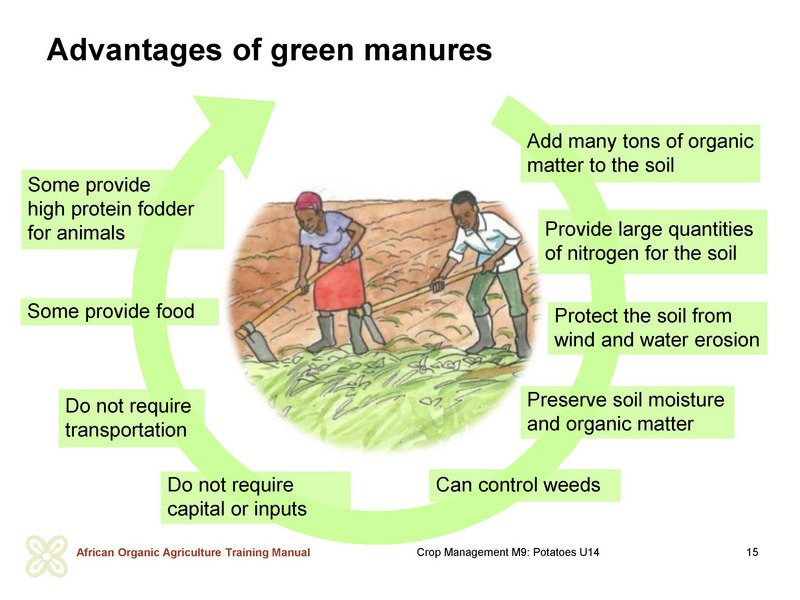
- Green manures are a farm-grown fertilizer and are, therefore, a cheap alternative to purchased fertilizers. They complement animal manures well and are of high value on farms where animal manure is scarce. Green manures can provide an incentive to abandon harmful traditional practices, such as burning crop residues.
Advantages and potentials of green manures
Compared to composting, another method that is generally recommended in organic agriculture, green manures have some advantages:
- Green manures can produce over 40 tons of plant biomass per hectare. They bring large quantities of nitrogen into the production cycle and make other nutrients available to the following crops. Composting, in contrast, is about recycling available plant and animal (waste) material, and making a highly valuable fertilizer with lots of phosphorus and other nutrients, but with little amounts of nitrogen.
- Green manures protect the soil from erosion by wind and water, preserving soil moisture and soil organic matter. Thus, they contribute decisively to soil conservation.
- Some green manures effectively suppress weeds.
- Sowing and, where necessary, slashing of green manures requires labour, but saves on fertilizer costs and can save on labour for weeding.
- Green manures do not require capital or inputs, if seeds are available.
- Green manures, in general, do not need to be irrigated. They take advantage of available rainwater or remaining soil moisture.
- Green manures do require no transportation, as they grow, where they are needed.
- Some green manures have edible plant parts, some are highly valuable animal feed.
The most obvious use of green manures in the common cropping systems of potato farmers in Cameroon would be to use the green manures instead of the traditional fallow. The higher fertilisation value of leguminous green manures may allow shortening the fallow period, as soil fertility restoration is speeded up. Alternatively, green manures can be sown among traditional row crops or relay intercropped towards the harvesting time of the main crop. Competition to food crops is reduced, if green manures primarily grow during the dry season. Alternatively, green manures such as jack bean or velvet bean can be grown in alleys. Evaluation of traditional cropping systems in Africa showed that rotation of legumes with other crops is more productive than intercropping.
Legumes do not significantly contribute to higher soil nitrogen contents when their grains and residues are removed for human and/or animal nutrition. If the legume biomass or residue is burnt or fully removed from the fields, negative nutrient balances arise. It is therefore important to ensure that all or at least part of the legume residues are retained in the field, if soil organic matter content is to be maintained.
If green manures are left as mulch on the soil surface, they effectively contribute to erosion and weed control and retain moisture in the soil. However, nutrients from mulches are released only slowly. If green manures are incorporated into the soil, a relevant share of the nutrients are mineralised in one season. Thus, the fertilizing effect on the subsequent crop is greater after incorporation. At the end, the total amount of nutrients that is made available to plants is about the same whether green manure residues are left as mulch or incorporated.
The dense plant covers of green manures not only protect the soil from erosion by wind and water, but also prevent propagation of weeds saving time for weed control. If green manures leave a thick dry mulch cover, they can provide favourable conditions for planting of the following crop without any need for weeding or soil preparation.
Some green manure species provide generous amounts of high protein fodder for livestock. This may encourage cooperation between animal farmers and plant production farmers: animal feed may be produced on parts of the farmland in exchange for manure. But despite all the benefits, green manures may, as a sole soil fertility management measure, not be sufficient to maintain or even improve soil fertility.
Leguminous green manure species depend on the availability of sufficient phosphorus, the presence of the right rhizobium for nitrogen fixation, healthy seeds and sufficient soil moisture.
Integrating green manures into farming systems
One reason why farmers do not grow green manures is that they do not know which species to plant and how to integrate them into their cropping system. It is important to know where, when and how to plant which species in order to obtain satisfying results. Other bottlenecks relate to ready availability of seed for the green manure crops, labour intensiveness, and unreliable performance of the green manures.
There are several ways of integrating green manures into the farming system:
i. Legumes are grown as short-term, improved rotational fallow.
ii. Long-term green manures are grown for more than one season.
iii. Food and non-food legumes can be intercropped with regular crops.
iv. Short duration non-food legumes can be grown towards the end of the cereal growing season using residual moisture (relay cropping).
v. Or legume trees are grown in an agroforestry system to provide nutrient rich biomass.
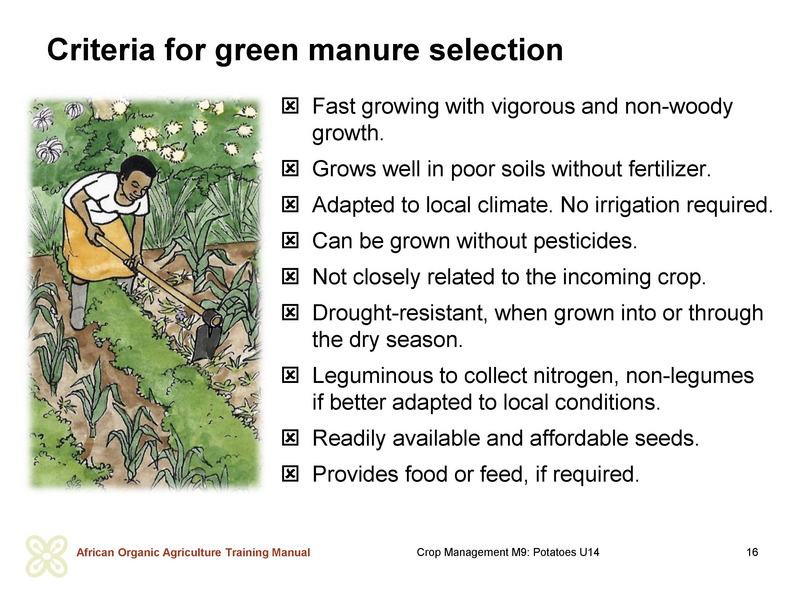
- Before large scale planting, it is advisable that farmers try out, on smaller pieces of land, the different types of green manure plants and observe, how they grow in the local conditions, and that they practice on managing them. The selection of appropriate green manures is essential to maximize their potential and minimize possible inconveniences. Green manures must suit the local climate, soil, and pest and disease situation, and fit into the cropping system. Annual green manures must be fast growing, have vigorous growth and be non-woody. They should grow well in the poorest soils and not need any fertilizer, nor irrigation, nor pesticide, and they should not be closely related to the incoming crop to avoid promotion of pests and diseases that may affect the following crop.
- To keep farmland productive, green manures must produce at least 25 tons of fresh organic matter per hectare and year. Under favourable conditions, common green manure species may produce up to double the amount of biomass and collect at least 80 kg of nitrogen per hectare and year. However, non-legumes can also be grown, as long as they produce enough biomass and develop a good root system. Non-legumes may also survive better in some conditions, may grow faster and sometimes tolerate extreme weather conditions or poor soils. Hence, it is always good to try and see what best suits the local conditions.
- The most obvious application of green manures in potato farming systems in Cameroon is replacing the traditional fallow in the dry season by an improved leguminous fallow. If potato is grown during the short rainy season from (March to June) and harvested in July, and the crop is followed by maize during the long rains until November, a leguminous green manure may be sown after the maize crop has been harvested in November, or may be relay-intercropped into the maize in September or October and remain in the field through the dry season.
- So far, little experience has been made integrating green manures or cover crops with low-growing vegetables such as potato. Trials have been made with Vicia intercropped with cabbages. In irrigated vegetable and potato fields, animal manure or compost may be economically more advantageous because the land under irrigation is too valuable for growing green manures.
Discussion on options for integration of green manures into existing farming systems
After presentation of the different options for integration of green manures into the farming system, ask the farmers, which options seem most suitable for their situation. What benefits would they expect from the green manure? What requirements would green manures have to meet relating to growth conditions, cultivation duration, uses as animal feed or for human consumption? What potential challenges are they likely to face in integrating green manures, and how do they think the challenges can be resolved?
Some potential green manures for potato farmers
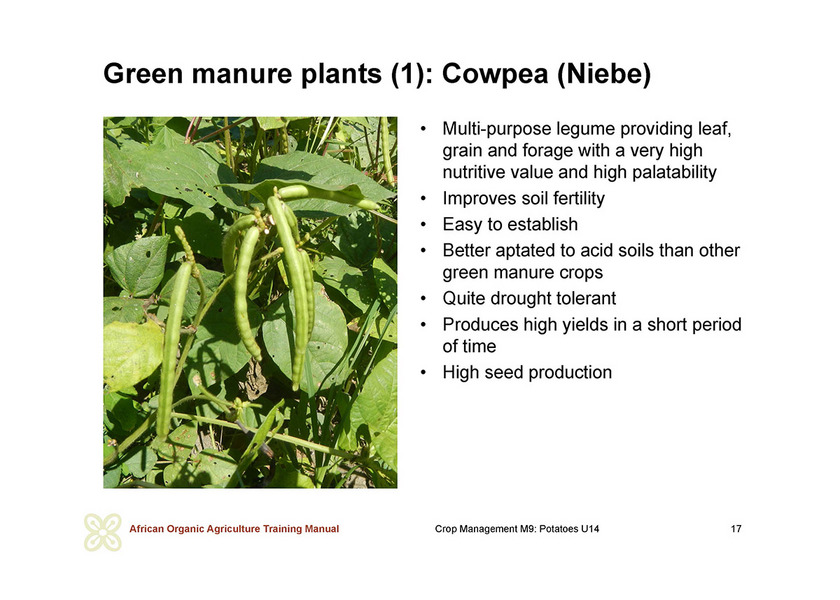
Niébé / Cowpea (Vigna unguiculata)
Cowpea is an herbaceous legume native to West Africa crawling, climbing, or growing bushy, depending on the type. It is one of the most important tropical dual-purpose legumes. It is widely used as vegetable (leaves and flowers) or grain for human consumption, and it makes excellent fresh forage, silage or hay (ideally in combination with a cereal/grass crop). Its rapid growth makes it an effective plant to control erosion.
Cowpea has a high fertilizing potential fixing about 80 kg N per hectare (compared to Phaseolus bean species that only fix about 30 kg N/ha). The legume can double the yield of a following maize crop compared to no fertilization and produces higher yields than a comparable amount of nitrogen provided to maize with inorganic N fertilizer.
Cowpea grows in a wide range of soils including very acid soils with pH 4 and soils with low fertility, with a preference for lighter soils that allow good rooting. Cowpea is better adapted to strongly acid soils than Lablab bean or Velvet bean. However, the legume does not tolerate extended flooding or salinity. It grows best at 25 to 35 °C and is very susceptible to frost. Cowpea is moderately tolerant of drought.
Depending on the variety, flowering can start as early as 30 days after sowing and seeds can be ready for harvest at 55 days, or it can take more than 90 days to flower, and 210 to 240 days to mature. While determinate, bush types are better for machine harvesting, in-determinate types will supply fresh leaves and flowers over an extended period of time for the household.
If cowpeas are new to a field, the seeds should be dusted with rhizobia, nitrogen fixing bacteria, to enable the legume to fixing nitrogen from the air. The seeds are either dusted with purchased bacteria or with soil from a field where cowpea has been grown. The legume is either broadcast with up to 90 kg of seed per hectare or sown with 30 to 60 cm between rows and 10 to 15 cm between plants with 20 to 50 kg per ha and a sowing depth of 3 to 5 cm.
Cowpea is susceptible to a wide range of diseases and pests, including post-harvest diseases attacking the grain. It also acts as host to pests of Phaseolus beans and is sensitive to root-knot nematodes, which thrive in the same soils where cowpeas are grown.
Cowpea is widely grown as intercrop in cereals such as maize, either as climbing types that require strong companion plants, or as bush-type. When planted at the same time as maize within the maize row they will save on labour for weeding of maize.
Alternatively, short-cycle cowpeas can be grown into the dry season protecting the soil from the heat. They will die and then can be incorporated into the soil before sowing the next crop.
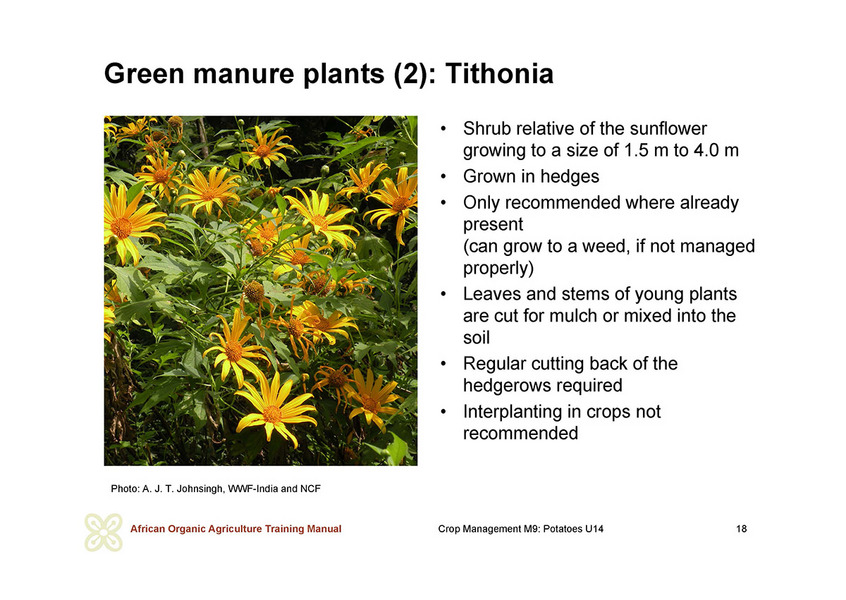
Tithonia, Mexican or wild sunflower (Tithonia diversifolia)
Tithonia, a shrub relative of the sunflower and native to Central America, but today found throughout the tropics, is often considered a weed. However, it can be used for animal fodder, compost, fuelwood, and for insect control, or to improve soil fertility. Tithonia was found to increase maize yields to up to 80 %. Nutrients are most concentrated in the tender green leaves and stems. Green leaves contain up to 6 % of nitrogen and 0.5 % of phosphorus, comparable to velvet bean. When worked into the soil, these nutrients quickly become available for the following crop.
Tithonia does not fix nitrogen as do leguminous plants. The species makes woody stems. For use as green manure, the leaves and stems are cut in a young stage of growth, chopped and carried to fields, where they are used as a mulch or are worked into the soil. Due to the amount of work that is needed for “harvesting” Tithonia, the use of Tithonia as a nutrient source is more profitable with high-value crops such as vegetables than with relatively low-valued maize. The transfer of Tithonia biomass to fields constitutes the redistribution of nutrients within the farm eventually requiring provision of nutrients to the places where Tithonia is grown to sustain production.
Tithonia is mostly grown in hedges along roadsides or farm boundaries, or on contours. When mixed to the soil the fresh plant material is spread over the half-made ridges at a rate of 2 kg per m2 two weeks before sowing a crop and then covered with 5 to 10 cm of soil to finish the ridges.
When applied as mulch, the material is spread below the crop 6 to 8 weeks after planting of the crop. Covering the mulch with a little soil facilitates nutrient release. Mulching and green manuring can be combined, which will provide more nutrients. Interplanting of Tithonia in the field is not recommended as it would compete with crops for nutrients.
Tithonia grows on most soils to a size of 1.5 m to 4.0 m in height and width if left uncut. To prevent Tithonia from becoming a weed, Tithonia hedgerows must be cut back regularly. Tithonia can be harvested as often as every four months. Tithonia reproduces from stem and root cuttings, as well as through numerous, small seeds that are light enough to be dispersed by wind.
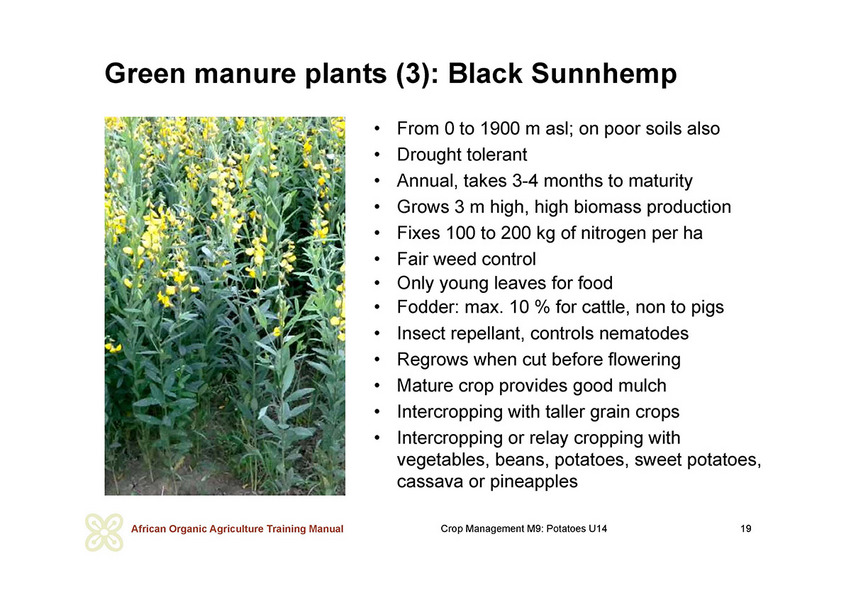
Sunnhemp (Crotalaria juncea)
Crotalaria green manure can contribute significantly as an organic fertilizer in potato production. The erect, high-growing, non-vining, annual legume is best grown in rotation. However, it may also be intercropped with vegetables like kales by cutting it back regularly. It grows up to altitudes of 2000 m and has some drought resistance. Innoculation of Crotalaria seed with rhizobia is not necessary. The green manure is sown by broadcasting. The plants rapidly produce a thick ground cover. For green manuring the plants are ideally slashed and worked into the soil about 60 days after planting at bud or early-bloom stage, when they are about 1 m tall. For seed production the plants need about 5 months with sufficient water until flowering followed by dry weather for seed development. The plant material can be used as feed and the beans are edible.
Crotolaria may be grown as a short-term fallow before maize or after maize into the dry season.
Intercropping of green manure species in general and of Crotalaria grahamiana in particular with potato as a component crop was advantageous in research trials in Cameroon. Similar results with other green manure species were found.
Relay intercropping of Crotalaria into a one-month-old potato crop may not be recommended, as the green manure may not develop well in the dense potato crop.
If Sunnhemp is left until its cycle ends and seeds are ripe, the seedpods need to be harvested to avoid that the mature seeds germinate subsequently and become weeds.
Velvet bean (Mucuna pruriens)
Velvet bean is probably the most common green manure crop in the tropics. The species prefers a humid environment with up to 2,500 mm of rain, but will grow in drier areas, too. It is drought resistant, but will die during the dry season. In cool climates it will grow 3 to 4 months into the dry season.
The typical Mucuna type is vining, but there is also a bush or dwarf type (Mucuna enana). Both, the vining and the bush type produce a dense canopy and suppress weeds well. The seeds are not edible due to L-dopa and need to be boiled well before consumption. Mucuna leaves can be mixed with 4 times of Napier grass for fodder, and the residues can be used as forage, silage or hay.
The bush type flowers in 80 to 90 days, whereas most velvet beans will take up to a year to produce seeds. The bush velvet bean grows best in temperatures of 20 to 30 °C and to elevations of 2,000 m. It is sensitive to frost, and very insect resistant. It can fix as much as 200 kg/ha of nitrogen and produce about 4 tons/ha of dry matter in fertile soils. It also contributes to nematode control.
Mucuna can be planted at the onset of the rainy season as an improved fallow on severely degraded soils. It can also be sown as a relay crop in cereal crops with repeated pruning and subsequently used as an improved fallow. The following crop is then sown into the dead mucuna mulch.
The bush type may also be intercropped to annual crops.
Lablab bean (Lablab purpureus)
Lablab is a fast growing, climbing legume. Bush varieties are also available. It has a high drought tolerance when it is established, and may stay green throughout the dry season. Its long cycle provides cover for an extended time if there are no hard frosts, being able to perform as a biennial plant.
Lablab beans grow well to up to about 1,500 meters. It requires more fertile soils than jackbean. Lablab starts flowering after 3 months and continues producing seed as well as remaining green. In contrast to velvet bean or jackbean the lablab bean can be cut off near the ground and will grow again with reduced vigour.
As animals like lablab very much, the beans cannot be grown where animals run free. On the other hand, lablab beans can be a high value dry season pasture for animals. Young lablab pods, and immature and dry beans can be eaten.
Jackbean (Canavalia ensiformis)
Jackbean is resistant to drought, poor soils, insects and diseases. A climbing and a bush type exist. The species will grow 5 to 6 months through the dry sea-son and can protect the soil during this time preventing erosion. The species is very useful to regenerate wasteland or as a green manure after the late monsoon crop is harvested. Jackbeans grow up to about 1,800 meters. The plants begin flowering after 4 to 5 months, then continuously produce seedpods for at least an entire year.
Jackbean can be used in grain fields, under orchard trees or to shorten fallow periods. As it is not as vigorous as the velvet bean, mixtures of the two species may do best.
Pigeon pea (Cajanus cajan)
Pigeon pea originates from India, but is widespread in Eastern and Central Africa. It has a shrubby growth habit and is usually perennial, but new varieties have been developed, which produce seeds within 3 to 4 months. The plant can be used for human consumption as well as fodder for animals and green manure or cover crop. For human consumption pigean peas are eaten fresh or are dried and cooked or milled or sprouted.
Nitrogen fixation of pigeon pea is reported to be around 90 kg per ha and year. It grows well under dry conditions. 650 mm of rain per year are sufficient for the crop to grow. Intercropping with maize or rice is widespread in America and Asia. The plant is also known in Cameroon and might be used in the crop rotation as a cash crop adding nutrients to the soil.
Fish poison bean (Tephrosia vogelii)
The fish poison bean has a shrubby growth habit, reaches up to 4 m of height and is perennial. It is very adaptive, tolerates different climates, poor soils, droughts and strong wind. However, the plant requires 850 mm of annual rainfall. It produces first seeds after 3 months. As it is a legume, it fixes nitrogen in its nodules. The fish poison bean has been used for decades as improved fallow in some areas of the Cameroon North-East District. As its name suggests, it is poisonous to fish, if the extract has contact with water, and its leaves are toxic to livestock. Therefore, livestock will not eat it. Fish poison bean extract is used as an acaricide on livestock. Some effects against insect pests have been reported, but have not been tested scientifically so far.
Different other plant species may be suited as green manure/cover crops, especially leguminous plants. In Cameroon, many leguminous trees are abundant, as well as different kind of beans. Organic farmers are encouraged to experiment with those plants and find the best solution for their specific farm.

Compost
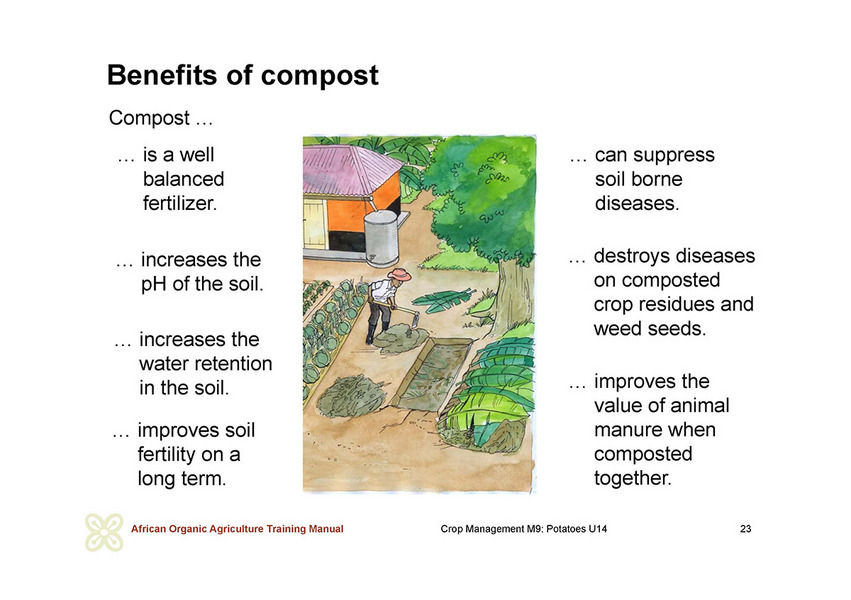
Compost is a highly valuable organic fertilizer, especially in tropical conditions, as it will contribute stable organic matter and help to build the soil in the long term. Compost is a common name used for decomposed organic materials. Compared with uncontrolled decomposition, as it naturally occurs, decomposition in the controlled composting process is faster, reaches higher temperatures and results in a product of higher quality. Nutrients provided by compost are more balanced from a plant perspective than nutrients derived directly from animal manure. Compost improves soil structure and increases water retention capacity of soils. It also can suppress soil-borne diseases in some cases.
Compost making relies on materials that are available on the farm and does not require any special equipment (maybe with exception of a shredder and watering cans or some kind of sprinkler, or if the operation is done on a large scale), making it a cheap method. On the other hand, compost making requires a lot of work for collecting and preparing the materials, and to subsequently turn the compost heap regularly during the composting period. Therefore, compost production may be economical mainly in cropping systems with high value crops such as vegetables and potatoes.
Ideally, compost is made from equal amounts of animal manure and fresh plant materials, and dry woody materials. Farm-own plant material includes collected crop residues, weeds, or plants that are cultivated specifically for their biomass. Wood ashes and some old compost can be added as well. Compost production requires humid conditions. Therefore, regular watering is required in dry weather to ensure a proper decomposition process.
Evaluation of compost as a fertilizer and soil amendment
Discuss with the farmers advantages and constraints of compost production under local circumstances compared to green manuring and other measures for improving plant nutrition and soil fertility. What source materials are available on the farm? Is there enough work force available for compost production? How can it be transported to the fields? How are the advantages to be weighted compared to the disadvantages?
Crop rotation
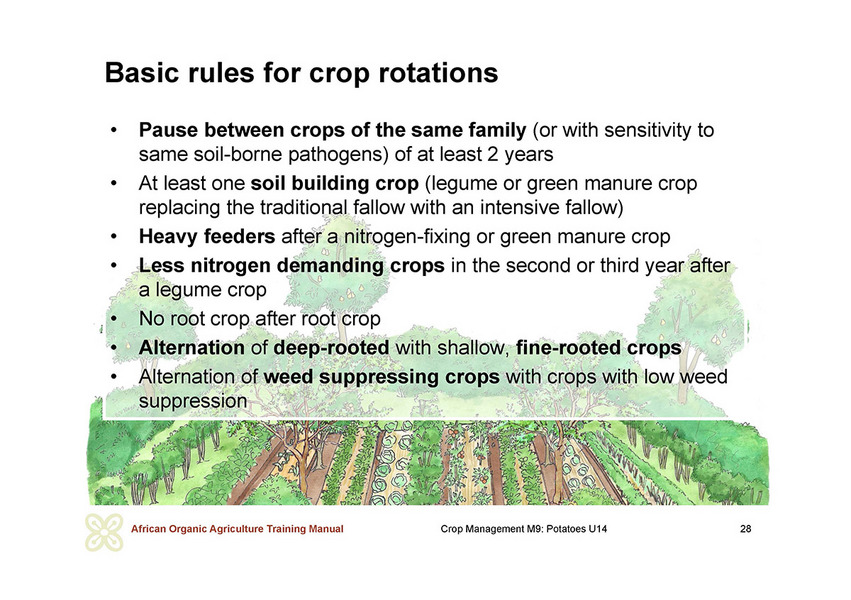
Organic agriculture’s approach to soil fertility management and plant nutrition has implications on the design of the crop rotation. Crops are arranged in such a manner as to contribute in the best possible way to the fertilisation of the following crop, to the maintenance of soil fertility, and to the control of soil-borne pests, diseases, and weeds.
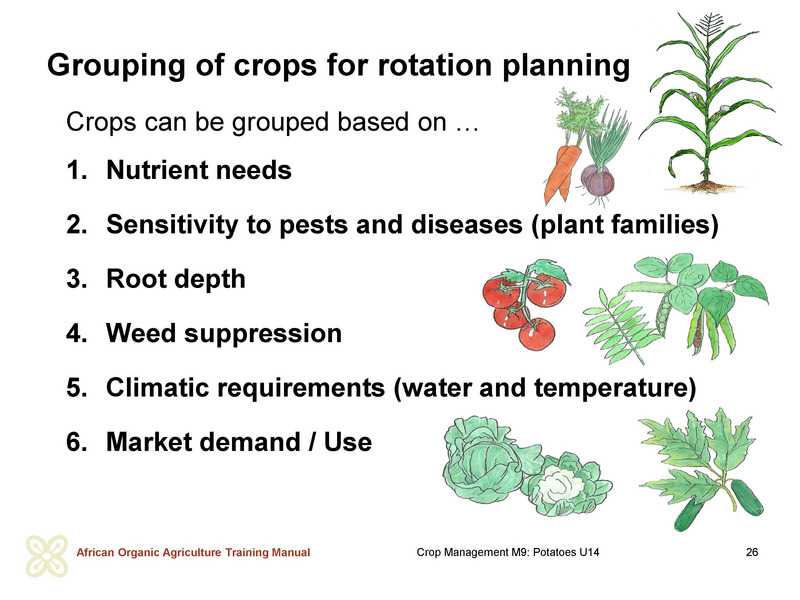
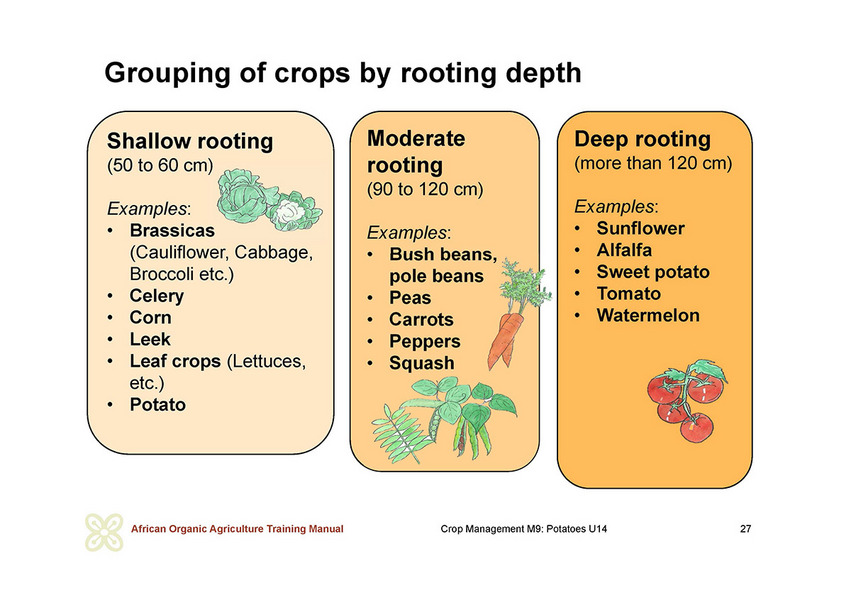
Grouping of crops based on nutrient needs
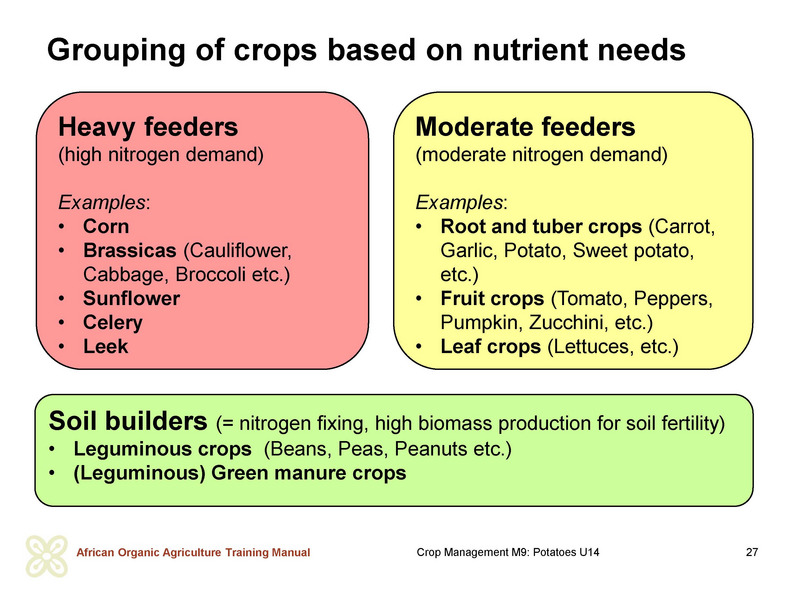
The crops can be grouped based on their nitrogen (or nutrient) demand, distinguishing heavy feeders, moderate feeders and fertility builders. Heavy feeders include crops such as maize, cabbage or Leek. These crops depend on high amounts of nitrogen to produce good yields. Moderate feeders include root and tuber crops, and fruit as well as leaf vegetables. Fertility builders include legume crops such as beans, peas, and (leguminous) green manures that are cultivated for improvement of soil fertility mainly.
The nitrogen that is provided by fertility builders is best exploited, if a legume crop is followed by a heavy feeder. Heavy feeders should then be followed by a moderate feeder. After heavy feeders such as corn or cabbages only few nutrients remain in the soil. Growing two heavy feeders after each other requires a high nutrient supply with fertilizers.
Organic farmers grow green manures or leguminous crops in the rotation to restore the nitrogen level of the soil. Leguminous green manures that are grown for soil improvement mainly will leave more nitrogen in the soil than legume crops, of which the grains are harvested. One or two year traditional fallows consisting of spontaneous plant growth (most of which are weed plants) is ideally replaced by an intensive (or improved) fallow to restore the nitrogen level of the soil. Introduction of an improved fallow will furthermore allow shortening the fallow period resulting in an intensification of the cropping system.
As an alternative to green manure crops, nitrogen fixing herbaceous feed crops can be grown in the rotation. The produced feed can be offered to animal farmers for grazing in exchange for the animal manure. The challenge may be though to ensure that the animal manure remains in the field and is not deposited outside the field.
Grouping of crops based on their susceptibility to diseases and pests
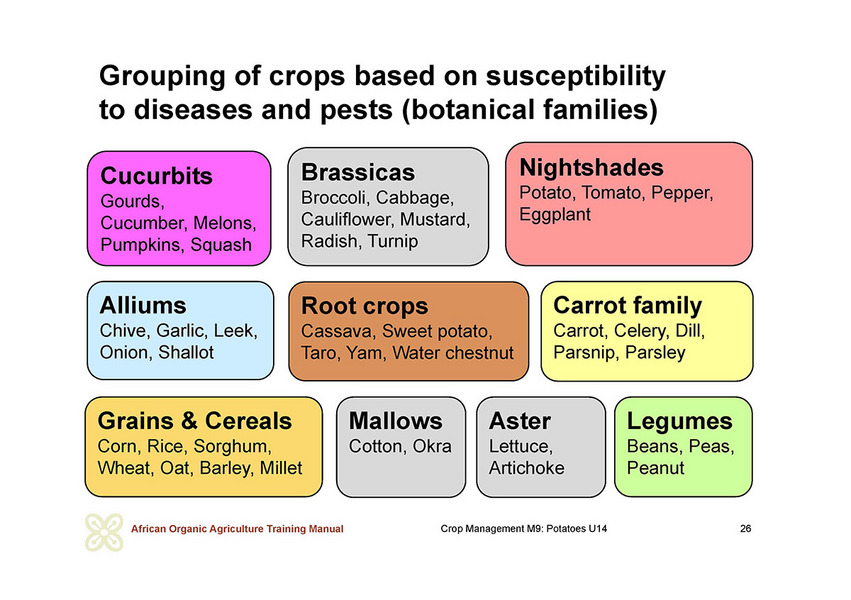
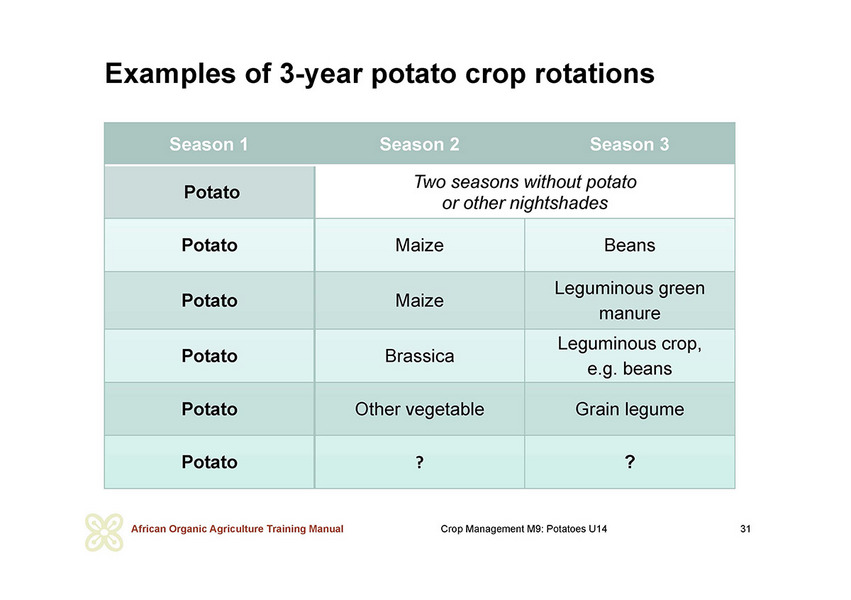
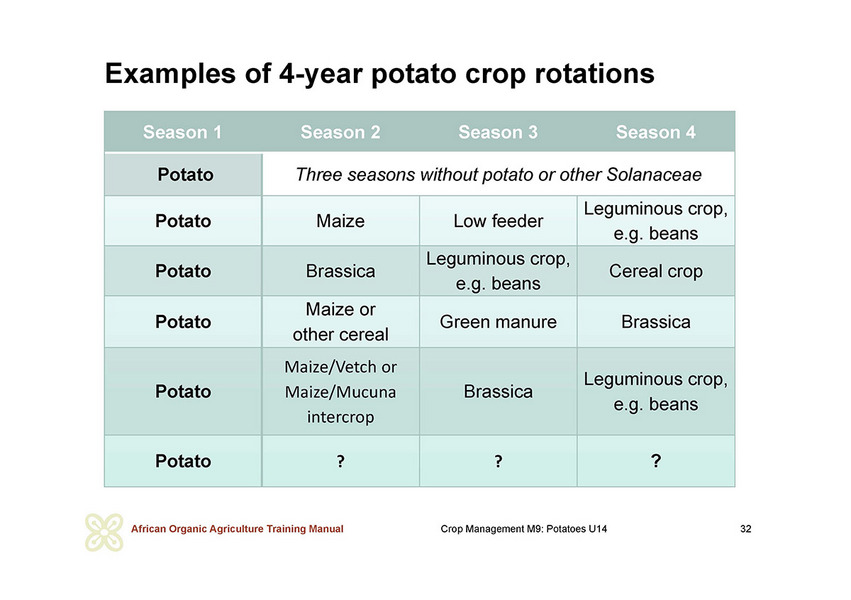
Crop rotation design not only plays a key role for soil fertility management, but it is also important for control of soil-borne pests and diseases such as nematodes. For this reason, crops of different botanical plant families should be rotated. To prevent build-up of soil borne pests and diseases most crops, including potato, should not be grown on the same field more than every third or fourth season. As long as no soil-borne pests or diseases are noticed, potatoes may be grown every third season in the same field. During the cultivation break, also other crops of the nightshades family related to potato such as tomato, capsicums (peppers), eggplant, black nightshade and other should not be cultivated in this field. In addition, volunteer potato plants need to be rogued out. As a result, not more than a third or a fourth of the farmland is cultivated with potato or other nightshades at a time. The same rule applies in case of intercropping of potato with other crops.
Designing suitable crop rotations
Ask the farmers, what crops they currently grow. Note each crop, including potato, on a card.
If the farmers already have been growing potato, ask them to describe the rotation they practice on their farm. What experiences have they made with their rotation relating to soil fertility and soil-borne diseases? Discuss the rotations in the group. Mention critical aspects and make suggestions for possible changes with special attention to potato production.
If possible, go to the farmers’ fields for the discussion.
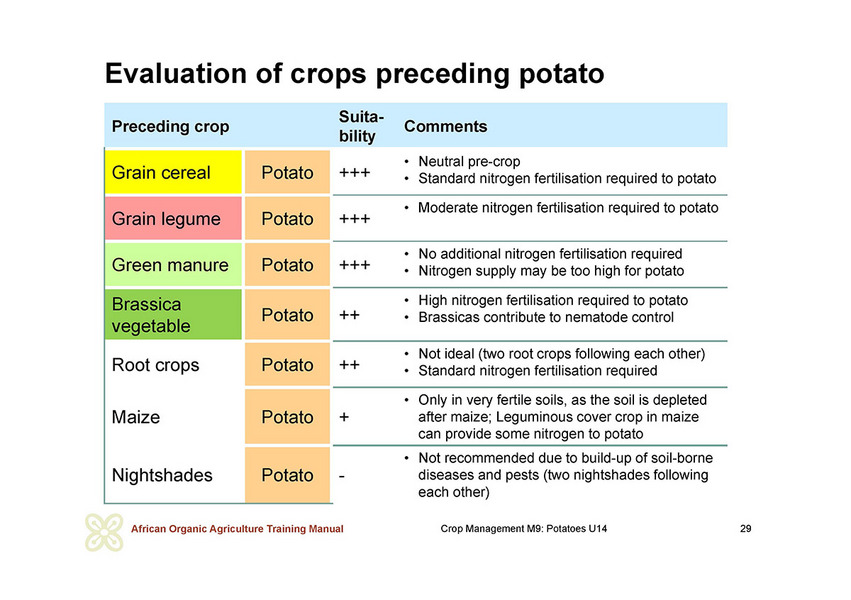
Preceeding and following crops to potato
The potato crop has relatively a high nitrogen demand in the first half of its growth period. Therefore, it does especially well after crops that leave a loose soil and a high amount of easily degradable organic material behind. Thus, suitable preceding crops include grain legumes such as beans and other vegetables. Leguminous green manure or feed crops are an option, too. Brassicas such as broccoli, cabbage and mustard plants preceding the potato crop reduce bacterial wilt and root knot nematodes in the soil. When harvesting the preceding crop or mulching the green manure crop, attention must be paid not to compact the soil.
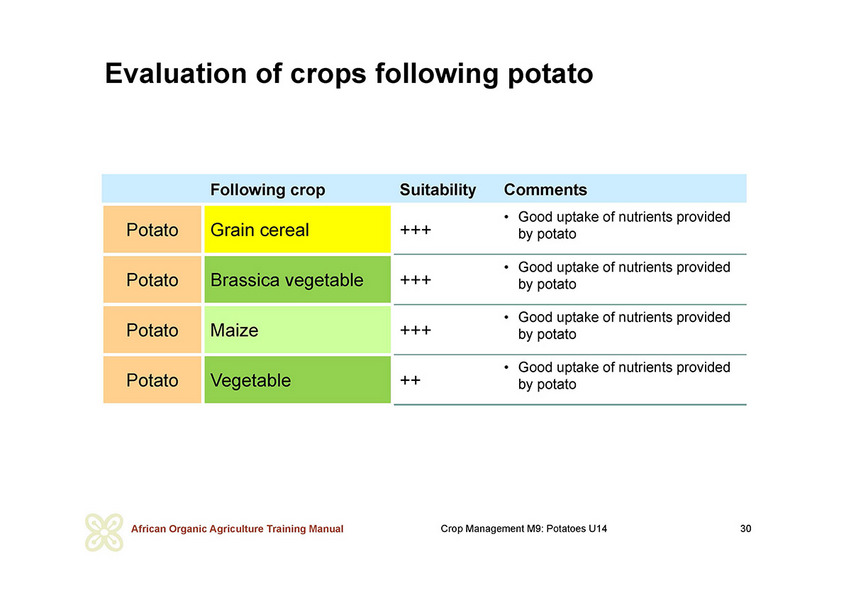
After the crop, high amounts of soluble nitrogen remain in the soil. To avoid leaching of the nutrients in case of rain or erosion by wind if the crop is followed by a dry season, either a succeeding crop with elevated nitrogen demand such as maize, cabbages, leeks or a cereal or a fodder crop should be cultivated soon. Alternatively, the soil is covered with a cover crop to catch the nitrogen and prevent erosion.
The potato crop generally leaves a clean field for the succeeding crop. This allows reduced or minimal soil tillage for the preservation of the soil structure.
Mixed cropping or intercropping of potatoes
Intercropping is quite common in Cameroon. This practice improves food security by minimizing the consequence of failure of an individual crop, takes advantage of complementary characteristics of crops, reduces risks due to pests and diseases, and contributes to erosion control.
Some farmers traditionally grow mixed crops such as maize and beans or potato and beans, either by inter- or by alley-cropping. In the early rain season, potato is often intercropped with maize, cocoyam, cabbage, or other annual crops. Beans are a common choice of intercropping with potatoes in the late season. Unsuitable crops for association with potato are celery and nightshades such as peppers, aubergine and tomato. Commonly, intercrops are planted at the bottom or at the edge of the furrows and the potatoes on the ridge.
Although intercropping with a short season legume such as beans may increase total crop yield and help prevent spread of diseases, potatoes may rather be cultivated in rotation with other crops in order to produce high potato yields, suppress weeds efficiently, and simplify management. Consociated crops grown on the potato-ridge must be harvested at the same time as the potatoes.
Potato variety selection, seed production, pre-germination
Variety selection
Challenges related to variety selection
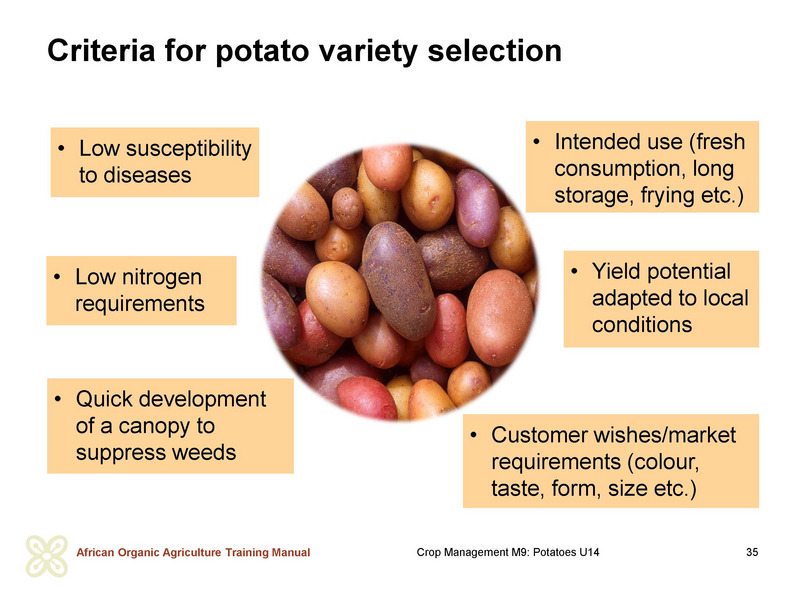
Variety selection in potato production depends on the intended use, consumer preferences, potential performance, pest and disease resistances, adaptation to local growth conditions and available planting material. Although the intended use, yield potential and the preferences of customers play an important role in variety selection, good growth characteristics of a variety and disease resistance or tolerance can be decisive factors. The variety that is preferred in the market may be highly sensitive to late blight and thus difficult to cultivate. Introduction of a new, resistant variety may require major efforts by the entire value chain to convince consumers of the qualities of the new variety. In Cameroon, the availability of healthy seeds is an essential issue.
Relevant criteria
Organic farmers look for varieties with fast early growth building a canopy quickly for good weed suppression, early tuber formation to reach good yields before appearance of late blight, and low susceptibility to diseases as well as low nitrogen requirements. Short growth duration can be very important in Cameroon to avoid losses by late blight, which is generally a more serious threat during the months of June to September when rains are consistent.
Some varieties show reduced risk of scab, hollow hearts, dry core, late blight, silver scurf, blackleg etc. However, no variety is immune to all these conditions. Therefore, regional recommendations may be helpful in variety selection to choose the varieties with the best resistances.
Before selecting a new variety or when producing for a new buyer, farmer cooperatives and larger farms need to discuss the varietal requirements with the retailer, as he/she will request varieties that are demanded more by the market. Farmers producing for local markets have more freedom in variety selection and can gradually introduce new varieties with different characteristics to their customers. Ideally, new varieties are best cultivated on a small scale in the first year allowing comparison with established varieties.
Criteria for variety selection:
- Yield: Varieties that produce many larger size tubers yield more and are preferred by the customers (and make a higher price).
- Varieties with tolerance or resistance to diseases such as potato late blight and viruses reduce the dependence from plant protection measures and limit the risk of crop failure.
- Earliness: Fast growing varieties with a short production cycle of 90 days can be cultivated in the (short) inter-season.
- Market preferences: certain customers or retailers prefer white skin potatoes while others prefer red skin potatoes. In addition, the size of the tubers and the depth of the eyes can be relevant criteria.
Discussion of criteria for potato variety selection
Ask the farmers, which criteria they consider in variety selection. Mention additional criteria, if some have not been mentioned. Discuss the relevance of the different criteria. Evaluate available and potential varieties based on selected criteria. Discuss the critical aspect of availability of planting material. How could the availability of requested planting material be improved?
Registered varieties
Several varieties are registered in Cameroon. Cipira, Tubira, Bambui wonder, Jacobs 2005, IRAD 2005 and Maffo were released by the national research program - Institute for Agricultural Research for Development IRAD. New high yielding varieties were bred through collaborative work of the IRAD of Cameroon and the International Potato Center (CIP). This collaboration led to the release of varieties such as Cipira and Tubira. Both varieties are well suited for production in Cameroon. Cipira, although degenerated, is still widely planted. IRAD has also released several more varieties through evaluations and testing of materials from CIP genetic material for adaptability.
Certified potato varieties have undergone independent resistance testing for key pests, diseases and pathogens. Testing is undertaken through the AHDB Potatoes-funded Independent Variety Trials (IVT) programme.
Introduced new varieties
Many of the long-established varieties have degenerated from viral infection over the years or have become susceptible to late blight. Therefore, in 2017, the Green Innovation Centre introduced six new potato seed varieties to Cameroon. In accordance with the national law, new introduced varieties must be tested for their distinguishability, homogeneity, stability, and their agronomic and technological values. The new varieties include Marabel, Jelly, Juwel, Bavapom, Sevim and Kronen. These varieties have a short growth period of about 90 days, a high yield potential and show tolerance or resistance to major diseases. Jelly is widespread in central European organic farming, as it has a good taste and is healthy. Kronen and Sevim are quite resistant against late blight and have a moderate nitrogen demand. Kronen has a slow emergence and therefore must be pre-sprouted well. These varieties might be well suited for organic farming in Cameroon.
Importation of seed potato from Europe for ensuring high quality seed for farmers has resulted in major losses of seed material during transport and storage before use in the field in the past. Thus, this procedure has proved not sustainable. Importation of certified potato seed may be a first temporary step though to establishing a national quality seed production.
Availability of seed needs to be addressed in a broad context and solutions should be developed on a national level. The production of site-adapted varieties must be supported. The propagation, adaptation and use of genetically resistant varieties (e.g. Carolus) should be developed. Collaboration with the International Potato Centre CIP should be envisaged.
Seed production methods
Some farmers in the north of Cameroon have been trained on commercial potato seed production. Farm-based, specialized seed production requires specific knowledge and is only possible in contract with seed producing organisations. Potato seeds must be cultivated with sufficient distance from regular potato fields to avoid infections by viruses and blight disease. Production of seed potatoes at higher altitudes results in more slow-sprouting planting material.
Production of mini-tubercules, as practiced by CIP in Kenya, is a valid alternative to standard potato seed production. However, mini-tubercules must be propagated by specialists and under supervision of CIP or an equivalent national organisation.
To increase the availability of high quality potato seed, the International Potato Center CIP and partners have developed the ‘3 seed potato generation revolution’ (3G). The approach uses rapid multiplication techniques (RMT), such as aeroponics or sandponics, to produce mini-tubers from in vitro plantlets, and two subsequent field generations for seed multiplication. The approach involves national agricultural research and extension systems, and includes farmer trainings in seed management and storage.
In the last years, the idea of using true potato seeds (TPS) for production of seed or ware tubers has aroused interest. True seed does not transmit most of the potato diseases, is very light and is easy to transport. True potato seeds either can be sown directly in the field, raised as seedlings from true seeds in a greenhouse or seedbed and transplanted later into the field in the same season, or sown directly in seedbeds at close spacing for production of seedling tubers. Practical tests showed that the seedling transplants gave significantly more tubers per plant than seedling tubers, but tuber yield per hectare and percent of ware sized tuber yield were much lower. The small size of the harvested tuber makes this propagation method unsuitable for ware potato production. However, it may be an interesting approach for production of baby tubers.
Another way to improve availability of healthy potato seed is establishing a farm-based seed production. However, this seed tuber production method is normally not supervised by experts and does not result in quality-certified seeds (for more information see below).
Quality and source of seed potato
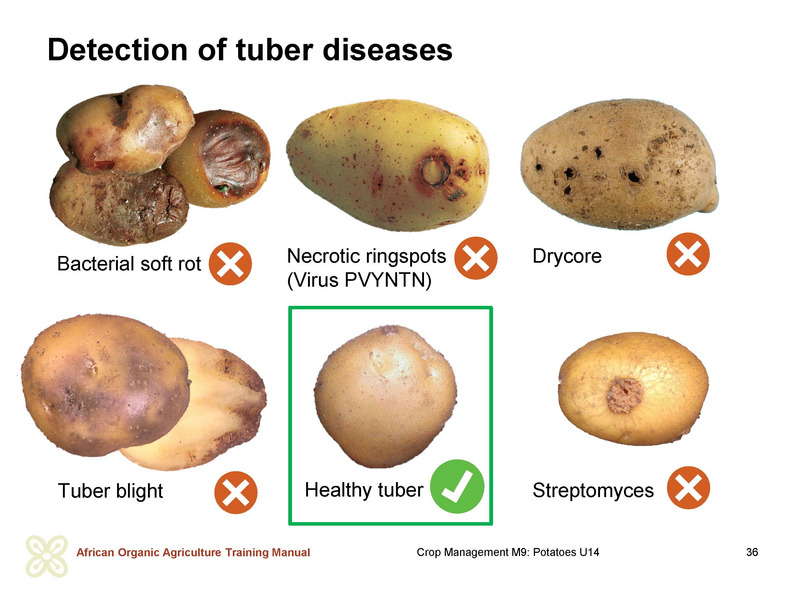
The quality of seed is highly relevant for successful potato production. The planting material should be free of seed-borne diseases. The use of certified seeds reduces the risk of infection with tuber diseases. Therefore, certified seed potatoes should be used whenever possible. However, such planting material may not be available or may be too expensive. Instead, high quality seeds with known history e.g. from a known seed multiplier may be used.
- Any purchased planting material should be controlled for quality defects such as black scurf (Rhizoctonia) marks or wet rot. Defects should be reported to the supplier immediately (keep the labels of the seed).
- Basically, the same quality criteria apply for saved, non-certified planting material as for certified seed. In practice, non-certified seed bears a higher risk of carrying seed-borne diseases such as viruses than certified seed. Therefore, in case of farm-own seed selection farmers should mark healthy plants on their production fields and check the external quality of the saved seed to reduce the risk of transmission of diseases to the next potato crop.
- Dressing of planting material with antagonists such as Bacillus subtilis and Pseudomonas species may reduce infection with Rhizoctonia and dry core. However, such potato seed dressings may not be common in Cameroon and effectiveness has not been proved yet.
- Calibrating planting material facilitates cultivation, as calibrated plants will build more even stands.
- For certified organic potato production, the planting material must be derived from organic propagation. If such seed material is not available for certain varieties, an exceptional permission from the inspection body may be necessary before purchasing seed tubers from conventional propagation.

Farm-based seed multiplication
Continuous use of same seed stocks year after year without periodic replacement encourages infestation of the tubers with seed-borne diseases, particularly with viruses. Virus infestation considerably reduces the yield potential of potato plants.
A method to get good quality seed for use in the following season is the seed plot technique. For own seed multiplication, farmers purchase small quantities of quality seed and multiply it in the cleanest part of their land. This technique helps in meeting part of the large requirement of healthy seed.
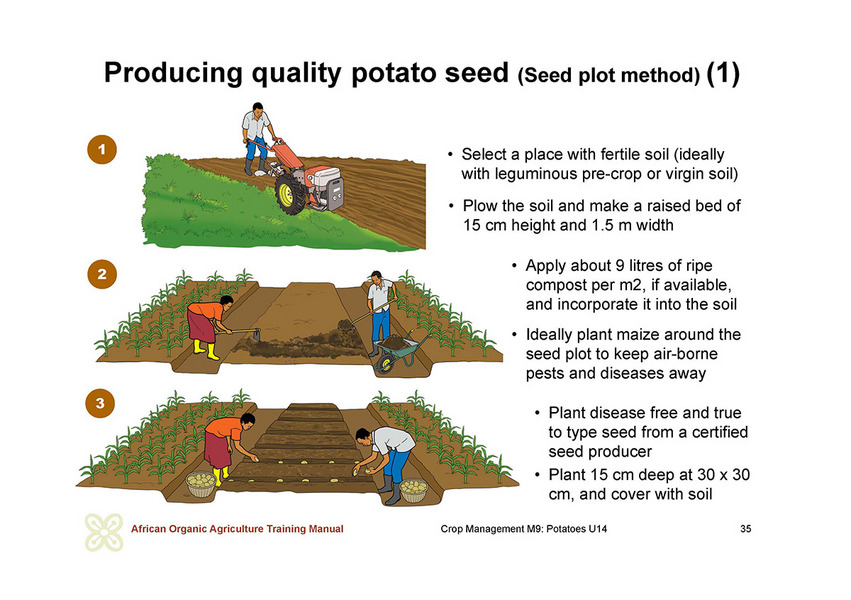
- Location: Seed plots should be established on the top part of the slope in the farm. The surface should not have had any nightshade crops on it for at least 5 years. Preferably, land surface has been covered with an improved green manure fallow or with dense grass or has been virgin land. The plot is ideally located in a highland area in a distance upwind from commercial potato fields and alternative host crops to reduce dissemination of viruses through aphids carrying viruses. The site should be well-aerated, well-drained with full sunshine and should not have received lime for 5 years.
- Size: The size of the seed plot depends on the intended production area and the multiplication rate of the variety (average number of seed tubers produced by one plant). The seed plot technique uses about 50 % less land than ware potato production to meet on-farm seed tuber requirements. For 1 hectare of land about 2.500 kg of seed tubers are required. At an average seed tuber weight of 50 to 70 g and depending on the planting distances, 25.000 to 50.000 tubers are needed to plant the surface. At an estimated multiplication rate of 10, at least 2.500 to 5.000 tubers must be planted in the seed plot. If a part of the multiplied seed tubers will be used to produce more seeds for the following season, more surface is needed.
- Seedbed preparation: The land is ploughed to a depth of 20 to 30 cm. Then, the soil is formed to a raised bed of 15 cm height and 1.5 m width. The length of the bed depends on the size of the land.
- Fertilisation: Ideally, legumes were previously grown on the area providing sufficient nitrogen for the seed potato. Otherwise, nitrogen rich organic fertilizer such as chicken manure and/or compost is spread over the seedbed and is mixed well into the soil. The amount of fertilizer or compost spread on 1 hectare should contain at least 100 kg of nitrogen.
- Border crop: To minimize infestation of the potato plants by aphids, at least 4 rows of maize can be planted 2 to 3 weeks before the seed potatoes around the seed plot as a border crop.
- Another prevention measure consists of cleaning and disinfecting the tools, feet and shoes before entering the seed plot area with a household bleach (sodium hypchlorite) at the rate of 50 ml in 1 litre of water.
- Spacing: The tubers are planted at a spacing of 30 by 30 cm with a spacing of 15 cm on the edges of the bed at a planting depth of 10 to 15 cm. To produce seeds for 1 hectare a seed plot of about 300 m length is required.
- Crop management is the same as for a regular potato crop including control of plants for diseases and pests. However, weeding and hilling is done by hand by pulling of the weeds on the beds and then adding soil from the sides to raise the bed to approximately 5 to 10 cm height from the initial height. Especially yellow flowering weeds should be removed, as aphids are attracted to yellow colour. Other host plants of potato pests and diseases within and around the field should also be removed.
- Observation: The seed plot should be inspected on a weekly base to monitor crop performance and particularly the occurrence of aphids, potato tuber moths, bacterial wilt, viruses, as well as early and late blight. Especially young potato plants should be protected from aphid attack, as young potato plants are more susceptible to virus attack than older plants, and plants that are infected early become more efficient sources for further virus spread than plants infected later in the season.
- Control of aphids: Aphids can be controlled by punctual treatment with Neem, or with potassium soap at a concentration of 2 %. In case of very high infestation pressure, treatment with pyrethrin or quassia in a mixture with potassium soap is recommended (always add potash soap last).
- Control of potato tuber moth: To prevent infestation with potato tuber moth the tubers should be covered with sufficient soil at all times. Plants with bacterial wilt and/or virus infection should be uprooted and destroyed. After removing a wilted plant two hands full of ashes or 1 hand full of lime should be spread into the hole. Preventive repeated application of copper is recommended against Early and Late blight, where infections are common.
- Timing of harvesting: When trial digging of potato shows that the tubers have reached the required size (in Cameroon in general at 20 to 40 mm of diameter), the potato stems should be cut-off. From dehaulming to harvesting of the tubers a period of about 2 weeks should be awaited for the tuber skin to harden. Re-growing shoots must be removed during this period, as the young shoots are easily infested by aphids that spread viruses. The tubers should be harvested when the soil is dry avoid injuring the tubers. Too large tubers should be sold as ware potatoes.
- Storage of seed tubers: The selected seed tubers should be stored in diffused light and with ample aeration, separated by varieties, and spread thinly on the floor or in wooden crates. The seed potato tubers should be protected from aphids during storage to avoid transmission of viruses at storage, as potato aphids readily colonise tuber sprouts. Seed potatoes are very susceptible to infection at this stage. The tubers can also be covered with branches of Lantana camara (tickberry). Storing seed potatoes under sawdust keeps away tuber moths and keep the seeds longer. Seed tubers should be stored in dark stores used for ware potatoes and in gunny bags or other dense bags.
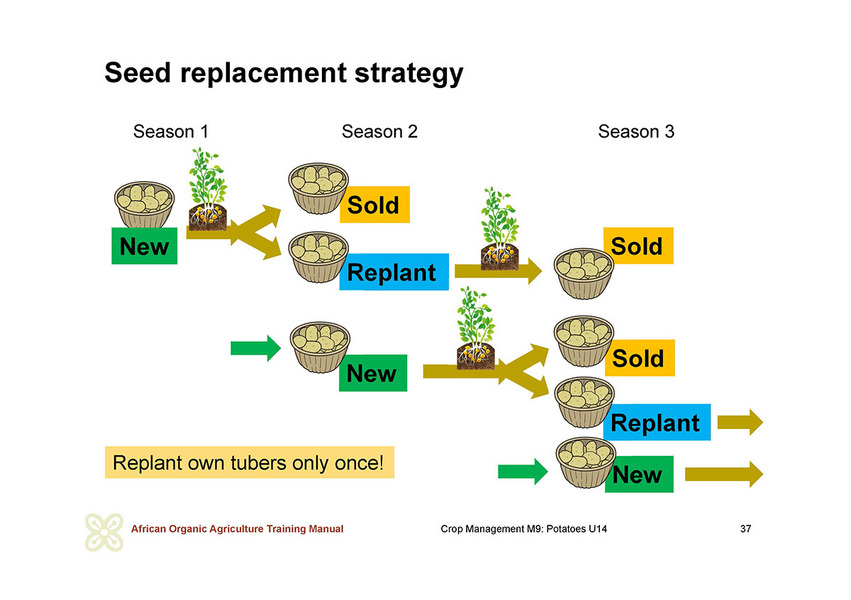
- Seed replacement: A part of the seed potato can be used for the production of new seed tubers, the other part is used for the production of ware potato. Seed tubers from own seeds should not be multiplied for more than 3 seasons to prevent quality losses due to the build-up of diseases and pests that are transmitted with the tubers.
Demonstration of the seed plot technique
Demonstrate the preparation process for establishing a potato seed plot in the field.
Pre-germination
Before planting, the potato seed should be pre-germinated (or chitted). Pre-germination significantly increases yield safety, as pre-germinated tubers emerge faster and are ready for harvesting 10 to 14 days sooner than not pre-germinated tubers. This reduces the likelihood of infection of the sensitive sprouts with Rhizoctonia (Black scurf) or Erwinia (Blackleg), and reduces the risk of late blight.
Moreover, pre-germination leads to fewer sprouts and as a result to fewer stems per unit area of foliage, reducing the number of tubers, but increasing their size. The additional workload for pre-sprouting is reclaimed through higher yields and higher yield security.
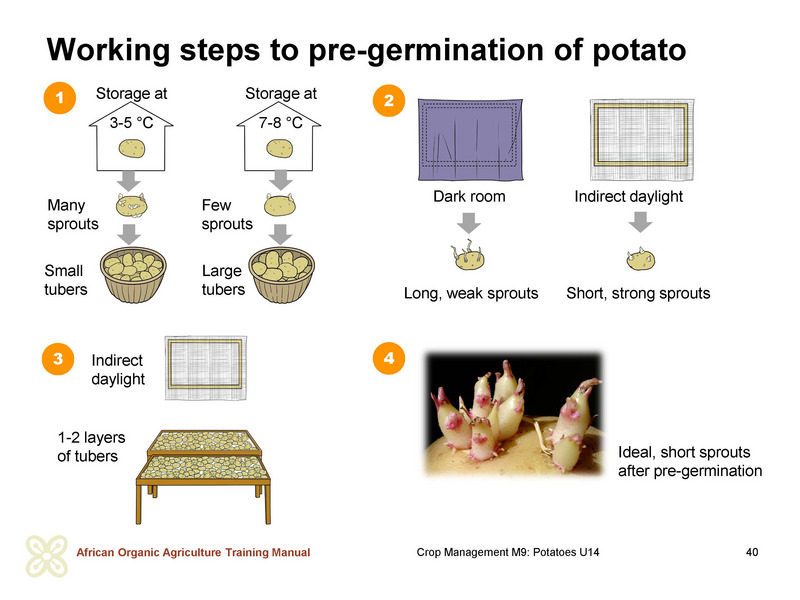
- Temperature has the largest influence on the number of later sprouts in the pre-germination process. New potato varieties should have fewer sprouts in order to reach the required size quickly. Tubers for seed potato production should have more sprouts resulting in many tubers of rather small size.
- Short and strong multiple sprouts are extremely important for a high yield. Furthermore, seed tubers with short, firm sprouts can be transported to the field with lower risk of sprout injury than tubers with longer sprouts.
- Development of the sprouts is primarily affected by light intensity. If the tubers are well-exposed to diffuse light (but not direct sunlight), the sprouts will be slow in growth, coloured and sturdy. Seed tubers held in the dark will develop pale and long sprouts that easily break off. Long sprouts deplete the seed tuber and make it shrivel.
- Thus, for pre-germination the seed tubers are placed in a cool and bright place, avoiding direct sunlight. In case of artificial light lamps with warm tones, more than 100 W per t of planting material are used for 8 to 10 hours per day. To ensure exposure to light from all sides no more than two layers of potatoes are laid out in the chitting crates or onto flat trays.
- Seed tubers should have medium size, and no damages or signs of pests or diseases. Small tubers will produce less potatoes than medium size tubers.
- Pre-germination is started 4 to 10 weeks before the desired planting date, depending on the variety and pre-germination temperature.
- The ideal temperature for pre-germination is 10 to 12 °C. The higher the temperature during pre-germination is, the faster germination takes place. A slow germination is preferred to a fast germination. If necessary, the seed potatoes can be exposed to 18 to 20 °C over 2–3 days to induce germination. When the first sprouts emerge, the temperature is ideally lowered again to 10 to 12 °C (seed potatoes: 8 to 10 °C).
- Ideal air humidity is 70–80. If the tubers form too many roots, humidity is too high and needs to be lowered, or the pre-germination box is placed in the sun for a short period of time.
Demonstration of proper pre-germination of seed potato
Show the farmers, how seed potato tubers are pre-germinated, and what chitted seed should look like. Discuss with the farmers how they can practice good chitting on their farms.
Land preparation and planting
Mechanical versus manual soil preparation
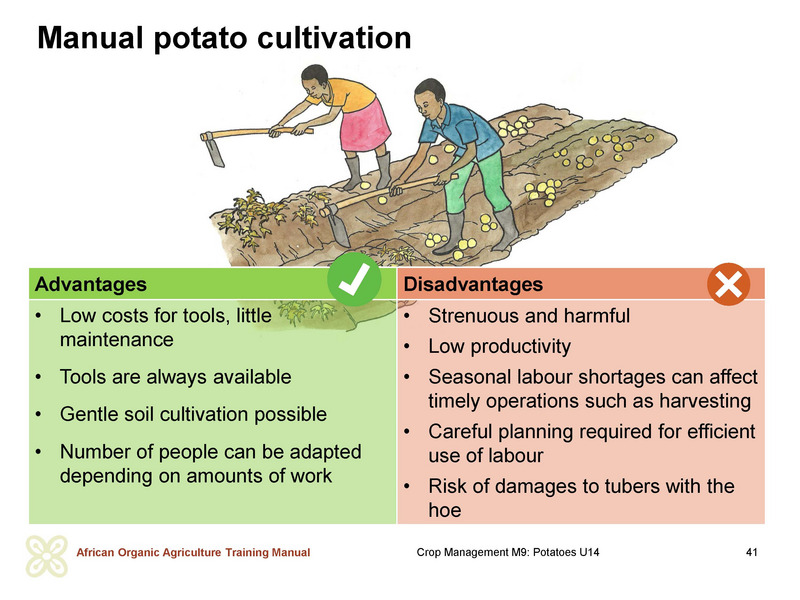
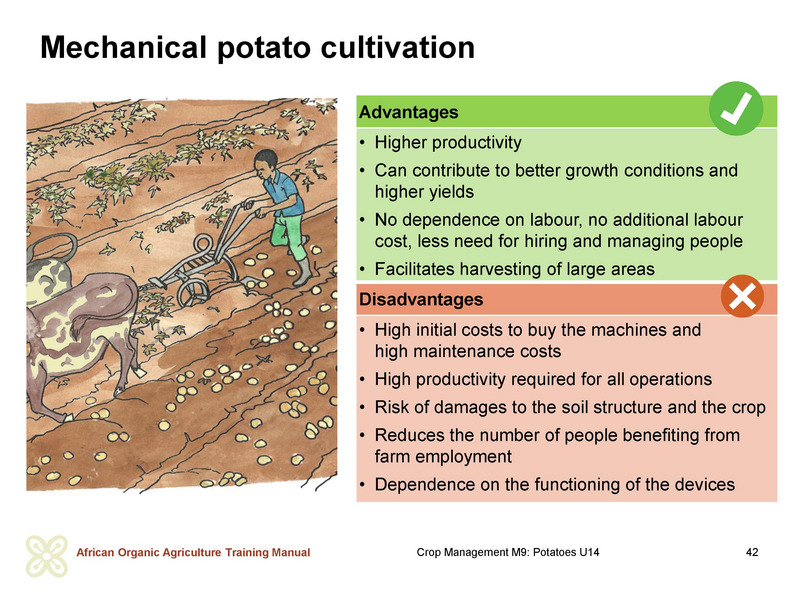
The decision of the way to work the soil is mainly an economic one. If labour is cheap and well available, it is efficient to do land preparation by hand in a traditional way using hand-held hoes. This is hard physical work and a strong strain for the back. As long as many workers in rural areas are available, this work ensures employment. As soon as labour costs rise, it might be economic to use mechanical soil tillage, for example in form of single-axle tractors, motor cultivators or even large tractors. The decision should always be based on cost-benefit calculations.
Primary soil preparation
Potato is tolerant to a wide variety of soils, except heavy, waterlogged clays. Good drainage is of great importance. Deep, fertile soils with good water retention and aeration offer best growth and yields.
Soil preparation for potato serves at producing deep, loose ridges for planting. The ridges should be free of stones and clods, because they inhibit growth of the tubers, result in deformations and damage during mechanical harvest.
Potato does not grow well in compacted soil. To avoid compaction of soil or building of clods, primary soil tillage should be performed under suitable conditions only, when the soil has dried sufficiently.
Traditionally, soil preparation is done with a hand hoe, which is very labour-intensive. In heavy soils, the use of a plough is appropriate if mechanisation is available. A working depth of 20 cm is normally sufficient.
Besides creating a loose seedbed, tilling contributes to weed control through incorporation of the weeds into the soil, and to the reduction of some pests and diseases. However, deep and intensive soil preparation does harm soil organisms and can encourage soil erosion. Thus, in slopes, preventive measures against erosion need to be taken such as constructing contour bunds, and tilling intensity is to be reduced. On steep slopes, potatoes should not be cultivated. Generally, the risk of erosion under potato production is much higher than under other crops due to the deep soil preparation, the cultivation on ridges, and the long period to canopy closure.
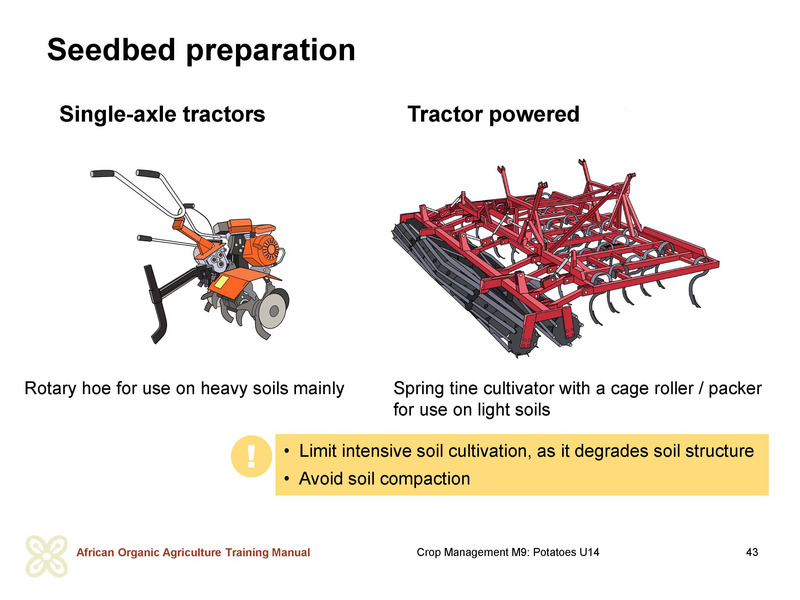
Seedbed preparation
After primary soil preparation, the soil is finely worked to minimize clods. For mechanical cultivation on light soils, the seedbed can be prepared with a spring tine cultivator including a cage roller / packer. On heavier soils, a rotary hoe is commonly used in mechanical soil cultivation. Using manual labour only, the soil can be refined by a second pass with the hand hoe, breaking all bigger clods.
The more intensely a soil is cultivated though, the more the soil aggregates are broken up. This exposes soil organic matter and speeds up its breakdown and loss. Regular intensive cultivation degrades soil structure. Therefore, reducing tillage depth and intensity of cultivation contributes to better soil structure and reduces risk of soil erosion. In addition, the less the soil is compacted before planting, the better for the potato crop.
Planting
Potatoes need three weeks to emerge from the soil and another three weeks to cover the ground adequately. Therefore, on slopes, potatoes should be planted in rows along the contour lines to reduce the risk of erosion.
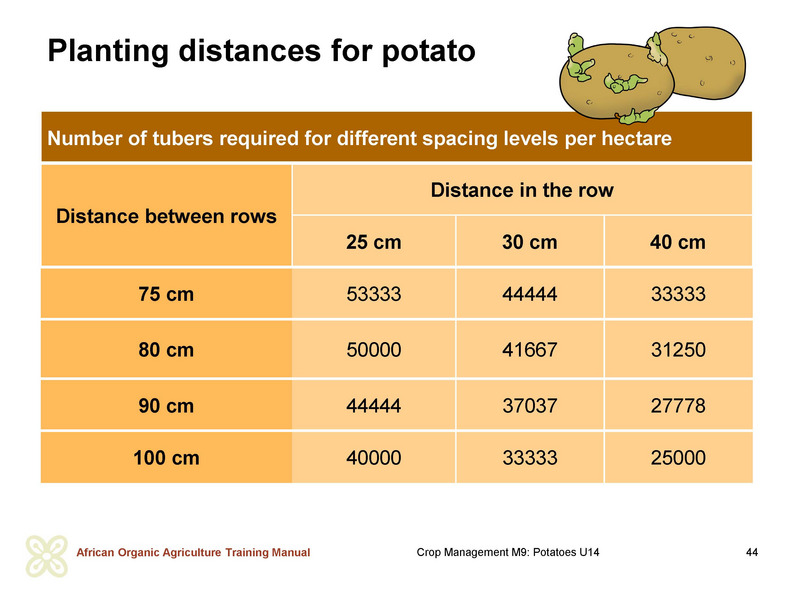
The distance between ridges can range from 75 to 90 cm. In case of mechanical cultivation row distance is usually 75 cm, since most machinery is designed for a track width of 1.5 m. Larger row spacing results in larger ridges with better water storage, better aeration of the plants, better nutrient supply and fewer green tubers. Larger row distance may help reduce the risk of late blight spread to some extent. In some areas where the soils are not deep enough to get enough soil for appropriate hilling, larger row spacing is useful.
The recommended planting distance in the row is of 25 to 40 cm depending on the row distance, the size of the seed, the variety and the desired size oh harvested tubers. Larger planting distance leads to less, but larger tubers. The larger the row distance, the smaller the planting distance within the row to achieve a favourable plant density. Planting at wide spacings can result in gappy crops particularly where planting is irregular or emergence poor. This may result in reduced yield per surface. Therefore, planting at higher densities should be considered, although increasing plant density will reduce the average tuber size. Plant populations below 25’000 plants per hectare are generally not recommended.
In Cameroon, potatoes are usually planted by hand at a depth of 10 to 15 cm to the top of the tuber. Planting depth is greater under warm, dry conditions than under cool, wet conditions. Shallow planting should be avoided, because the lower nodes of the stem must remain covered by soil to encourage tuber initiation, and to avoid greening of tubers and damage by the tuber moth. The sprouts of seed potatoes should face upwards. Attention is to be paid to prevent breaking of the sprouts. Seed of the same size should be planted together in one area to ensure a uniform crop for better management.
Discussion on soil erosion
Discuss the risk of soil erosion in potato production considering the local topography, the soil types, climatic conditions, and traditional as well as new methods of soil cultivation.
Discuss possible measures for minimizing soil erosion, using existing local cases.
Fertilisation
Potato responds well to high soil fertility. On depleted soils without fertilisation, the crop will produce low yields and small tubers only. Hence, well-decomposed animal manure or compost is needed, if the land has been continuously cropped. Additionally, sufficient nitrogen is provided by a leguminous (green manure) crop.
In order to ensure suitable nutrient supply of the potato crop for good yields and product quality, it is important to understand, how the plant develops, and what its nutrient needs are during the production cycle. Commonly, five development stages are distinguished.
From sprouting through planting until shoot emergence in the field, the potato plant widely depends on the nutrient reserves and the water that is stored in the seed tuber. Thus, small and wrinkly tubers will provide less nutrients and water to the plant during the first growth phase.
Once the plant produces leaves, roots, and new shoots during vegetative growth, it rapidly depends on nutrients from the soil. From emergence to tuber initiation, the crop has a high nitrogen demand. At tuber bulking stage the plant has already stopped growing, and only the tubers become larger.
Specific nutrient needs of potato
Organic farming’s general approach to plant nutrition consists of promoting soil biological activity and not of supplying specific nutrients in a form that is readily available to plants. Nevertheless, it can be relevant to understand the specific nutrient needs of the potato plant to achieve good yields and good tuber quality.
Potassium
Potato is among the crops with the highest potassium demand. Potassium is important for the development of starch. Moreover, it improves the shelf life and reduces the number of damaged tubers. It also increases the amount of organic acids and the vitamin C content in the tubers. This, in turn, leads to a decrease of discolouration in the raw state and after cooking, as well as a reduction in bruising. However, oversupply of potassium can have a negative impact on dry matter and starch content of the tubers.
Typical acidic laterite soils are poor in potassium. Thus, appropriate supply of potassium to the soil can be decisive to achieve good yields. Great suppliers of potassium are wood ash, animal manure, slurry and compost. If not available, potassium fertilizers that are approved for organic agriculture, such as potassium sulphate (Patent Kali), can be used. Potassium chloride should be avoided, as this fertiliser has negative impact on the potato. One hectare of potatoes with a yield of 30 tonnes requires about 200 kg of K.
Nitrogen
Until emergence, potato plants do not need any nitrogen, as they take it off the mother tuber’s reserves. The majority of the nitrogen is required during the short period between emergence and tuber development for the production of green plant material. Appropriate nitrogen supply within the first 35 to 50 days after emergence results in strong leaf growth resulting in good tuber growth. The more nitrogen is stored in the leaves, the more tubers develop every day, and the longer yield production lasts (unless leaf blight occurs).
During tuber formation, the plant continues to extract nitrogen from the soil, but the majority of the nitrogen is transferred from the leaves. When the nitrogen supply in the leaves is exhausted, the tubers mature. In some cases, high nitrogen supply may lead to an increase in hollow hearts in large tubers, secondary growth, and growth tears.
If nitrogen supply is too high, the constant development of new leaves and stems will result in a large, dense foliage. This can delay tuber formation and growth. Early infestation of leaf blight can lead to losses of yield. In addition, too high and too late nitrogen supply has a negative impact on dry matter and starch content of the tubers and on the flavour. Furthermore, it increases susceptibility to damage and to discolouration in the raw state and after cooking, and reduces storability. A too high release of nitrogen with a low potassium supply impairs maturation due to re-sprouting. This, in turn, complicates haulm destruction.
Organic farmers only use organically bound nitrogen sources including farmyard manures, leguminous green manures and grain legumes. The release of nitrogen from these sources depends on the nitrogen content of the source, its C:N-ratio and the conditions for mineralisation in the soil. The higher biological activity of a soil is, the higher its organic matter content is, and the better a soil is aerated and moist, the higher nitrogen mineralisation is (besides considering temperature).
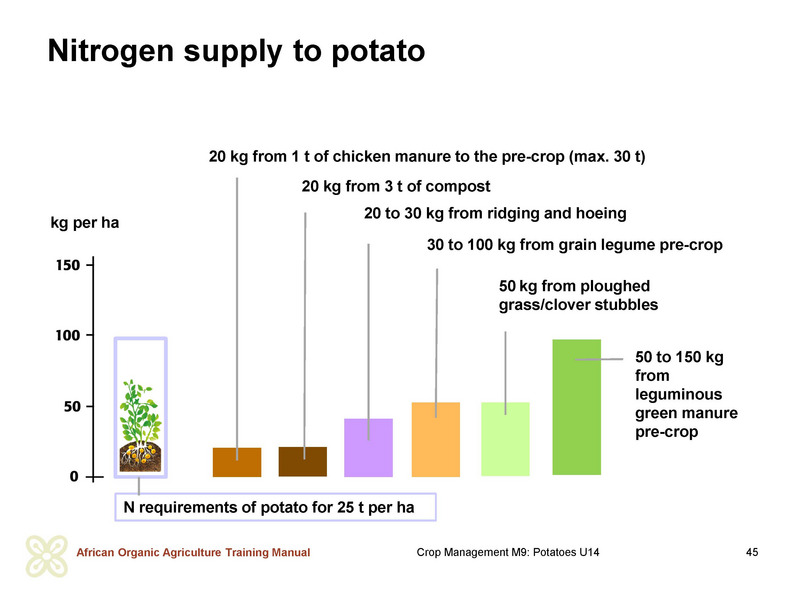
The nitrogen demand of potatoes depends on different factors such as yield expectations, the variety, and growth conditions. It can range from 80 to 200 kg per hectare. Biologically active soils deliver about 20 kg of N per hectare (the higher the fertilisation or the amount of pre-crop residues, the higher mineralisation of nitrogen in the soil) under favourable mineralisation conditions during the vegetation period. With every ridging and hoeing, additional 10 to 20 kg of nitrogen per hectare are mineralised.
Leguminous green manures as pre-crop can provide 50 to 150 kg of available nitrogen per hectare, if the conditions for mineralisation and timing are good. Grain legumes leave, depending on the species, between 30 and 100 kg of available nitrogen per hectare to the succeeding crop (soybean 30 kg, grain peas: 50 to 80 kg, field beans: up to 100 kg).
Phosphorus
Compared to potassium, phosphorus requirements of potato are low. The phosphorus needs are best met with compost or manure. If additional phosphorus is needed, rock phosphates or organic chicken manure can be used as supplements. Due to a low phosphorus availability in laterite soils, addition of organic matter to the soil will improve availability of phosphorus. Due to its neutral pH, compost improves the availability of nutrients in acid soils. Farmyard manures and green manures are other suitable organic fertilisers in such soils.
Use of fertilizers
The use of farm-own or locally available organic fertilizers not only increases provision of nutrients to the crops, it also reduces the production costs compared to the use of commercial fertilizers, and limits dependence on external sources of inputs.
The most valuable source of nutrients for potato farmers in Cameroon may be green manures, as green manures have several advantages compared to other sources (see chapter 2.3.2). Unfortunately, many farmers in Africa are not yet exploiting the potential of leguminous green manures and cover crops in soil fertility management. The main challenge related to green manures is to find appropriate species that do well in the local climate and fit into the local cropping system.
Animal manure can be recommended for the basic fertilisation of potatoes. However, many farmers in Cameroon do not keep own farm animals. Therefore, collaboration with near livestock farmers may be an option. Ideally, animal manure should be stored for 60 to 90 days before application or composted together with plant material.
Cattle manure is rich in potassium, whereas pig manure contains less K, but has higher amounts of phosphorus. Poultry manure contains about three times as much nitrogen, four times as much phosphorus and similar potassium contents as cattle manure. This explains partly, why poultry manure is so sought-after by farmers in Cameroon. Manure, composted manure and other composts provide plenty of potassium and magnesium. However, composted manure has a significantly lower effect on nitrogen supply than stacked manure. Slurry from cattle is relatively high in K and N. On the other hand, pig slurry has higher N and P contents. While manures and slurries mainly have a short-term fertilizing effect, but a low effect on long-term soil building, composted manures have a higher positive effect on soil fertility and soil biological activity.
Manures and slurries should be applied to the preceding crop or before planting of potatoes, and not directly to the crop. To prevent food-borne illness from Escherichia coli or other bacteria, manures should never be used as a top-dress, but should be applied at least 120 days before a crop is harvested. Application of manure to the preceding crop reduces the risk of Rhizoctonia infestation. Both manure and slurry should be worked into the soil immediately after application to prevent losses of N through volatilization.
As a rule, no more than 25 to 30 tonnes of manure or 15 to 30 m3 of slurry per hectare should be used, because too high doses lead to a prolonged nitrogen supply to the potato crop and impede its maturation. In case of dryness or heavy soils, the succeeding crop might actually benefit more from the nutrients than the potato crop itself.
A balanced dose of manure can have a positive effect on the K content of the tubers, whereas excessive fertilising with manure leads to a decrease of starch and dry matter content in the tubers. Doses of slurry and nitrogen that are too high can increase nitrate content and decrease dry matter and starch contents in the tubers.
Compost made from plant material can also be used. Compost provides both macronutrients (nutrients required in greater quantities) like N, K, Ca, Mg, P, and S, and micronutrients (nutrients required in smaller quantities) like Cl, Fe, B, and Mn to the soil. Composts have the additional benefit of suppressing soil-borne plant diseases, if applied on a regular base. Compost from plant material applied in the planting furrows can reduce Rhizoctonia infestation.
Compost must be sufficiently decomposed and free from potato diseases. This requires proper composting (for more information see chapter 2.3.3). Waste potato tubers and diseased potato crops material should not be mixed with other composting materials. Instead, they should be dug deep into the ground to avoid further plant infections.
If commercial organic nitrogen fertilisers are used, only fertilisers with quick mineralisation of nitrogen should be used (such as finely ground field beans). These fertilisers should be applied at time of planting, or at the latest when hoeing the crop for the first time. Due to the high costs, commercial organic nitrogen fertilisers are only recommended, if not enough nitrogen from green manures or farm manure is available.
In European organic certification schemes the use of mineral potassium fertiliser is only allowed in organic production, if deficiency in the soil is proven by soil analysis. Potassium is best applied as sulphate of potash, as potatoes are susceptible to chloride toxicity.
Lime should not be applied to potato, as it increases the risk of scab infection. When the soil is very acid (pH below 5.5) lime should be applied on the previous crop.
Magnesium is particularly important (primarily on lighter soils that may not supply enough magnesium), as are boron and manganese for good yield and quality. Soil analyses show whether there is a deficiency of these nutrients in the soil or not. In European organic agriculture certification schemes the use of leaf and trace element fertilisers must be documented by the farmers, e. g. by performing soil or leaf analyses.
In order to increase the plants’ resilience and soil fertility, some organic farmers use plant strengtheners and tonics. Examples are whey, stone meal, compounds with microorganisms, herbal extracts, compost teas or herbal teas. In many cases, the effect and mode of action have not yet been studied or clarified, and the resulting yield increases have not been scientifically proven.
The fertilizers are best applied before or during soil preparation, as it is then possible to incorporate them well into the soil. If the fertilizers are placed just beneath the seed tubers, the high concentration of nutrients around the tuber can burn the tubers. Furthermore, the potato plant will produce less roots to access the nutrients and will therefore be less drought resistant.
Discussion on fertilisers and other nutrient sources for potato
Ask the farmers, what farm-made fertilisers they use, and what other organic (commercial) fertilisers are available. Evaluate the fertilisers based on their compliance with organic agriculture principles, fertilising quality, price, and other criteria. Discuss with the farmers their experiences with these fertilisers. Mention other fertilisers that have not been mentioned, such as green manures or compost maybe. Determine the acceptance of new nutrient sources among the farmers.
Weed management
Mechanical weeding
Until the closure of the canopy, the potato tolerates little competition from weeds. This means that weed-free conditions must be sought until then. Direct weed control as a complement to preventive measures in organic potato production is usually carried out using mechanical methods. The use of herbicides for weed control is not allowed in certified organic farming. Thermal weed control with flame weeders would be too cost intensive in the context of Cameroon. If mechanical weed control carried out properly, manual weeding is usually not necessary.
Preventive measures
Preventive measures in organic weed management include proper soil cultivation (tillage), the selection of competitive varieties with rapid youth development and strong leaf formation and weed-suppressing crop rotation design. Especially effective against weeds is the cultivation of green manures.
Hilling
Weed management in organic potato production is closely linked with hilling. Hilling serves to cover the tubers and stolons with soil to prevent toxic green tubers, protecting the tubers from pests such as the potato tuber moth, and at creating large and stable ridges to encourage production of new tubers. Moving soil for hilling furthermore breaks-up the soil surface and improves aeration and water infiltration into the ridges. This leads to better mineralization of organic fertilizers and improves nutrient availability for the plants. At the same time, hilling controls weeds until the crop-canopy covers the soil.
Weed control is important, as weeds can compete with the potato for light, nutrients and water. If weeds are not removed, crop yields can be severely reduced, and diseases and pests can be encouraged. Thus, weeding and hilling or ridging are two important operations after planting of potatoes. Strong leaf growth based on good nitrogen supply leads to early crop covering and thus better weed suppression.
In Cameroon, most smallholder farmers will use the traditional hoe for hilling. Hilling, whether it is done with a hand hoe or a machine, should be executed with care, as it can damage the delicate root hairs of the potato plants at the sides of the ridge, and can lead to damage on the leaves, stolons and small tubers, reducing yield. Roots and leaves may then offer ways for diseases to enter the plant. Any mechanical weeding work should always be carried out when the soil is sufficiently dry to avoid damages to the soil structure. Preferably, hoeing is carried out in the evening, when the potato leaves are upright, as it reduces the risk of covering them with earth.
Standard tools
Traditionally ridging is done with hand-hoes in Western Africa. Mechanically equipped farmers will use a tine weeder, disc harrow, ridge harrow, rotary hoe or rotary hiller for hilling and weed management. The rotary hoe makes well-covered ridges, but is not applicable on very stony soils, and is less suitable for ridging at the end of the rows. The rotary hiller makes well-covering ridges, but causes greater soil disturbance with risk of capping. It is only recommended for difficult, cohesive soils. Ridge-shaping boards may be recommended for the last tilling round. Hoeing equipment with rigidly mounted duckfoot-blades should be employed only when there is no risk of damaging potato roots. Multi-purpose devices exist that complete harrowing, earthing up and possibly hoeing in one operation.
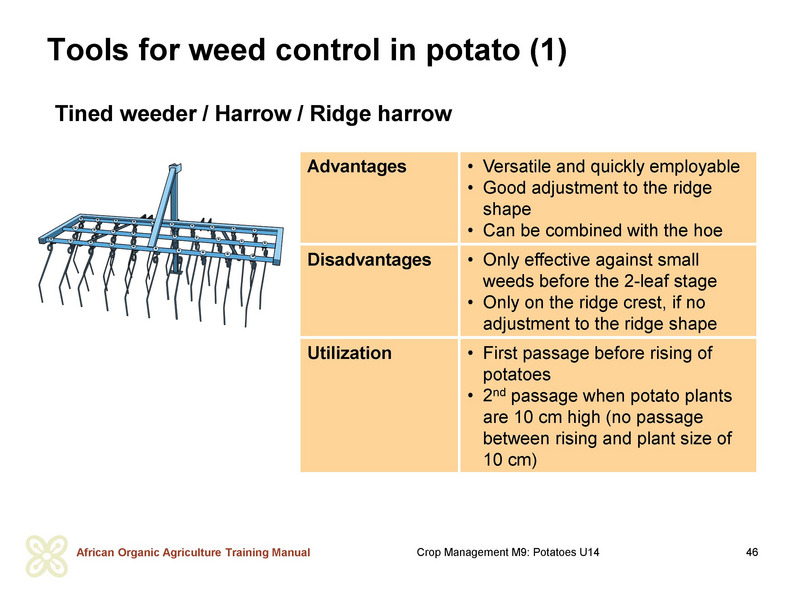
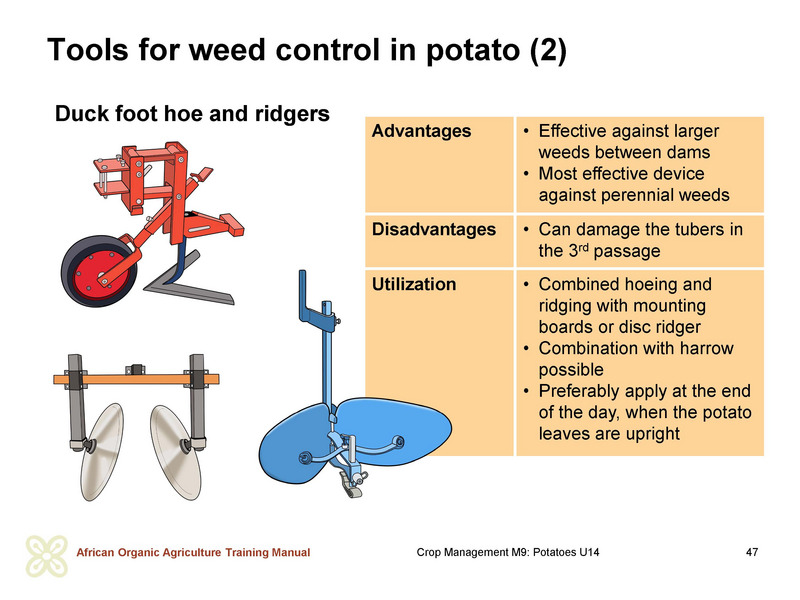
Procedure
From a weed management perspective, the ideal time for weed control is before the weeds become visible (in the white-thread stage /pre-emergence); at the latest when the weeds reach the two-leaf stage. Going through the rows with a tine harrow before emergence of the crop (blind harrowing) provides early first control of weeds.
Newly emerged potato plants are sensitive and should not be hilled or harrowed. Potato crops are usually hilled twice: a first time when the plants are hand-high, and a second time 3-4 weeks later. If the hilling is carried-out properly, weeds are effectively controlled. In the context of Cameroon, the measure of ridging is usually sufficient to control weeds. At the first hilling, the soil is pulled-up gently around the potato plants building homogeneous ridges. Plants with leaves of more than the size of a fist should not be covered anymore. After the first hilling, the height of the ridges should be around 30 cm. At the second hilling, soil is moved from the furrows to the top of the ridges.
In case of mechanical weed management, only light tractors with narrow tyres should be used for driving though the crop, to avoid compaction of the ridges.
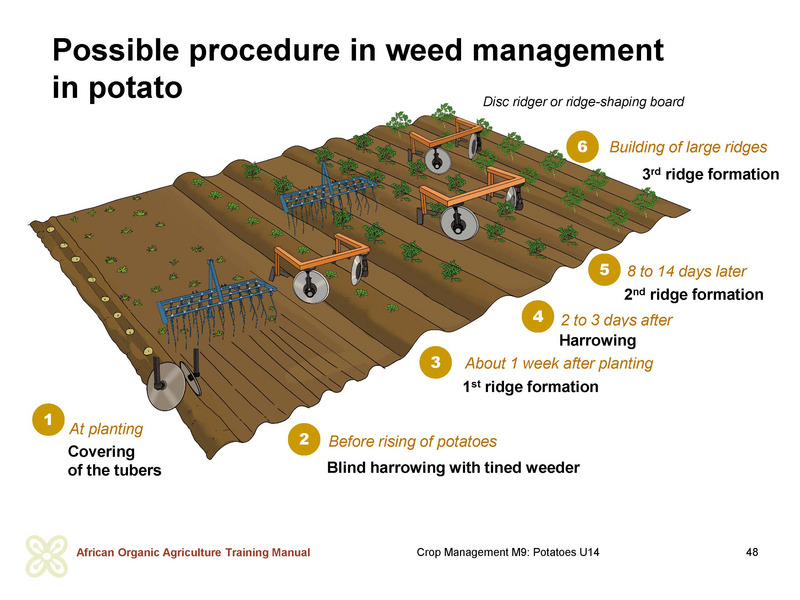
Discussion and demonstration
Invite the farmers to share their experiences related to weed management. Draw conclusions together on principles for weed management. Add information, if important aspects have not been mentioned.
If possible, take the farmers to a potato field and show them, when weeds are best controlled and how damages to the crop can be avoided.
Irrigation
Adequate water supply is essential in all growth stages for optimum potato yields, tuber quality and yield security. A potato crop needs, depending on the growth stage, about 20 litres of water per m2 per week. Due to the high water requirements of the crop, most farmers in Cameroon grow potato from March to June, when rains are regular and moderate. However, farmers with access to irrigation water are recommended to grow potato in dry periods instead of rainy seasons, as the risk of late blight infection is strongly reduced. Higher prices of potatoes may refund investments in irrigation equipment in a long term.
An elevated soil organic matter content contributes to a higher water retention in the soil and, as a result, to a higher water use efficiency. Therefore, medium and long-term investments into soil fertility including green manuring, composting, growing cover crops and mulching are relevant also if irrigation is available.
Water requirements of potato
- If the crop is cultivated in the dry season or in areas with low or irregular rainfall, it depends on regular irrigation, especially on lighter soils. In case of irregular rains, a rain collector will show how many litres have fallen with rains onto one square metre.
- Dry soil during early crop development promotes a wide root system. Dry periods during tuber formation result in reduced tuber formation and thus in yield and quality losses. On the other side, very wet soil at tuber initiation can promote powdery scab (S. subterranea) infection through lenticels and occasionally through eyes or wounds.
- Early irrigation promotes biological mineralisation of organic matter and, thus, improves nitrogen supply from the soil. After stem elongation has started, the soil should be kept moist, otherwise tuber formation might start too early and more than one generation of tubers might form.
- During tuber growth, sufficient soil water content is crucial for yield production, especially from 3 weeks after flowering until maturation. Sufficient soil moisture at the time of tuber formation (initiation) prevents common scab infection (S. scabies). Sufficient soil moisture during tuber development reduces secondary growth and growth tears, and leads to uniform cooking quality.
Irrigation systems
Drip irrigation is the most suited and most effective irrigation technique, as it reduces the humidity in the canopy minimising the risk of blight infections and saves water. Furrow irrigation is not recommended, as potatoes are very sensitive to waterlogging and bacterial diseases as bacterial wilt and blackleg are dispersed and favoured. Furrow irrigation also increases soil silting, damages the ridges, requires large amounts of water, and distributes water unevenly.
Visit to a farm with irrigation
Take the farmers to a farm with irrigation and use the occasion to discuss advantages, risks and possibilities of different irrigation systems.
Procedure
- From tuber formation to flowering, the water content within the ridge should be kept to a minimum of 50 % of the field capacity (field capacity being the amount of water held in the soil after excess water has drained away and when drainage ceases). This usually takes place 2 to 3 days after rain or irrigation.
- Depending on the soil and the development stage of the potato crop, the irrigation rates are 20 to 35 mm per application. The soil should not be filled up by the sprinkler application to more than 80 to 90 % of the usable field capacity to avoid losses of water and drainage of nutrients. This means the soil should never be completely saturated with water.
Pest and disease management
Management of pests, diseases and weeds is a challenge for most farmers in Africa. The wide diversity of pests and diseases, limited knowledge on the characteristics and the cycles of the pathogens make it difficult to choose the right preventive and direct control measures. Farmers need to know, which pathogens create damage in the fields. Proper determination of the pathogen is the first step to effective pest and disease management.
Limited knowledge on suitable organic pesticides and limited access to these pesticides due to financial and availability constraints pose challenges to pests, diseases and weeds control. To avoid major crop losses, the farmers should be able to implement affordable and effective measures without substantially increasing the production costs or harming beneficial organisms in and around the field.
Organic farmers put a lot of attention into preventing spreading and multiplication of pests and diseases applying proper crop management. Effective prevention minimizes costly direct control measures. Ideally, pest and disease management requires minimal extra cost and uses techniques, which are easy to prepare and apply, are effective under local conditions, safe to handle and have minimal or no negative effect on other organisms, on water, soil, air and agricultural products.
Three-step approach
Organic farming orients itself at a three-step approach for pest and disease management, where each step builds the foundation for the next one: step 1: soil and crop management; step 2: habitat management; step 3: direct control. The aim is to optimize the first and second step practices that encourage natural self-control of pest and disease pathogens, and to minimize the direct control measures.
As for pest and disease management in general, an integrated systems approach should be taken for control of pests and diseases in potato production, too. Such an approach makes use of (i) resistant/tolerant varieties, (ii) available agronomic control strategies such as crop rotation with consideration of required cultivation breaks, and an optimized cultivation system, (iii) alternative treatments (e. g. organically-based pesticides, plant ‘strengtheners’ and bio-control agents which can replace synthetic and copper-based fungicides) and (iv) optimisation treatments utilising forecasting systems (if available) with the aim of maximising synergistic interactions between (i), (ii), (iii) and (iv).
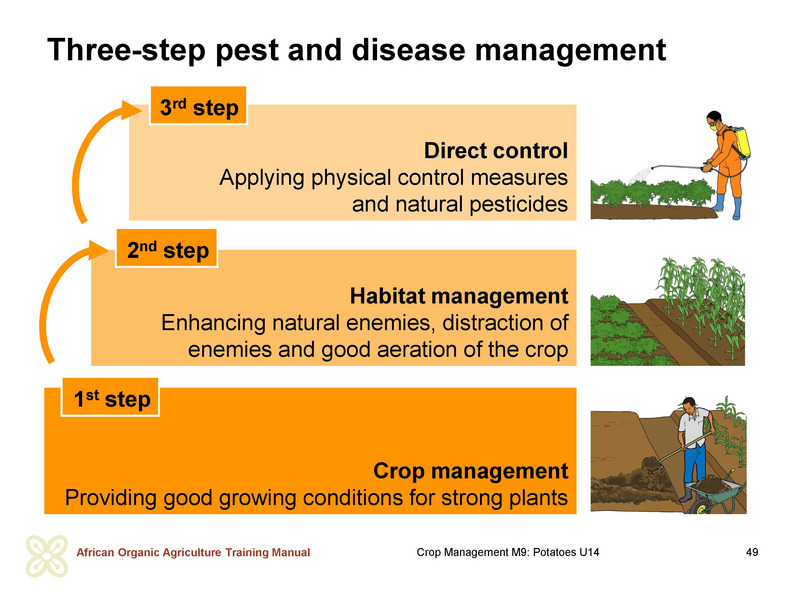
Major potato diseases
The major potato diseases in Cameroon are Late blight, Bacterial wilt and Black leg.
Late blight
This important disease is caused by the fungus Phytophthora infestans. It regularly infects plants from the tuber initiation stages up until harvest, and often causes high yield losses. Infections are encouraged by rainfall, high humidity and low temperatures. This disease acts very quickly. If it is not controlled, infected plants will die within two or three days.
Symptoms
Symptoms include brown spots, partly looking oily with a blurred, light green transition to healthy tissue, on the upper side of leaves and on stems. On the underside of the leaves grey / black spots are found, and white fungal growth (looking like flour) after rain or morning dew (especially on the edge). During dry weather the fungal growth can be cultured by keeping the leaf in a wet bag overnight to form the white mycelium and facilitate identification. Severe infections cause all leaves to rot, dry out and fall to the ground, stems to dry out and plants to die. In case of heavy rainfalls the spores from leaves can be washed into the ridges and infect tubers. These turn brown and exhibit wet and dry rots. The flesh of cut open tubers is brown, too.
The disease is not to be confused with ‘sun burn’, early blight (both have no transition zone around the leaf spots) or grey mould (grey fungal growth on the surface /underside of leaves).
Source and spreading
The initial infection of the leaves can be brought on by (latently) infected planting material, volunteer potatoes or tubers on compost heaps, or it can be brought in by wind from a greater distance. Tubers are infected through seepage of spores from infected leaves, or smear infection during harvest.
Transmission of spores by air occurs when the relative air humidity is over 90 % and the temperature is around 18 °C. In order for the spores to infest the plant, drops of water are needed on the surface. The leaf wetness is therefore an important factor in the development of the disease. If the infection is very likely, the fungus can infect an entire crop within a few days. Depending on the weather conditions, it takes between 2 to 3 weeks and 2 months for the plants to die off after initial infection. In dry weather, the infection stops spreading; in wet weather, it increases.
Management
Prevention:
The best prevention measure is
- The use of resistant or highly tolerant varieties with fast tuber growth. In order to reduce the risk of breaking the resistance of individual varieties, different varieties should be cultivated in separate rows. More susceptible varieties should be cultivated on the side of the field downwind of the prevailing wind direction. Alternating cultivation in rows of susceptible and less susceptible varieties can delay the spread of the disease.
- Planting of healthy looking tubers reduces the risk of early outbreak of the disease. Pregermination of seed uncovers infected tubers, as they will start to rot during pregermination and can be removed and disposed. Pregermination also shortens the period to harvest. Discarded tubers should be composted at 60 °C or buried in a deep hole and covered with soil.
- Choose well-ventilated locations that allow the crop to dry off quickly after rain or dew.
- Avoid narrow spacing, as it will increase humidity in the plant stand and support late blight infections.
- Planting a strip of at least 12 m of a different crop such as maize perpendicular to the prevailing wind direction delays the propagation of the disease, too.
- Avoid over-supply of nitrogen, which makes the plants more susceptible.
- Avoid heavy weed infestation to allow faster drying of the crop.
- Avoid volunteer potatoes in the succeeding crops. Pigs can be good at removing groundkeepers.
- Remove potato plants from waste heaps or cover them with soil.
Containment of the disease is most likely to be possible in the early stages of infection. Hence, the crops should be checked for the typical symptoms every two days in the morning. Any infected individual plants or stoves identified must be pulled out and burnt or buried.
Timely dehaulming (cutting back foliage when tubers reach their optimum size) can help prevent disease moving from foliage to tubers or to surrounding potato plants.
Preventive protection:
In practice, plant strengtheners, such as rock dust, tithonia, skimmed milk or whey and compost tea, are often used to protect the potato crops against late blight and control the disease. According to practical experience, rock dust supports the drying of the leaves. However, scientific tests by FiBL could not prove a sufficient efficacy of these agents for control of foliar blight. Under conditions with limited humidity (and thus moderate disease pressure), and in tolerant varieties the use of stone meal or tithonia or compost-tea may be sufficient.
In Cameroon, many farmers use home-made plant protection products, based on macerated leaves of papaya, tithonia, wood-ash, charcoal or other source materials. Soap and neem are frequently used as insecticide. Commercially available effective micro-organisms (EM) are used by some farmers as an all-round plant protection agent. The efficacy of these products (but for soap and neem) is not proven. Application of a mixture of stinging nettle and Omo (the commercial laundry detergent) was partially effective in Kenya.
The most effective plant protection product organic farmers have available against late blight is inorganic copper. Copper provides long-lasting protection to plants against different fungal and bacterial diseases such as late blight.
However, copper has a major inconvenience: As a heavy metal it is accumulated in the topsoil, and acts in high doses toxic to microorganisms and earthworms in the soil. Thus, it can also inhibit microbial nitrogen mineralization, which is important in organic farming. Copper is also toxic to fish and livestock, as causes acute gastrointestinal disturbances to humans. The long-term future of copper for use in certified organic farming for blight control is uncertain. Alternative active substances have been researched for years. First effective products may be available in the coming years (maybe not as fast in Africa).
Copper-based products are registered and available in Cameroon. However, copper has not been used by potato farmers in Cameroon, so far.
Different preparations of copper exist with copper contents between 20 and 50 %. In organic farming copper hydroxide and copper oxychloride are commonly used. Combinations of both also exist. The various copper formulations show hardly any differences in effectiveness. A traditional copper product is Bordeaux mixture, which is a combination of copper sulphate, lime, and water. Bordeaux mixture is known to adhere very well to plants in rainy weather, but leaves a blue-green discoloration on plants. Bordeaux mixture is commercially available in premixed packages, or it can be mixed individually.
The effectiveness of the Bordeaux mixture depends on its correct preparation. For making the mixture dilute 100 grams of hydrated lime (or builders lime – i.e. the lime used for mixing cement) in 5 litres of water until the lime has fully dissolved into the water. Then, dilute 100 grams of copper sulphate in approximately 5 litres of water. Gradually pour the diluted lime into the 5 litres of diluted copper sulphate while mixing both well. This procedure results in 10 litres of ready to be used Bordeaux mixture. Only prepare the amount of mixture that will be used subsequently. The spray solution should be used soon after you prepare it, since the mixture will deteriorate upon standing. If a wetting agent is added to a copper preparation, e.g. pure soap without additives, the amount of copper can be reduced.
Copper must always be applied preventively, meaning before infection and before rains. It can protect healthy plants, but cannot heal infected plants. After infection, the fungus cannot be stopped from spreading through the plant. The affected plants must be removed and the protection of healthy crops must be increased. With all copper sprays, an even copper coating on the upper and lower side of the leaves is essential to give plants the desired protection. The spray liquid must cover all plant parts to ensure good protection. This can be achieved with manually operated back sprayers, motor sprayers or tractor operated sprayers. 400 to 1000 litres per hectare should be used to ensure good wetting.
As long as no infestation is detected in the region at a radius of about 50 km, no treatment is necessary. Applications need to be started as soon as symptoms are reported in the region. When late blight occurs in the region, but no infection is visible in the neighbouring and own fields, protection of the crop with a reduced dosage of 200 to 300 g of pure copper per hectare is in general sufficient.
Measures in case of infections:
As soon as late blight occurs in the own or neighbouring fields, the dosage of the treatments must be increased to 800 to 1000 g of pure copper per hectare.
In addition, the diseased plants must be rogued by removing the stems and foliage within a 3 m radius of the infection, leaving the tubers in the soil. Remove the leaves and stems from the field and bury them in a hole.
If at least 30 mm of precipitation has fallen since the last application, or if many new leaves have been formed since then, the coating must be renewed. The treatment should be repeated after one week at the latest.
Harvest the tubers of the rogued plants after 2 to 3 weeks. This allows the skin of the tubers to set, reducing the risk of infection from sporulating leaves during harvest.
The maximum permitted copper application rate per hectare and year in certified organic farming schemes is between 2 and 6 kg of pure copper per hectare and year.

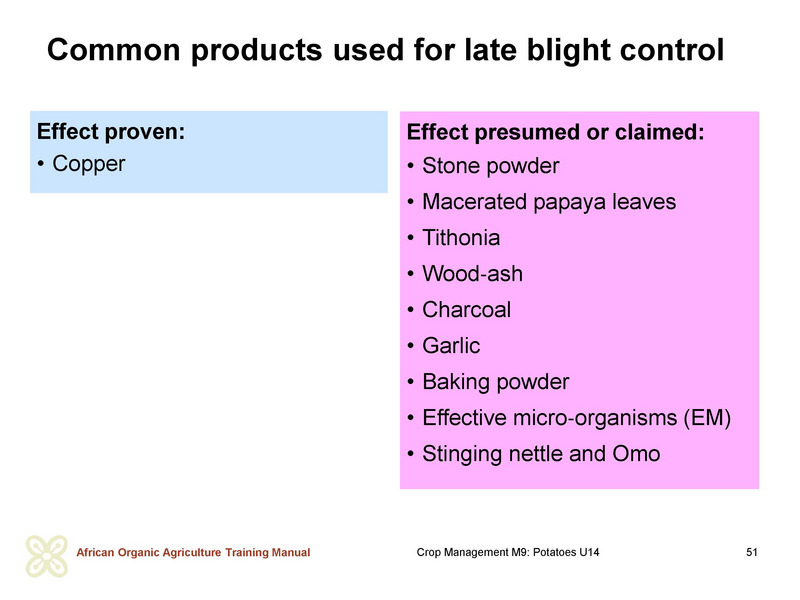
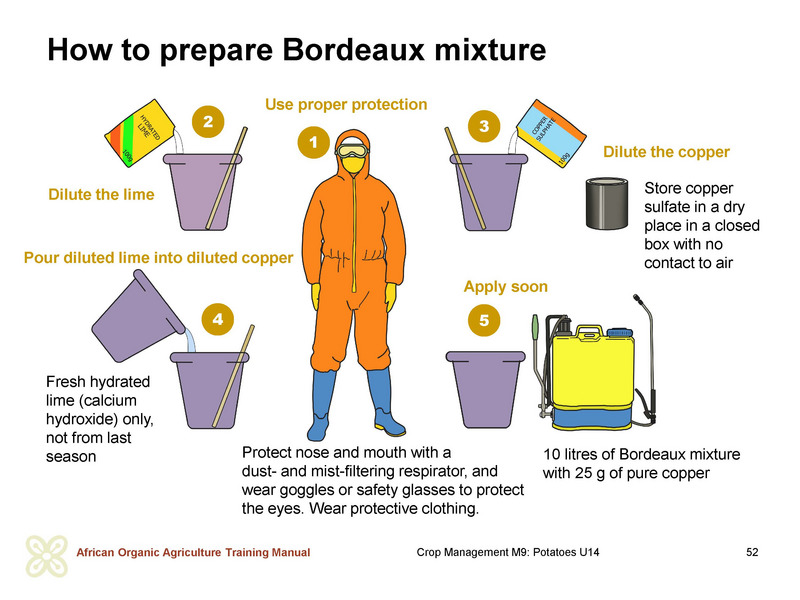
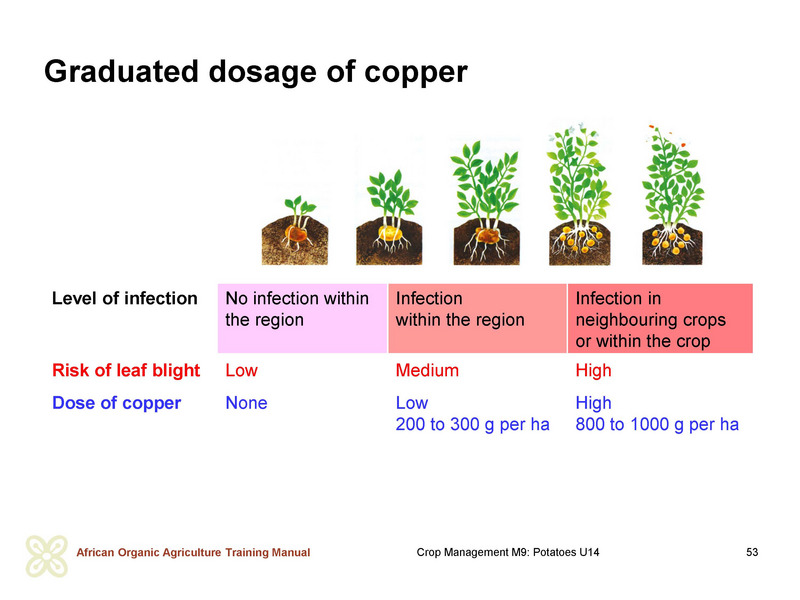
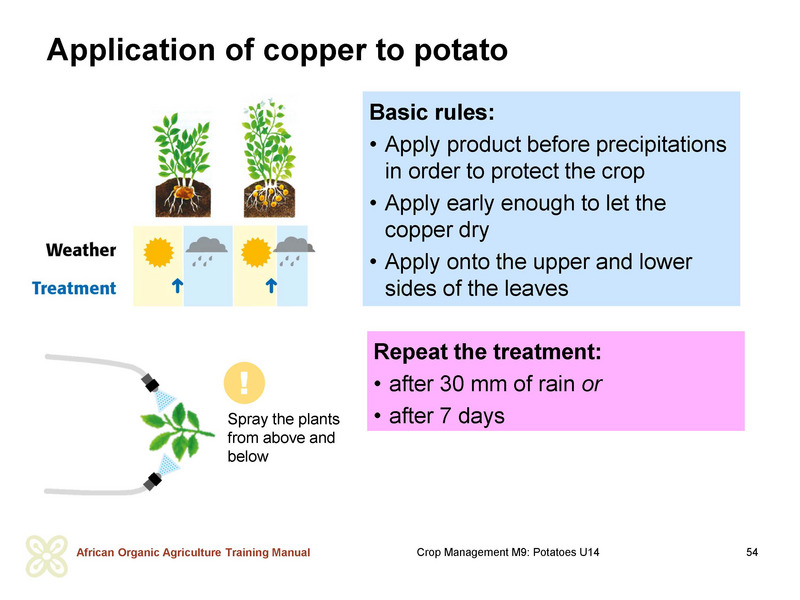
Bacterial wilt
Bacterial wilt is caused by the bacterium Ralstonia solanacearum (formerly known as Pseudomonas solanacearum). This disease is extremely dangerous, especially in regions where potato is cultivated intensively. Besides potato the pathogen also infects other crops of the nightshade family such as chili, tomato, tobacco, black nightshade and eggplant. It also spreads on several weed species. In some areas, it is the biggest cause of reduced production.
Symptoms
This disease causes rapid wilting and death of the entire plant without any yellowing or spotting of leaves. All branches wilt at about the same time. The first visible symptom is a wilting of the leaves at the ends of the branches during the heat of the day and often in the afternoon. At night, wilted leaves recover. The reason for the wilt is the interruption of the water supply of the plant, as the bacteria inside the plant clog the vascular bundles. As the disease develops, a brown coloured ring is visible due to rotting of the vascular ring, when stems are cut. The leaves develop a bronze tint.
Mildly infected tubers do not show any outward signs of disease, but when a tuber is cut in half, black or brown rings will be visible. If left for a while or squeezed, these rings will exude a thick white fluid. Soil sticking to tuber eyes when crops are harvested is a typical sign, too. Serious infection causes tubers to rot. Characteristic rot caused by bacterial wilt produces very bad smell.
Source and spreading
Bacterial wilt can be spread quickly over water, soil, plants, plant parts such as seed tubers and rogue potato plants, cutting tools, livestock and people, and be transferred to healthy plants. But is can also be transmitted from other crop or weed plants that can host bacterial wilt. Bacterial wilt can survive in soil and water without a host for several years. Therefore, rotation is not effective against bacterial wilt. Infected tubers must not be stored or used for seed, as the disease will spread rapidly in the warmer temperatures in storage areas, and will cause tubers to rot.
Management
To the day, no organic plant protection product for controlling bacterial wilt is available. Therefore, the disease needs to be managed through cultural practices. An essential element is prevention of disease development on a farm. This includes (i) using healthy (certified) seed only, (ii) using resistant varieties where available, (iii) maintaining a proper crop rotation with non-nightshades, (iv) regularly applying compost to the soil.
If bacterial wilt is observed on a field, further development and spread of the disease in the field must be prevented by: (i) careful removal and burning of infested plants and tubers to reduce spreading of the disease from plant to plant, (ii) spreading dolomitic lime around infected plants to increase soil pH; (iii) no cultivation of potatoes or other nightshades on these fields for several years (in serious cases for more than 10 years), (iii) as bacterial wilt spreads rapidly in flooded fields, avoid watering the field or try to make sure water does not flow over the infested surface of the field by digging channels that allow water to flow around it, (iv) not using water contaminated with bacterial wilt to irrigate the crop, (v) disinfecting farming tools after use.
Although crop rotation is not sufficient to control bacterial wilt, the disease incidence can be reduced, if cultivation of non-susceptible crops such as cereals is combined with other control measures.
The earlier bacterial wilt infections are detected, the better. Therefore, farmers are recommended to observe their potato (and other nightshade crops) for symptoms of bacterial wilts from 35 days onwards.
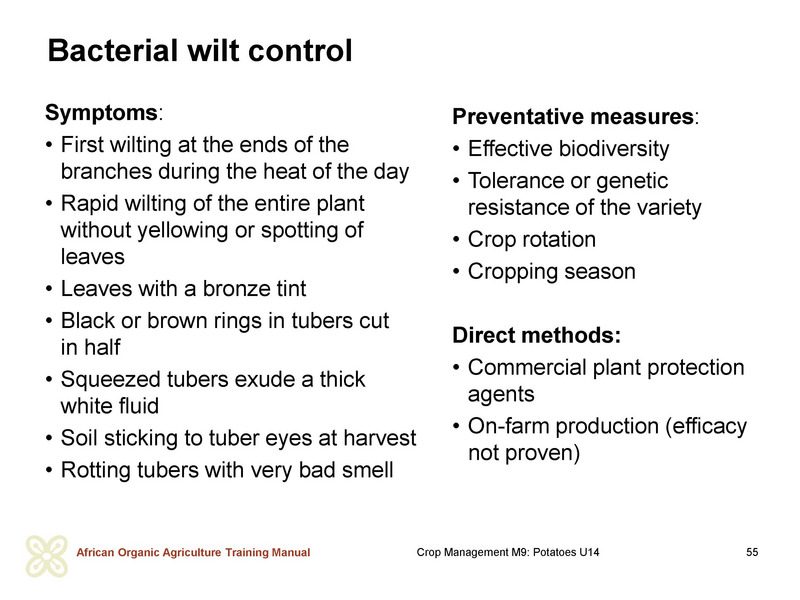
Black leg and soft rots in tubers
Blackleg disease of potato is caused by several species of bacteria that are transmitted through the tubers (Dickeya ssp., Pectobacter ssp. and other). The disease can cause severe economic losses to the potato crop. However, the occurrence of blackleg depends very much on the growth conditions, particularly temperature and rainfall after planting. As the Blackleg disease is also a bacterial disease, just as bacterial wilt, symptoms, life cycle and management are similar.
Symptoms
Early blackleg develops soon after the plants emerge. Foliage is stunted and yellowish and has a stiff, upright habit. The lower stem is dark brown to black and extensively decayed. Infested young plants do not develop further and die.
Blackleg may also develop later in the growing season. First symptom is a black discoloration of below ground stems, followed by rapid wilting and yellowing of the leaves. Entirely diseased stems decay, become desiccated, and are often lost from view.
Source and spreading
The bacteria are mostly spread via seed tubers. Soft rot forms when the conditions for bacteria to thrive are optimal with sufficient water and the resistance of the tuber can be overcome. Healthy tubers are rarely infested. At storage, dormant infection can spread after the tubers have been washed or are stored in plastic bags (due to warm and humid conditions).
Bacteria thrive in cooler wet conditions. Infection is promoted by tuber blight (dry rot), tuber damage by millipedes, Tuber moth, tools, impact or waterlogging.
The disease can be controlled through good hygiene. Control measures, which reduce bacterial contamination on seed tubers, also reduce the risk of soft rot and black leg.
Management
Prevention measures include (i) use of healthy seed only, (ii) promotion of quick emergence, (iii) prevention of tuber blight, (iv) avoiding waterlogging and over-irrigation, (v) maintaining proper crop rotations with recommended intervals between nightshades.
Harvesting the crop as early as possible, when tubers have developed a stable skin limits risk of spreading. At harvest, mechanical damages must be avoided. Potatoes should be completely dry before storage. This is done by leaving the potatoes in the open air a few days before storage. Tubers should be stored in dry environments only. Sweating and moisture condensation during storage and transport must be avoided, as this promotes germination of spores. For ventilation, dry air should be used.
In case of infection, spreading of the disease into healthy fields should be avoided using clean machinery only. Cleaning of the grader prior to grading of harvested potato limits spreading of infection during sorting. Infested tubers should be marketed unwashed.
Viral diseases
Reduced potato yields can be due to low soil fertility and insufficient plant nutrition. However, it can also be due to virus infection. Potato is affected by different viruses, one being the Potato Leaf Roll Virus (PLRV). The symptoms on the plants after infection vary depending on the virus, ranging from leaf mottling to mosaic appearance of the leaves and crinkling to dwarf growth. Heavily infected plants will give a poor crop of small tubers. In mild infections, plants often show no signs of disease at all. Therefore, virus infections are underestimated by most farmers because the viruses are not visible by eye, and the plants rarely die.
The viruses are transmitted by aphids and other sucking insects such as thrips, mites and whiteflies, and with infested tubers. Aphids spread the disease within the field and from one field to another. Mechanical transmission through tools is also possible, but secondary compared to transmission by aphids. Some viruses like PLRV also infect other nightshade crops and weeds such as tomato, tobacco and jimson weed.
Often virus infection is due to continuous re-use of farm-own planting material, transferring infection from one crop to the next with infested seed tubers. When farmers select the smaller tubers for seed, and the chosen tubers are those already infected with viral diseases (leading to smaller tubers), the risk of transmission of the pathogens is increased.
As symptoms appear during the early stages of potato growth, observations should begin when the plants rise, walking along the raised seedbeds and looking for plants showing symptoms of the disease.
Management principles are nearly the same for all viral diseases. Viruses can be controlled by (i) Using virus-free seed tubers; (ii) Using resistant varieties where available; (iii) Uprooting infected plants to reduce spreading of the disease within the field, and destroying them. Maximum effectiveness is obtained when removing all the plants in a radius of 1 m around the diseased plant. This is particularly important in seed fields. Controlling nightshades and volunteer potatoes on own and neighbour fields, because these plants can be reservoirs for the pathogen; (iv) Avoiding overlapping of potato crops; and (v) Controlling sucking insects as the main vectors of the viruses spraying.
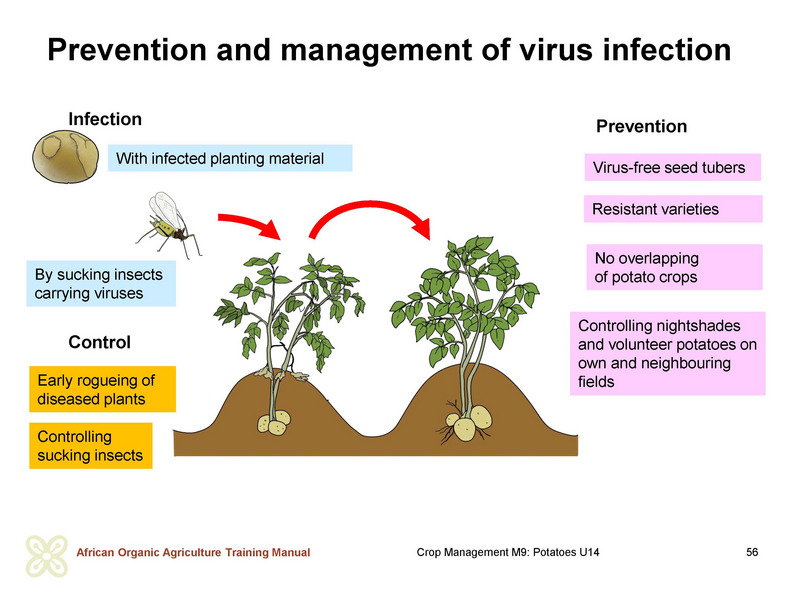
Major potato pests
Potato Tuber Moth
The Potato Tuber Moth (Phthorimea opercullella) is the most serious pest of potatoes in Africa. The small butterfly occurs wherever potatoes are grown. Besides potato, the insect also attacks tomatoes and other nightshades. The damage is caused by the larvae of the moth (caterpillars) that make tunnels in the potato tubers.
The female moths are active after sunset and at dusk and lay eggs onto sheltered places of leaves and stems of the potato plants and near the eye buds of exposed tubers through cracks in the soil or in the store. The moths also lay egg on potato buds during pre-sprouting and on bags with potato tubers in the store. One female lays up to 200 eggs.
When the whitish to later pale greenish caterpillars hatch from the eggs after 8 days, they feed below the upper skin layer of the leaves and stems and bore their way to the tubers, where they make long, irregular black tunnels filled with excreta. Caterpillars hatching from egg that were laid onto tubers begin feeding on the tubers immediately upon hatching. In the feeding tunnels disease-causing fungi, bacteria and mites develop. The tubers start to rot and develop an unpleasant smell. Infested tubers cannot be used for human consumption anymore.
When the 15 mm large caterpillars have fed enough after about 2 weeks, they pupate in a cocoon covered with soil particles and debris among dead potato leaves, soil litter, eyes of tubers. In storage the pupae are found between tubers, in the entrance to the larval tunnels, and on the walls and floors of the storage room.
At harvest, the pest is transferred with the tubers from the field to the store, where it can reproduce and infest other tubers. Stored infested tubers can result in destruction of the entire crop at storage. Between potato crops, the pest survives as pupae in the soil, or in discarded potatoes left in the field at harvest.
The tubers are attacked when they grow larger and come nearer the soil surface. At this time, the soil cracks and the larvae move from the foliage to attack the tubers, and to lay eggs on or near them. Infestations are worse in heavy soils that crack when dry.
The adult moth is 8 to 10 mm long. The males have fringed brown wings with dark spots, the females have an X pattern when the wings are together. The moths live for up to 10 days.
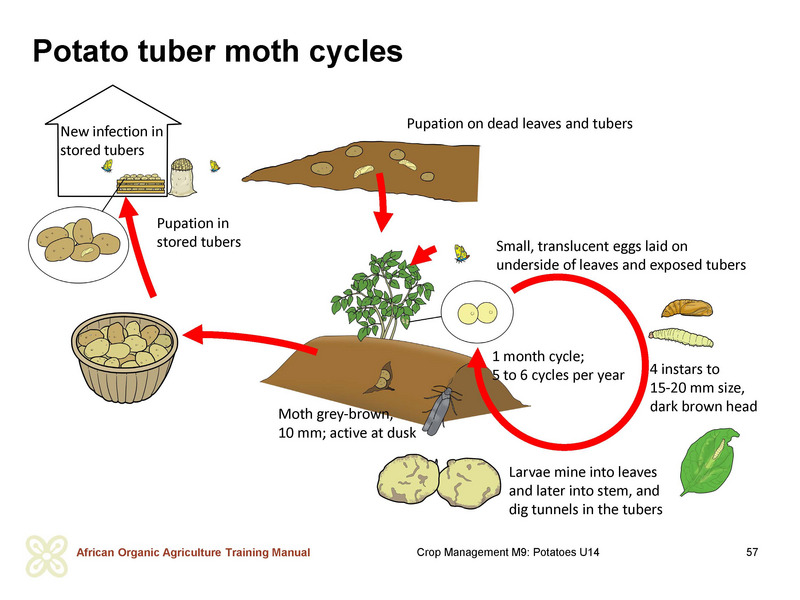
Prevention
Prevention of tuber moth damages includes (i) Use of healthy, clean seed, since infested seed tubers are the main cause of re-infestation in the field; (ii) Avoiding planting into rough soil and too light and loose soil, as it facilitates exposure of tubers.; (iii) Planting at least 10 cm deep; (iv) Ridging at least three times during the growing season creating compact ridges. Compact ridges prevent moths reaching the tubers to lay eggs, and moths emerging from infested tubers to fly off. (v) Keeping the ridges moist to prevent soil cracks until the end of the cultivation cycle; (vi) Targeting an early harvest to avoid late infestation, and harvesting the tubers immediately when ready, as tubers left in the field for a longer period are highly infested. (vii) At harvest, ensuring that the tubers are not exposed to moths before they are properly protected in the store. All harvested tubers have to be stored properly before late afternoon; (viii) Carefully sorting of the tubers before storage removing all tubers with openings or galleries, and destroying all infested potatoes immediately; (ix) Decontaminating the storage rooms carefully before storing new potato tubers; (x) Removing all remaining tubers and plant residues from the field, and destroying all volunteer potato plants before planting new potato crops; (xi) In case of heavy infestation, the crop rotation should be extended to 5 years.
Ladybird, lacewing, and parasitic wasps are important natural enemies of the potato tuber moth. Ladybird beetles prey on eggs and young caterpillars. Larvae of lacewings, big-eyed bugs, ground beetles, earwigs and rove beetles prey on all stages of the pest. Natural enemies can be promoted with promotion of native flower plants that provide food and shelter to the insects. Several parasitic wasps, native from South America, have been introduced to several countries in Africa and have provided effective control of the pests.
Protection
Intercropping potatoes with hot pepper, onions or peas keeps the moths away to some extent. Mulching the ridges with neem leaves during the last 4 weeks before harvest can significantly reduce insect damage.
Treatment of the potato plants with neem during cultivation limits the proliferation of the pest.
At storage, storing potatoes in layers with branches of lantana (Lantana aculeate) or Eucalyptus globulus provide some protection of the tubers. Tuber infestation can be reduced by bedding the potatoes in the leaves of the Peruvian pepper tree (Schinus molle). The tubers can also be sprayed with neem seed extract with 1 kg of neem extract in 40 l of water before they are packed in bags. Alternatively, Bt (Bacillus thuringiensis) powder mixed with fine sand (1:25) dusted controls the pest in the store too. Application of plenty of wood ash or diatomite earth onto the plants prevents rapid build-up of tuber moth. Pheromone traps can be placed in the storage room to confuse the moths.
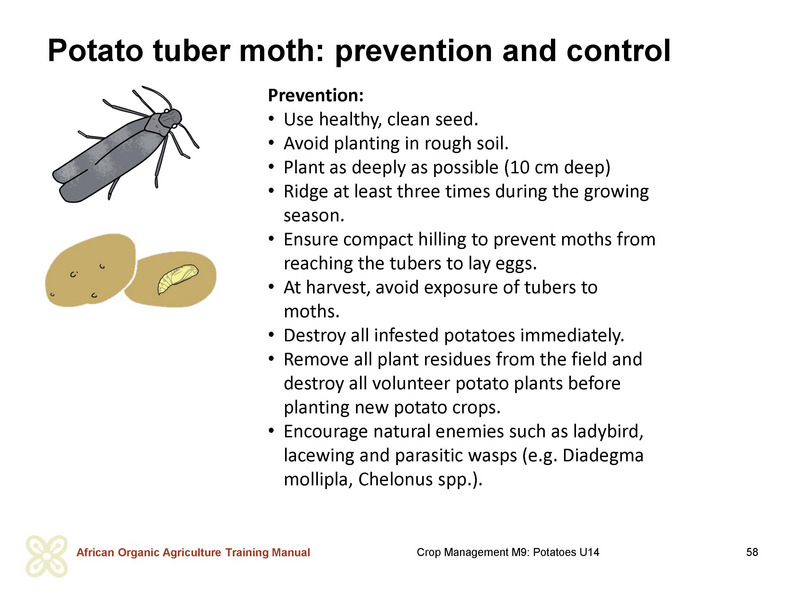
Exchange of experience
Ask the farmers, which pests and diseases they know causing damage in their fields. How do they recognize them? What do they know about their cycles, conditions for propagation, and preventive and direct control measures?
Try to clarify the following questions relating to diseases:
- What is the cause of the disease: is it a virus, a bacterium or a fungus?
- How is it transmitted: by seeds, through the soil, through the air, or through insects?
- Which stage of the plant does it attack: the seedling, the growing plant or the mature plant?
- Which part of the plant is infested: leaves, roots, the stem, fruits, seeds or the entire plant?
- What kind of damage does it cause: rotting, chlorosis, wilting, spotting or other?
- When does it attack: in the dry season or in the wet season?
Try to clarify the following questions relating to pests:
- At what stage of its lifecycle is the pathogen a pest: when it is a larva, a caterpillar or an adult?
- Which stage of the plant does it attack: the seedling, the growing plant or the mature plant?
- Which part of the plant does it attack: leaves, roots, the stem, fruits, seeds or the entire plant?
- What kind of damage does it cause: chewing, sucking or wilting?
- When does it attack: in the dry season or in the wet season?
Dehaulming and harvesting potatoes
The harvesting operation involves destroying the above ground parts (called dehaulming), lifting and collecting the tubers. Time of harvesting of potato varies with cultivar, climate, disease and pest pressure, and maybe price. Uneven soil conditions and leaf blight within a crop often lead to uneven maturation of the tubers. A well-timed haulm removal promotes more even maturation as well as early setting of skin and early maturity. Seed potatoes are harvested early at 80 to 100 days after planting, depending on the variety, to avoid virus infection that may occur in the second half of the growing season. Viral diseases in particular spread to tubers if stems begin to wilt and dry out. The same occurs to other diseases such as late blight, stem rot and bacterial wilt.
Too early harvest can lead to unripe and non-storable potato with a too low starch content, regrowth of leaves and net necrosis. Immature potato tubers have a thin, poorly developed skin, and are easily bruised. This can result in easier infection by fungi and bacteria. Immature tubers also tend to have low dry matter content, and are very perishable and can only be stored for a short period.
Late blight attack is the most common reason for early harvesting to reduce the risk of tuber blight. If the growing period of healthy potato plants is extended, late haulm destruction can lead to higher starch contents, better baking properties and a better flavour.
Dehaulming
The moment for dehauling has come, when the tubers have reached their preferred size for marketing or if no further growth of marketable yield is expected. For example, if a heavy infestation of late blight took place and more than half of the leaf area is destroyed, it is better to dehaulm and preserve the tubers from tuber blight. At dehaulming the tops of the plants are cut manually or mechanically at the base of their stems. If the foliage is healthy, it can be collected and composted. Leaves with disease symptoms must be burnt or composted adequately with frequent turning and thorough heat periods in the pile to kill the disease. After dehaulming the tubers are then given 14 to 21 days to develop matured and hardened skins. Well-matured (skin-stable) tubers are less sensitive to damage and storage rot. The tubers are mature, when the skins are firm and cannot be removed by lightly rubbing the tubers with the fingers.
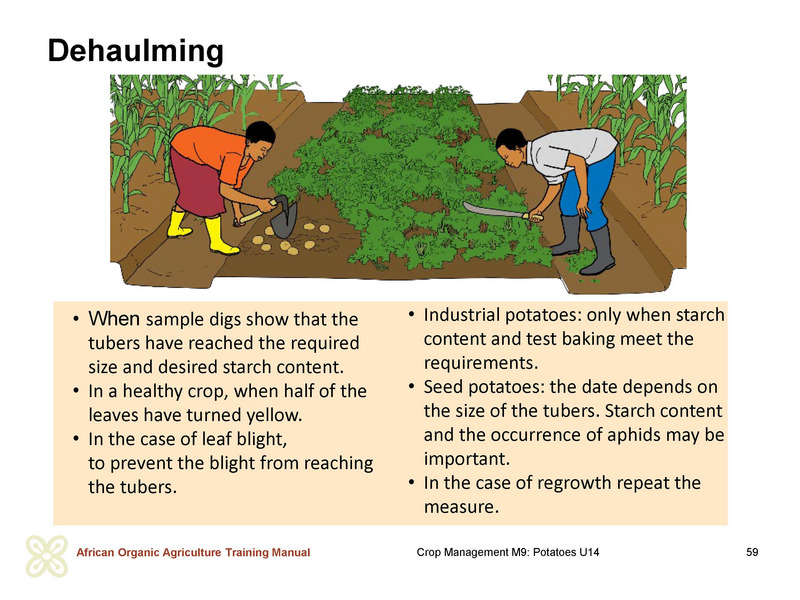
Harvesting
A stable skin of the tubers is the basic requirement for defining harvest readiness. At this stage the harvest should not be unnecessarily delayed, if weather and soil conditions allow safe lifting of the tubers. Delayed harvest significantly increases the risk of impaired quality caused by wireworms, millipeds and Rhizoctonia. On the other hand, incomplete skin stability, rain or wet soil, or very dry soil, a high number of tubers affected by wet rot, are reasons to delay the harvest for a few days. Harvesting requires dry weather and moderately dry soil. If soils are very dry and cloddy, irrigation with 5 to 15 mm of water per m2 can facilitate the harvest.
On most farms in Cameroon, potatoes are harvested manually with hand hoes. Mechanical harvesting is only practiced on large farms using ploughs, spinners or elevator diggers.
Harvesting with hand hoes can result in damaged tubers, which must be sorted out and cannot be stored. Tubers with attached soil are best left on the ground for two hours to let the soil dry out and fall off, as tubers with attached soil can cause them to rot.
Pressure and bruising during harvest, storing, sorting, loading, washing, packing and transporting can result in tuber damage. The damaged spots will only become visible after a few days, when the discolouration takes place. Therefore, careful handling during and after harvest is essential to ensure good tuber quality.
Harvested tubers should be sorted by size and quality, separating healthy from damaged ones, then placed carefully in a box or in a basket. Potatoes should not be thrown from a distance.
After harvesting, the field should be cleaned from remaining plant parts and tubers. Post-harvest field sanitation is an important part of controlling pests and diseases, as it removes potential sources of contamination for the next crop.
 tap and then scroll down to the Add to Home Screen command.