Proper establishment of fish ponds
The first question related to the construction of a pond refers to the size and number of ponds needed:
- If fish production will mainly only serve household needs and the fingerlings will be purchased from a hatchery, then only two ponds will be needed.
- If a fish farming activity is intended that is independent from hatcheries, the farmer will need more ponds: (i) one breeding pond of 10 m x 10 m size and water depth of 50 to 80 cm, (ii) two or three nursery ponds of 2 m x 5 m and water depth of 30 to 50 cm, and (iii) two or three grow-out ponds of 20 m x 20 m or 20 m x 50 m with a water depth of 50 to 150 cm. In addition, it is recommended to have one stand-by pond of 10 m x 20 m and a water depth of 50 to 100 cm for special situations.
The sizes of the ponds depend on the available water per time unit and on planned extension and intensity of the future production.
Practical testing of soil samples
Bring different soil samples along to show the differences in properties. Ideally, bring a sample of clay soil, silt soil and sandy soil along and let the participants apply the different tests.
Site selection for pond culture
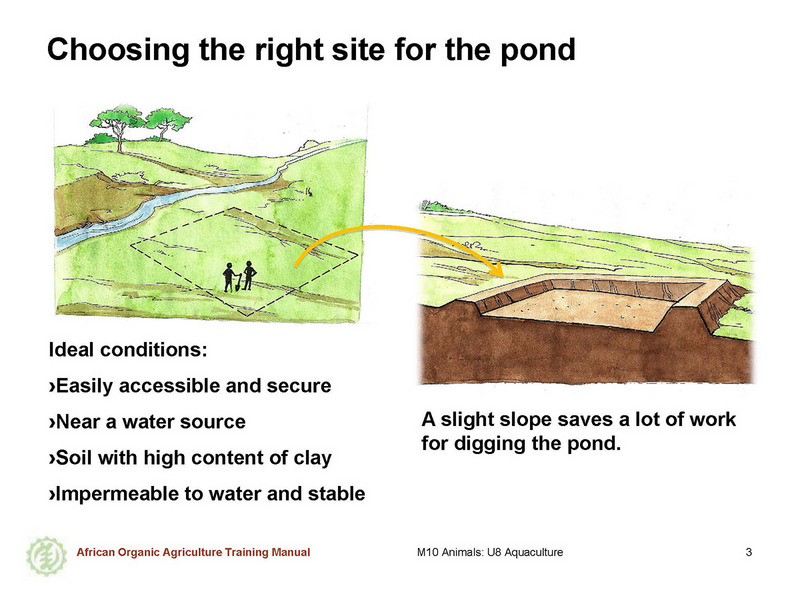
The most common and easiest system to grow tilapia is the earth pond system. Choosing an appropriate location for the ponds is essential to ensure permanent provision of water, minimize construction costs, allow easy management and avoid loss of water through seepage.
- Location - The fish ponds are ideally placed near the home or the village to minimize costs and effort for transport and to reduce the risk of losses from theft. The site should be accessible at all times and not subject to occasional flooding. And the ponds should not be placed next to conventional crop fields where agrochemicals are used, to avoid polluting the pond water. This also applies to the source of the incoming pond water, whether it is a stream or a well. The pond site borders should be protected with ridges, trees or bushes.
- Proximity to a water source - The ponds must be situated in proximity of a permanent water source. The water source can be a spring or a small stream. The minimum amount of incoming water should be about 10 litres per second for a pond of about 100 m x 100 m and a water depth of about 1 m. Water losses by evaporation must be considered. In general the annual water requirement to compensate for the losses by evaporation is nine times the volume of one pond filling. Make sure that the water is available all year round.
- Topography - Ideally the ponds are placed on a slight slope. This will save a lot of digging work to make the pond. A slight slope of 1 to 4 % is advantageous (a 1 % slope corresponds to 1 cm of height on a distance of 1 m).
- Soil properties - The permeability of the soil must be minimal to ensure minimum water losses through seepage. To be water impermeable and remain stable when flooded, the soil must have a high content of clay. A soil consisting of silt, which has the second smallest soil particles, is also mostly water impermeable, but it can become unstable when flooded.
There are three methods to test the suitability of the ground:
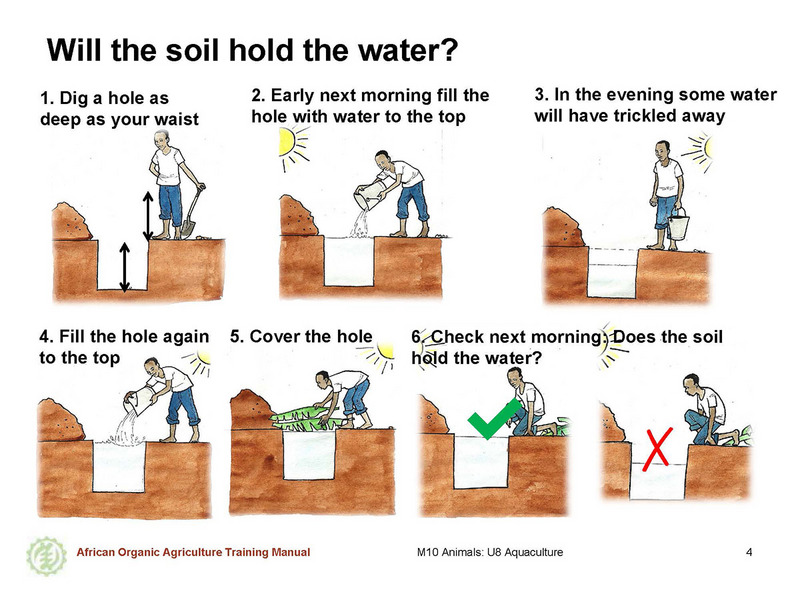
(i) Seepage test - Dig a hole and see, if the soil holds the water overnight to at least 90 %.
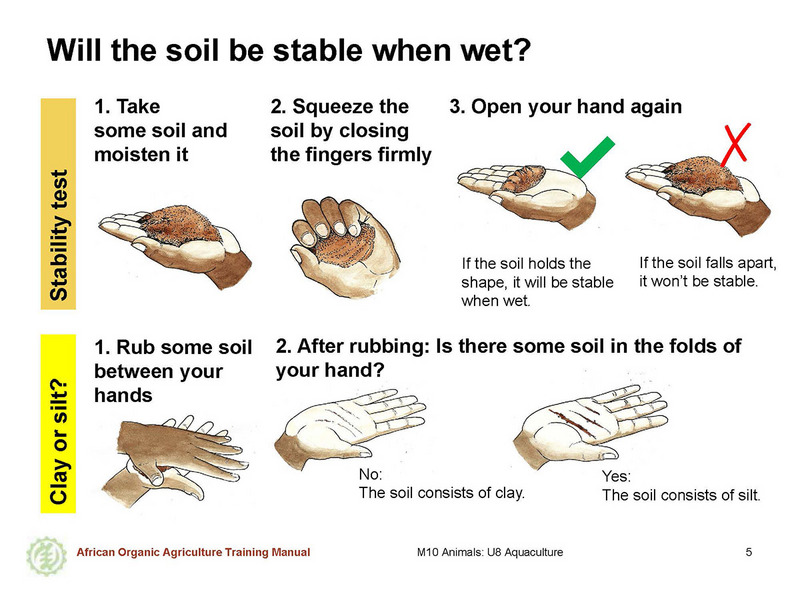
(ii) Press some soil in the hand to see if its stability is good.
(iii) Rub the soil between your hands to distinguish between clay and silt. If all tests are positive, you can begin to plan the dimensions of your ponds.
Assessment of local fish farming activities
Inquire among the farmers about fish farming in the area by asking the following questions:
- What do you know about fish farming?
- Are there any farmers growing fish in the area?
- How many farmers are growing fish and how big are their farms?
Pond construction
a. Pegging of the pond area
Once the site and the size of the pond have been defined and soil properties have been tested, the position of the edges of the pond and the height of the dyke are marked with pegs. The size of the pond should be about 10 m x 10 m and the water depth 50 to 80 cm. The bottom should be covered with sand or gravel.
Before placing the pegs for the pond, it is important that the area is cleared from big rocks, trees and bushes.
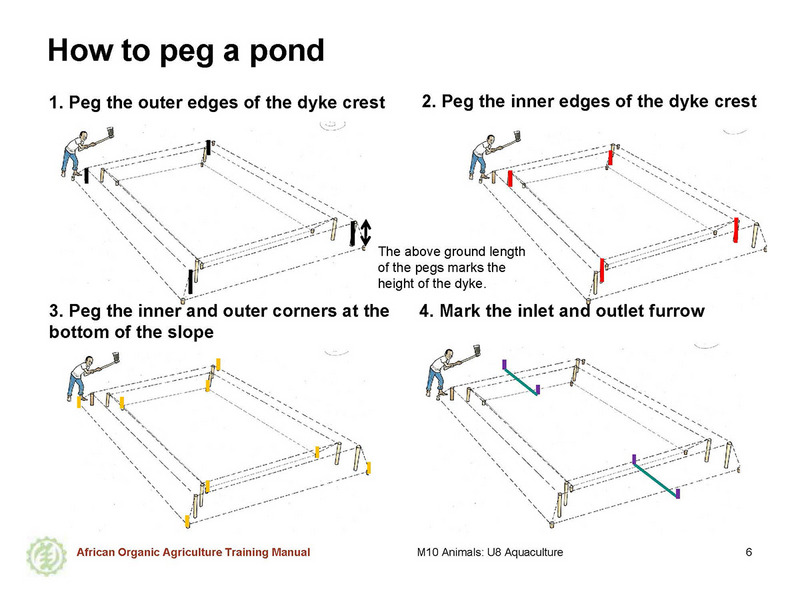
The first pegs placed should be the ones at the outer edges of the dyke’s crest. The above ground length of the pegs marks the height of the dyke. The height of the dyke on the inlet side of the pond must be at least 1 m high.
A second grid of pegs should mark the inner edges of the dyke’s crest at a distance of 1 to 2 m from the pegs marking the outer edges. All the upper ends of the pegs of the first and the second grid must be aligned horizontally. This can be made by connecting the tops of the pegs with a rope and using a water level.
A third and a fourth grid are used to mark the outer and inner bottom edges of the dyke’s slopes using short pegs.
At last the inlet and the outlet furrow are pegged.
b. Construction of the dykes
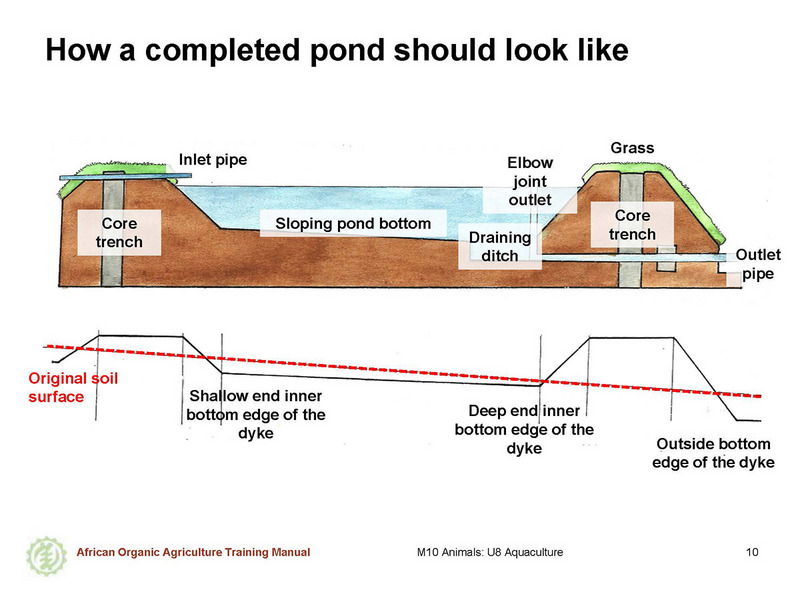
The top of the dyke must have the same level all around the pond and should be about 0.5 m higher than the water level. If the pond is built on a slope the height of the dyke will be less at the low water side and more at the deep water side. For example, if the area has a slope of 2 %, the bottom of the pond in a distance of 50 m from the inlet would be 1 m deeper without needing to dig (because 2 % of 5,000 cm is 100 cm). If the water level at the shallow end is 0.5 m, it will be 1.5 m at the deep end. That means the dyke will be 1 m at the low water side and 2 m at the deep water side.
The dykes of the pond must be water impermeable to prevent seepage and to remain stable. The material for dyke construction is ideally the material a farmer gets when digging out the pond. If the soil does not consist of mainly clay, a core trench should be built in the centre of the dyke.
The inlet furrow, which leads the water from the source to the head of the pond, needs a slope of at least 0.2 to 0.5 % to assure a good current of the incoming water. Ideally the inlet ends in a cascade or a fountain to oxygenate the water. The inlet can be designed as an open channel or as a submerged pipe. Open channels should be covered by stone plates in proximity of the pond to allow easy working.
At the deep-water end of the pond an overflowing pipe with an elbow joint leading to the outlet furrow or a monk must be constructed before building the dyke. Both serve to regulate the water flow going in and out of the pond. The outlet of a small pond can be realised as an overflowing pipe. If the upright part of the pipe is situated outside the pond, the water level can be easily regulated. This is very helpful in nursery ponds. In large ponds, monks made from wood or concrete are common, where the water level is regulated with wooden boards. All inlet and outlet pipes must be covered with suitable screens to prevent the fish from escaping and foreign fish from entering the pond. The screens must be cleaned regularly to guarantee accurate water flow.
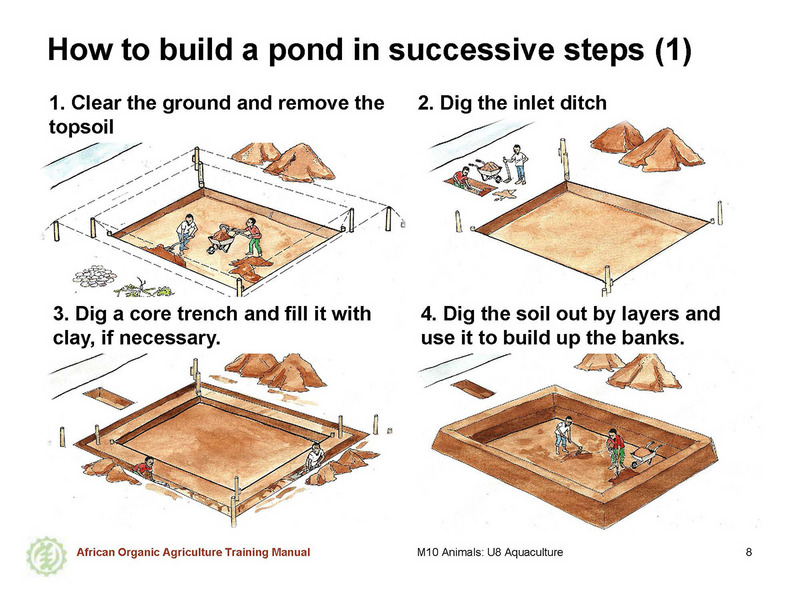
c. How to proceed for pond construction
To get material for the dykes and to make the pond deeper, the farmer must dig about 30 to 50 cm of soil from the interior of the pond and from the outlet furrow.
- First the top layer of the soil containing roots and leaves is removed and is deposited outside the pond area. It can be used later to cover the dykes for planting grass.
- In a second step the inlet ditches are dug to 1 m in front of the dyke (near the inlet pipe) and about 1 m from the place where the water is collected. After finishing all of the digging work, a sluice needs to be constructed and inserted into the ditch to be able to control the water flow. When all construction work is finished, the earth bridge between the pond and the sluice is removed and the water from the stream is lead into the inlet furrow. By putting different boards into the slots of the sluice one can control the water flow into the pond. An additional screen can prevent wild fish from getting into the pond.
- If the soil does not consist of mainly clay, the dyke can be made more stable and impermeable by thoroughly compacting pure clay taken from another place in the centre of the dyke, repeatedly building a core trench. The trench must be dug into the ground before the walls of the dyke are piled up.
- The trench is built above ground using wooden boards for planking. The soil inside the pegs is dug out, marking the inside banks at bottom level by layers of 20 cm at the upper end to 30 cm at the lower end. The soil is used to buildup the banks layer by layer, packing it tightly.
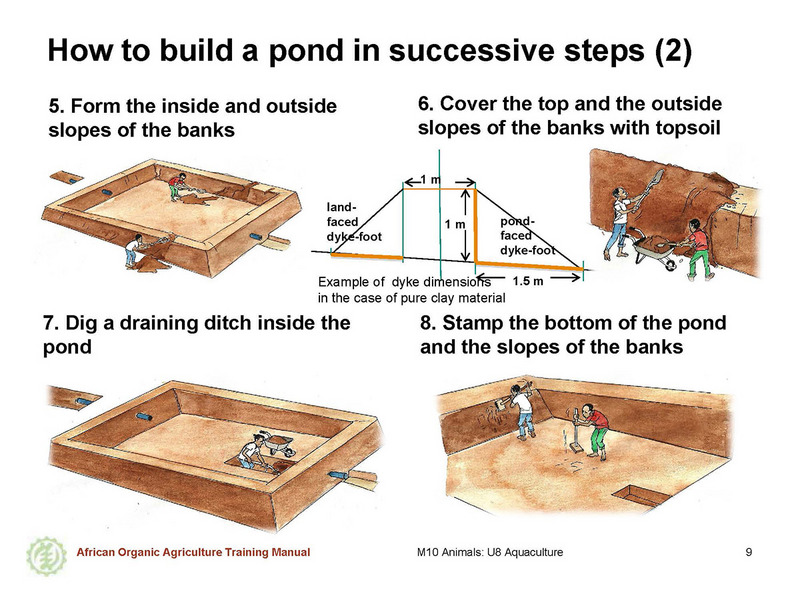
- Forming the inside and outside slopes of the banks. The inside slopes of the dyke shall slope less than the outside. The dykes of medium or large ponds should be about 1 to 2 m in width on top. The inside slopes of the dykes must be built in the proportions of 1:1.5 in the case of clay and 1:2 in the case of a clay/sand mixture. That means in pure clay soil the pond faced foot of the dyke needs to be 1.5 m long if the dyke is 1 m high. The outside wall of the dyke could be steeper: 1:1 in clay material and 1:1.5 in the case of clay/sand mixture.
- After forming the dykes the top side and the outside slopes are covered with the topsoil that was removed first.
- Bottom of the pond: The bottom of the pond should have a slope of 1 to 2 % to allow complete drainage for harvest. Instead of creating a continuous slope the farmer may dig a depression near the outlet on the bottom of the pond to enable easy and gentle harvest of the fish. Such a depression does, however, have the disadvantage that the pond cannot be completely emptied. The location and the shape of the pond can be chosen in accordance to the topography to minimize the work for digging. The bottom of the pond can be treated with slaked lime or quicklime and agricultural lime to make the nutrients in the soil soluble and sanitize the pond bottom. The lime must be thoroughly ploughed into the upper layer (5 to 10 cm) of the soil. The use of chlorinated lime is not allowed in organic aquaculture. The amount of lime needed depends on the pH of the soil and the kind of lime to be used.
- After all earthworks have been completed, the bottom and the inner slopes of the dykes might be stamped again.

Filling of the pond
Filling the pond with water will take some days or weeks, depending on the flow of incoming water and the volume of the pond. After filling the pond completely, it must be checked for possible water leaks. The farmers must make sure that the inflow and the outflows are accurate and that no material is clogged in the screens and that the pH of the water is balanced.
Within a few days water turbidity should decrease as the particles settle. If the incoming water is very turbid, a siltation tank is needed in front of the water inlet to the pond to allow the particles in the water to settle.
Microalgae and other microorganisms will then rapidly develop, turning the water’s colour from muddy brown or colourless to green. The extent of algae growth reflects the nutrient load in the water. It can easily be assessed by measuring the turbidity of the water using what is known as a Secchi disk (see transparency 15). When the water has developed a stable chemistry and colour, the first fish can be added to the pond.
What fish to use?
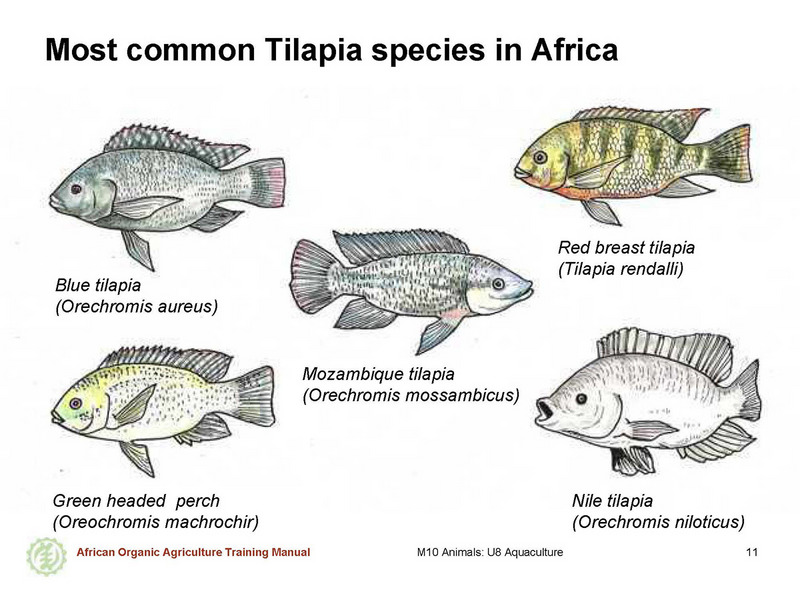
The choice of species for culture is of special importance. The most common fish for extensive or semi-intensive aquaculture in Africa is tilapia. The name refers to a whole group (tribe) of fish living in very different biological surroundings. Tilapias are indigenous in Africa, but only a few of them are really suitable for farming. The most common tilapias used in fish farming are: Nile tilapia (Orechromis niloticus), Mozambique tilapia (Orechromis mosambicus), blue tilapia (Oreochromis aureus), green headed perch (Oreochromis machrochir), Zillis perch (Tilapia zilli) and red breast tilapia (Tilapia rendalli). Other popular fish grown by African farmers are the African catfish (Clarias garipinus) and other species of catfish and different species of carps (Cyprinus carpio).
The species chosen for fish farming should ideally be easy to manage, popular for consumption, available as stock in the region and should grow well under local climate conditions. In this chapter, we recommend to work with tilapia species and refer to the most popular species Oreochromis niloticus, the Nile-Tilapia. This species is easy to manage and is omnivorous (i.e. it feeds on algae and microalgae as well as on zooplankton, small crustaceans and insects). In Eastern Africa, Oreochromis species might be more popular than the Tilapia species, whereas in the western African countries the trend is opposite.
Species selection also depends on local climatic conditions. Some species reproduce almost all year long if the minimum water temperatures are reached while others do have distinct spawning seasons depending on the water temperature. Some species need high temperatures (26 to 30° C) to grow well, other species do well at moderate temperatures around 22 to 24° C. In addition, hardiness and oxygen demand vary among the species.
Discussion on suitable fish species
Inquire among the farmers about the locally grown fish species by asking the following questions:
- Which type of fish is commonly grown in the region?
- What are the characteristics of these fish and what is the preferred species?
If possible, invite an experienced fish farmer to share his or her experiences with the preferred fish species.
 tap and then scroll down to the Add to Home Screen command.