Mechanisation options for different field operations on smallholder farms
Mechanisation options will be discussed in these sections for the following farm operations:
- Compost making
- Conventional versus reduced tillage
- Land preparation
- Planting
- Soil cover and weed management
- Harvesting and primary processing of selected arable land crops
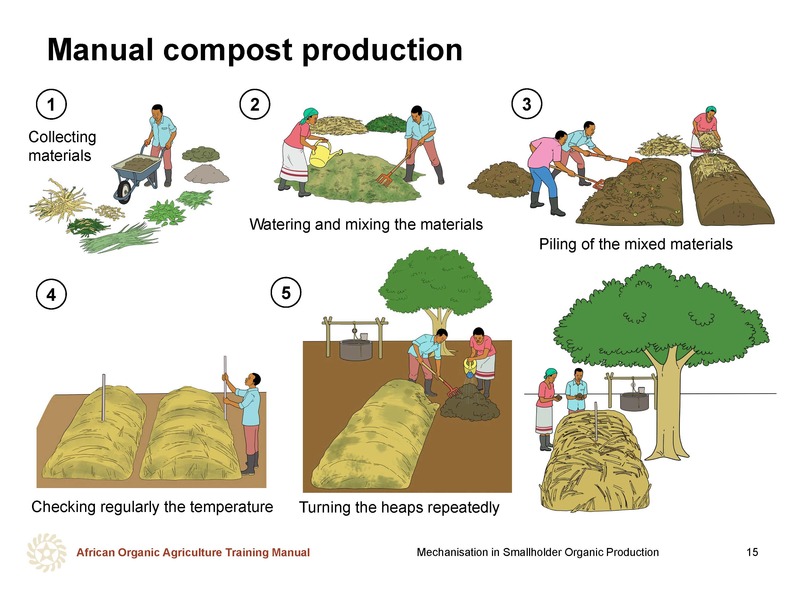
Making compost for gardens and smaller fields – manual methods
To make compost for use in backyard gardens and relatively small areas, farmers can produce compost mostly with hand held tools or instruments as illustrated.
The main tools required for compost making include:
- A sickle, machete or cutlass to cut the biomass
- A rake and/or garden fork to use in heaping the raw materials
- A wheelbarrow or other carrying containers to carry manure
- A watering can or bucket
- A shovel (and fork) for turning the decomposing materials
- A thermometer for measuring the temperature of the compost heap, or a simple stick as illustrated
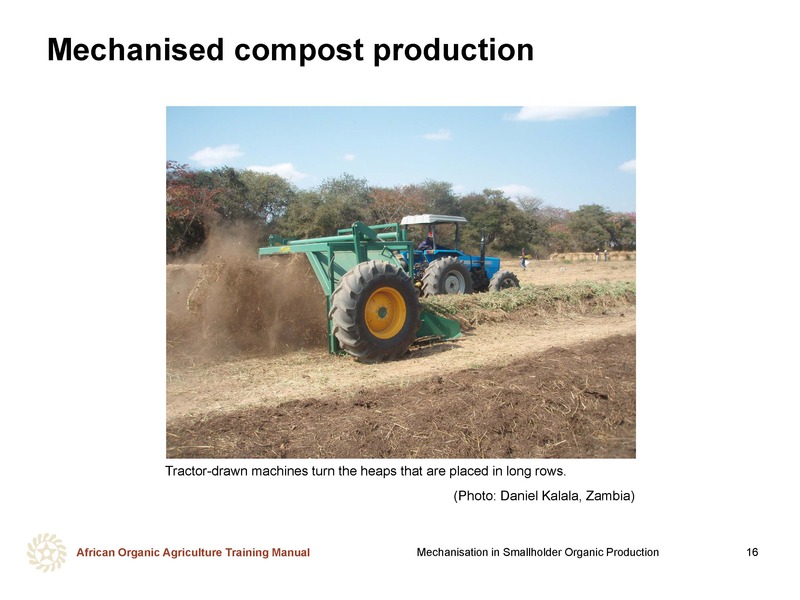
Mechanised compost making for gardens and smaller fields
Mechanised compost making has many applications in smallholder farming. It can be done by farmer groups, a single farmer who has a large field, a single entrepreneur farmer who produces compost for sale in addition to meeting his or her own needs, or a group of youths who can take compost making as a business. In this case, the amount of raw materials to be handled are too large for manual techniques except if labour is not a constraint. The raw materials are placed in rows and tractor-drawn machines used to handle the operations, particularly heaping the raw materials and turning the heaps during decomposition. This makes compost preparation a more efficient and less tedious process, but can be costly especially considering the cost of specialised machinery, the operator of the machinery, fuel for the tractor, the tractor itself and other considerations. Farmers are encouraged to assess and evaluate the benefits of such investments before incurring the costs.
Mechanised land preparation in compacted soils with hardpans
If soil compaction or a hardpan is present, remediation will be part of the land preparation process. Cover cropping and leaving a field fallow are long-term options to combat these problems, and are useful for revitalising degraded or compacted soils. For example, deep-rooted cover crops can do the hard work of soil revitalisation and aeration. However, cover cropping will not be discussed further in this training manual and trainers are encouraged to refer to other sources for details.
In the short term, farmers can use suitable mechanisation to deal with soils that are compacted and/or have a hard pan present. Mechanised options and strategies are available for hand-, draught-animal and machine powered systems.
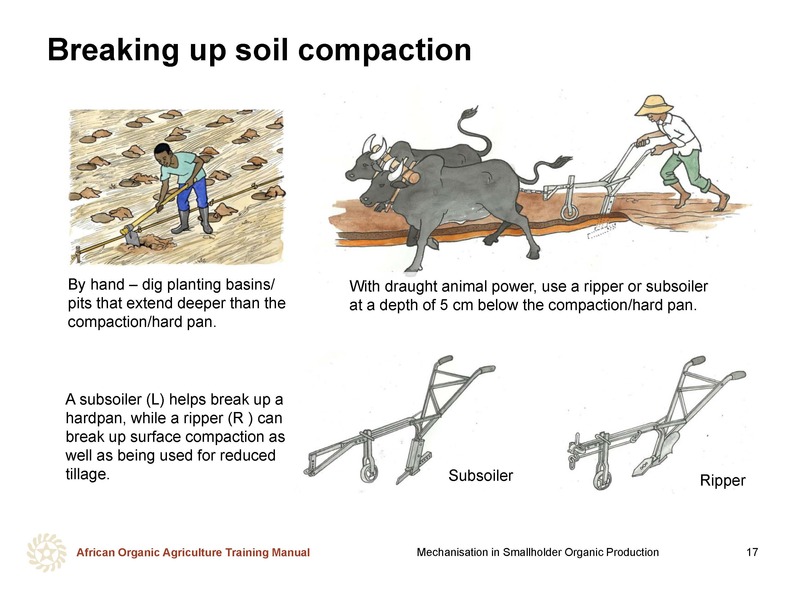
Combating compacted soils/hard pans using hand tools
Digging planting basins is effective for combating natural soil compaction or a hardpan caused by repeated ploughing/hoeing. Using a hand hoe, a pick/mattock, or shovel, dig planting basins that extend at least 5 cm deeper than the hard pan to allow plant roots to penetrate lower soil layers. This is discussed in more detail in further sections.
Breaking soil hardpans by draught animal power-driven implements
Hardpans often develop after years of mouldboard ploughing at the same depth. A hardpan inhibits water infiltration and root penetration. If a hardpan is present, a subsoiler may be useful to break it up before planting. A subsoiler is similar to a ripper, but is designed particularly for breaking up a hardpan, rather than with the added loosening and aeration functions of a ripper. A subsoiler should be set to run about 5 cm below the hardpan. It should be noted that using a subsoiler requires high pulling energy from draught animals, and the deeper it is set the more labour-intensive it will be. Therefore, if a hardpan is suspected, a few holes should be dug with a shovel to verify its existence and the required depth of tillage.
A ripper can break through compacted soil closer to the soil surface. This tool is discussed in more detail further sections.
Land preparation in healthy soils without compaction
Once compacted soils and/or hard pans have been dealt with, the farmers must choose their preferred method of land preparation. The chosen method depends on the availability of labour, draught animals or a tractor, field size, and many other factors. The following sections describe no-till and minimum tillage land preparation options for farmers with either hand tools or draught animals.
No-till land preparation – knocking down existing vegetation
Farmers interested in no-till land preparation should be equipped with the knowledge and skills on how to deal with plant residues, cover crops or vegetation, e. g. on fallow fields. The first step is to knock down any remaining vegetation or cover crops that are present in the field and leave it as mulch on the soil surface. If many trees are present and it is justified to cut some of them in order to open up land for crop production, then suitable implements such as a motorised chainsaw can be used, depending on the size of the trees to be cut. Farmers can ask their neighbours, or extension agents where they can source such an implement which can help them to clear the trees efficiently compared to using a hand axe. Specialised or trained operators should use a chainsaw as it can be dangerous to unexperienced users.
Slashing vegetation by hand
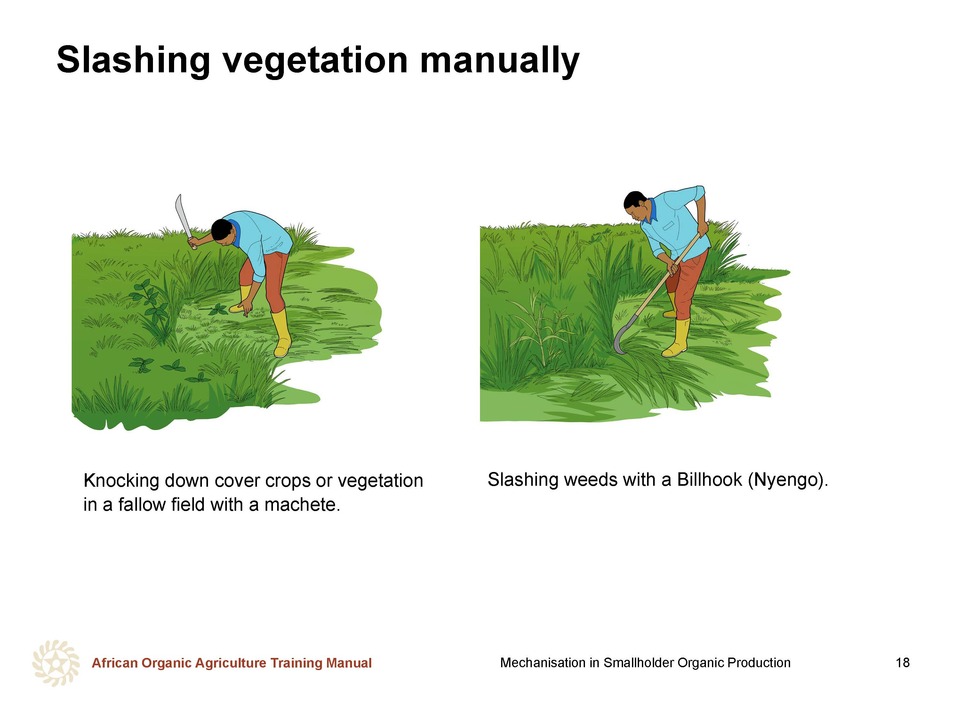
Slashing annual and succulent perennial vegetation by hand can be done with simple tools like a machete or a billhook and is the primary option for most smallholder farmers. Depending on the type and amount of vegetation, this can be labour-intensive. The farmers should only perform this task when preparing a fallow field or knocking down a cover crop.
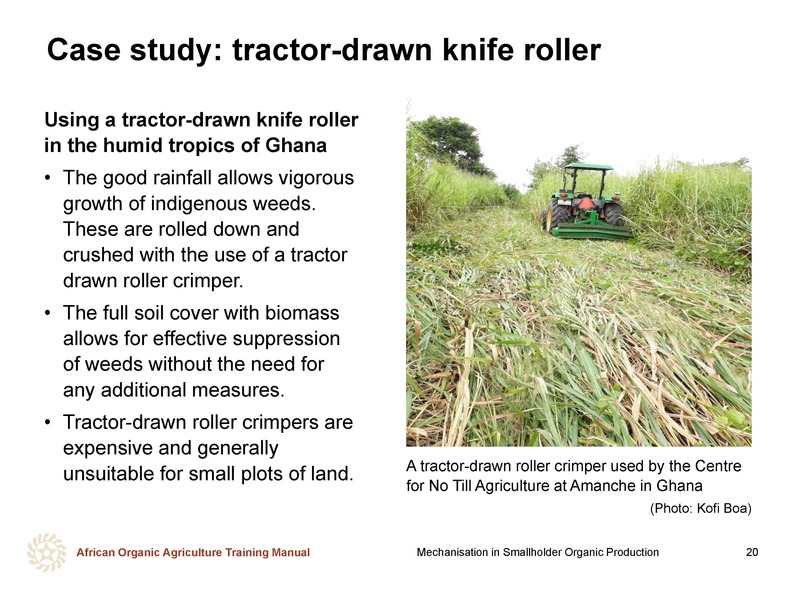
Slashing vegetation with draught animal or tractor power
If draught animal or tractor power is available, several options are available to flatten crops to create a mulch cover on the field.
a) Many locally-made tools have been developed to flatten cover crops (e.g. dragging a log or tyres over the cover crop), but these often do not work well. If they are too light to crimp the plant stem, they will not kill the cover crop and will not be very effective.
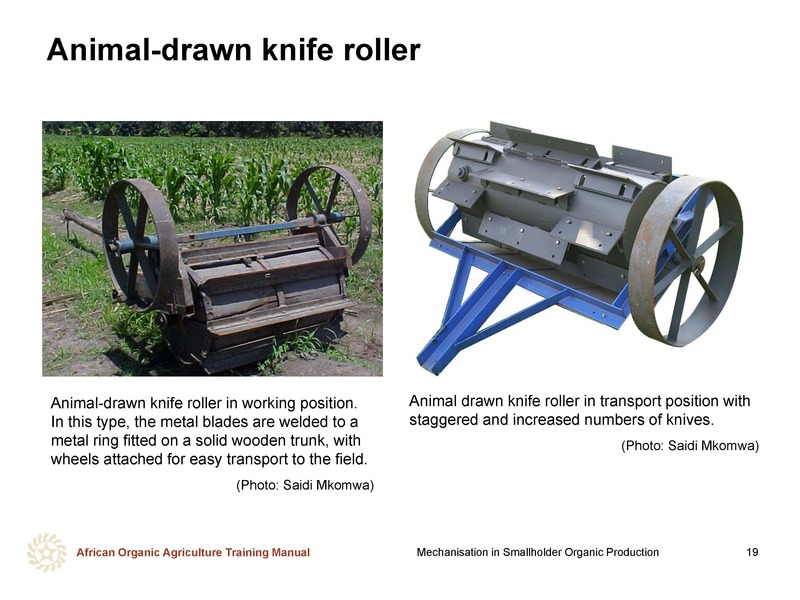
b) A knife roller is recommended if a farmer is willing to invest in a crimping implement. A knife roller is a heavy implement with raised wedges that neatly and thoroughly break the stems of the vegetation or cover crop. It is more effective than a beam or tyre in killing a cover crop and laying it down flat as mulch. This equipment can be manufactured by a local blacksmith, given a set of plans. Efficient plant crimping with a knife roller requires the weeds to be crushed but not detached from their stems. The operation should be continuous and comfortable on the necks of the oxen or donkeys where the yokes/harnesses come into contact. Helpful modifications include increasing the number knives from six to eight or ten, and using serrated half-length blades instead of full-length blades as illustrated.
Farmers can look at options of hiring this equipment as it may be too expensive to own, and besides it might not be used throughout the year. When farmers are working in groups, they can also decide to buy the knife roller as a group and develop good rules on how to share and take care of the implement.
No-till land preparation – opening holes or lines for planting
After mulch has been laid down on the field, the next option is to consider planting. If the soil underneath the mulch is healthy and well-aerated, a farmer may plant directly into the mulch.
However, if farmers need to plant seeds by hand because animal-drawn or tractorised direct planting tools are not available, or if the soil is not very healthy or well-aerated, they may consider additional planting area preparation to ensure good results.
Additional preparation of no-till fields by hand
Depending on the soil, labour availability, and crops to be grown, there are several additional no-till options for farmers with hand tools, including digging planting pits or hand ripping.
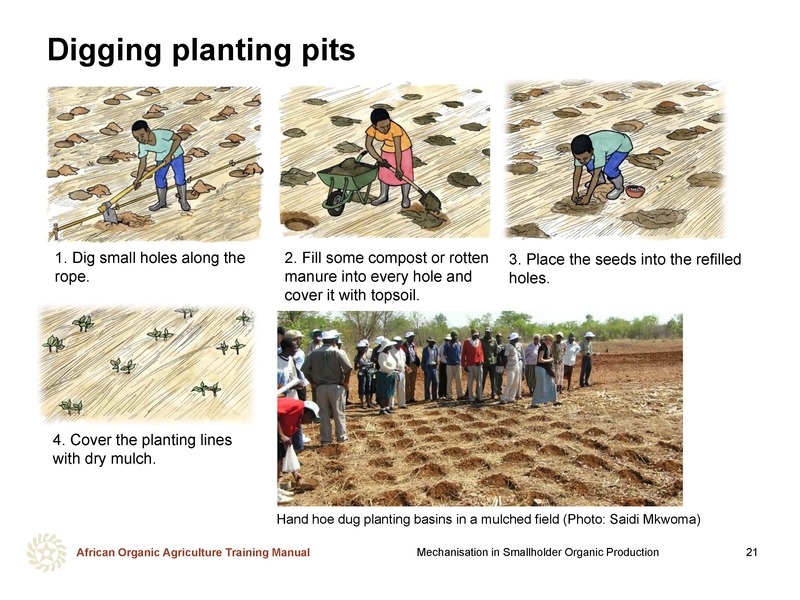
Digging planting pits reduces soil disturbance by only digging the pits themselves but overcomes issues of compaction and hard pans by loosening the soil around where the seeds will be planted. Planting pits can be dug into mulched or bare soil. Before or during planting, the farmer can add fertiliser (good quality compost and/or other additives such as rock phosphate) to each pit. The advantages of planting pits are that they can be dug slowly before the planting season when the farmers have time. They aid in water collection and retention, and can help to localise limited resources such as compost to the area where the crops will grow (compared to broadcast applications). These planting holes can be renewed and reused yearly. The disadvantage is the labour-intensive process of digging the pits, particularly in the first year. When crop rotations, e.g. with legumes, are involved, the farmers need to ensure that the planting spacing is ideal every season for the crop in question. Notably, legumes such as groundnuts are spaced more closely than maize hence the farmers need to adjust the spacing to suit the legume crop in such a way as not to lose yields due to wide spacing.
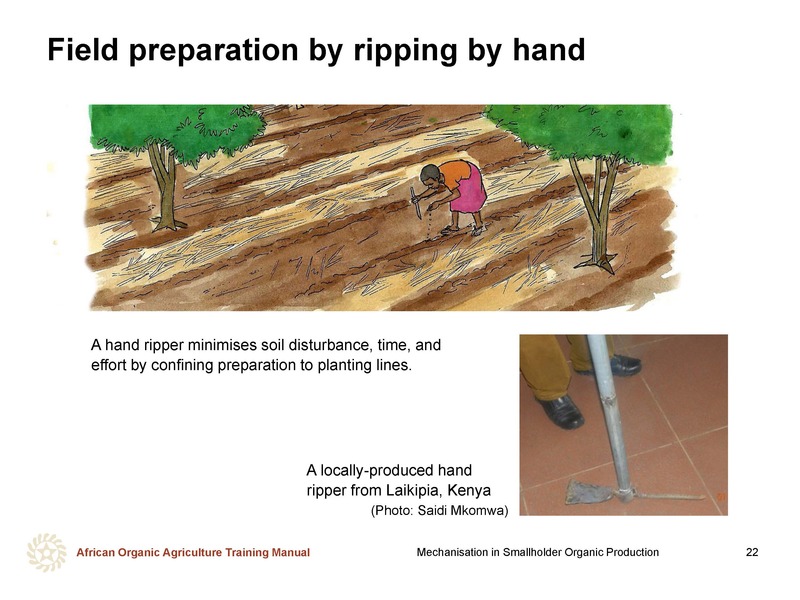
An alternative way to reduce tillage is to ‘rip’ lines into the field where the fertilisation and planting will occur using a hand ripping tool, and again overcomes issues of compaction or hard pans by loosening the soil where the seeds will be planted. The soil disturbance is minimal, as it is confined to the planting rows. The ripping tool can be used at a minimal depth, typically 10 to 15 cm.
Field preparation by ripping with draught animal power
If draught animal power is available, ripping along planting lines can be done with an animal-drawn ripper (aka chisel plough).
Like ripping by hand, ripping with draught animals opens up a row of soil 15 to 20 cm wide and 10 to 15 cm deep. Depending on soil conditions, ripping can be at different depths. For example, in healthy, well-aerated soils, a ripper can run shallow at depths of 8 to 12 cm for planting. In very dry areas or consolidated soil, a ripper may be used at a depth of 12 to 20 cm before rains to capture moisture in the soil. Ripping at 15 to 20 cm in dry soil will require considerable draught power, so farmers must take care not to over-burden draught animals.
A ripper has several advantages, particularly if the same planting lines are used year after year. With the addition of organic inputs, manure, and compost, ripping will become easier each year, and soil fertility will improve in the planting lines. Rippers can run through standing cover crops, mulches, or plant residues to reduce weed control and soil moisture loss challenges. However, rippers can be a challenge in some types of mulch as long-stem plant residue can become tangled and clog it. This is another factor that comes into play when choosing a cover crop. Farmers can discuss these types of technical details with neighbours, extension agents, and equipment manufacturers in order to make informed choices.
Rippers are available as conversions from mouldboard ploughs, as part of a multi-function toolbar, and as stand-alone tools. Even though a ripper looks small compared to a mouldboard plough, it is important to consider the pulling power needed, especially when working in hard or dry soils. Ideally, the width of the ripper point should be less than 4 cm, with some form of wing behind the point to lift and fracture the trench. The wider the ripper soil working parts, the greater the draft. If more than 8 cm in total, the ripper will be very difficult to pull. If ripping at greater depths, an 8 cm ripper may be as hard to pull as a mouldboard plough.

Using a ripper prior to the rainy season in very dry, compacted soils in the tropical savannah zone of Burkina Faso
Farmers in the tropical savannah zone of Burkina Faso face many challenges in preparing their fields for planting before the rainy season begins. The area receives 800 to 900 mm of rain annually, primarily in the rainy season from June to September. Soils are low in active clay and organic matter, and over-cultivation and over-grazing have further degraded the soils. Coming into the field preparation season, the soil is very often almost bare, as grazing animals have eaten any stubble left from the previous season. The intense heat of the dry season and the animals' hooves have left the soil hard, dry, and compacted. Furthermore, draught animals are often in poor condition after the long dry season, as there is a shortage of food as available grasses and crop residues are completely grazed. Farmers in this region do not usually store hay or other food for the draught animals.
While farmers in this region commonly use ploughs, efforts are made to introduce reduced tillage equipment such as rippers. The ripper, although it is easier to pull than a plough, is still often too difficult for the thin animals to pull through the hard soil. Therefore, the farmers make two passes with the ripper, each at approximately 10 centimetres, to reach the desired depth of 20 centimetres for planting.
Measurements done on the ‘average draught force’, or the force required to pull the ripper by the oxen, showed that the force to pull the ripper was approximately one half of that required to pull the traditional 20-cm mouldboard plough. This greatly reduced the burden on the oxen. Also, even with the two passes required with the ripper, the field was prepared in half the time usually spent for full width tillage with the plough.
The ripper loosened a band of soil about 20 cm wide, leaving the inter-row area undisturbed. This so-called ‘strip tillage’ builds soil health by conserving soil moisture, reduces tillage intensity, and can retain a protective crop residue cover on the soil surface (if already present).
The farmers were happy with the results, but despite this, the uptake of such technology, despite its clear benefits, is still not widespread.
Land preparation with shallow tillage
If farmers are not yet ready for a no-till system, they may choose to prepare their fields using tillage methods which reduce the depth of soils disturbed.
Shallow tillage by hand
Farmers can employ minimum tillage techniques by using the tools they already have, but at a lesser depth. For example, farmers can use a hand hoe to disturb only the top layer of soil to prepare a field. This conserves the organic matter and humus present in lower soil layers and reduces exposure of soil microorganisms to the scorching sun.
Shallow tillage with draught animal power
When draught animals are available, several shallow tillage options are possible for field preparation.
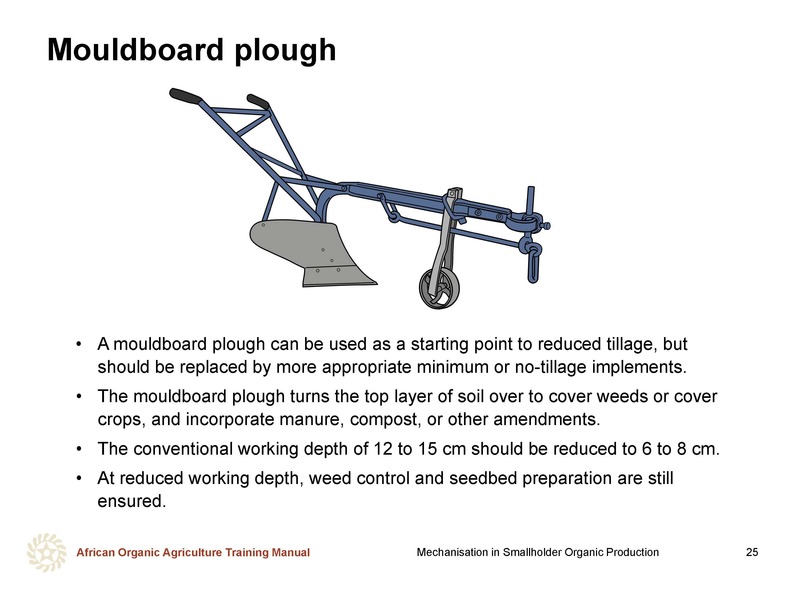
A mouldboard plough used at reduced depth can be considered a step towards minimum tillage. Although it is not a minimum tillage tool, it is included here as a bridge tool, because converting to minimum or low-till systems may be a process in which the farmer starts to experiment with familiar tools he or she already owns or has access too. However, reduced depth mouldboard ploughing should be replaced with a less aggressive reduced tillage implement as the farmer progresses and gains experience and access to more appropriate minimum tillage equipment.
A mouldboard plough is commonly the first implement a farmer will purchase when beginning with animal power. It turns the top layer of soil over to cover weeds or cover crops and incorporate manure, compost, or other amendments. Farmers interested in reduced tillage can use the plough at a reduced depth of 6 to 8 centimetres, rather than at the conventional depth of 15 to 20 centimetres. This approach has several advantages: the shallow depth will still achieve weed control and seedbed preparation, while significantly reducing the pulling forces on the draught animals. This means that the work will be easier for the animals, allowing them to accomplish more work in a day, or smaller animals, such as donkeys, could be used in regions where draught cattle are unavailable or are not affordable.
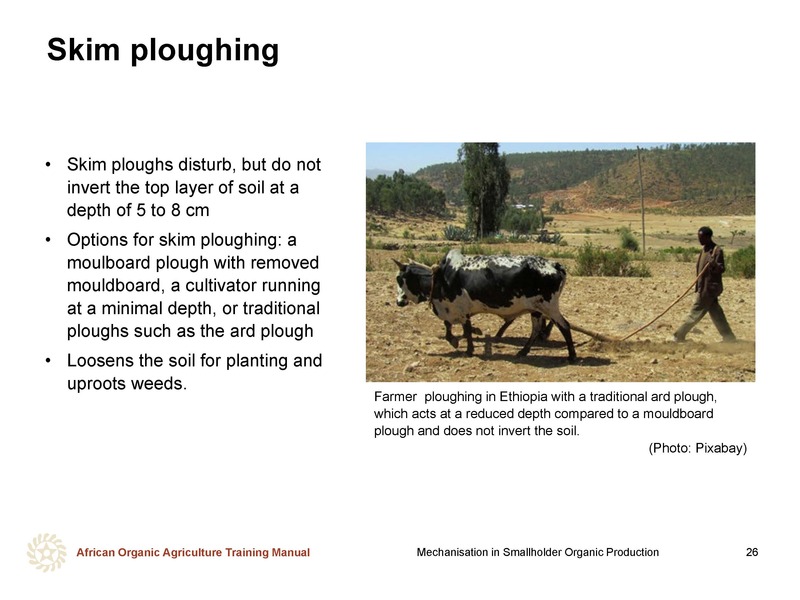
Skim ploughing
Skim ploughing is disturbing, without inverting, the top layer of soil at a depth of 5 to 8 centimetres with various implements rather than the traditional 15 to 20 centimetres with a mouldboard plough as described above. Various implements that loosen soil but do not invert it include a moulboard plough with the mouldboard removed, a weeding tool such as a cultivator running at a minimal depth, or traditional ploughs that are used in some regions such as the ard plough.
The process of skim ploughing is most effective on fields with little standing vegetation, and serves to both loosen the soil for planting as well as uprooting weeds. Skim ploughing alone may be sufficient for direct planting in coarse-textured sandy soils. For heavier soils, it may be necessary to combine skim ploughing for weed control with ripped planting lines for optimal planting conditions.
The advantages include saving time, reduced pulling force for the animals, and less soil disruption. A variety of implements can be used for skim ploughing, making it a flexible option for farmers lacking access to a diverse array of equipment. Farmers who already own a mouldboard plough can remove the mouldboard to create a suitable skim plough. A weeder with attachments or ‘sweeps’ designed for working at shallow depths such as ‘low crown sweeps’ will also work well in level seedbeds. There are a variety of purpose-built tools for skim ploughing available regionally.

Planting and mechanisation options for hand-powered, animal-drawn and tractorised systems
Once field preparation is complete, farmers then consider planting options. Mechanisation options for planting depend on how the land was prepared, and available equipment and labour.
Planting by hand
If farming by hand or in cases where draft power or motorised systems are not available, there are several mechanisation options to increase the speed and accuracy of planting and reduce drudgery.
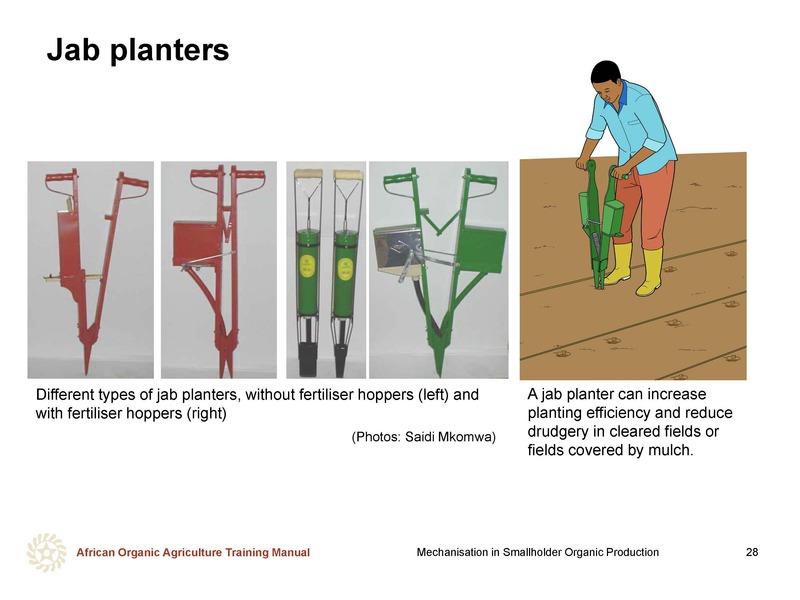
Jab planters
When a farmer plants directly into a field with mulch or crop residues, or wants to reduce the drudgery of bent-over planting, a jab planter or a punch planter can be a very effective tool.
A jab planter allows the farmer to stand, and with each ‘jab’, place a seed at the correct depth. With practice, this works well on a mulched field and on a prepared field with bare soil. Some versions of this planter have an attached hopper/holder for fertiliser so with each ‘jab’, fertiliser is placed into the soil with the seed. Unfortunately, these hoppers are rarely suitable for compost-type fertiliser so it is usually necessary to fertilise by hand. Despite this drawback, this planter saves time, increases the accuracy of planting, and decreases the drudgery of bent-over sowing. A row marker, such as a string or scribed line, helps create straight and evenly spaced rows.
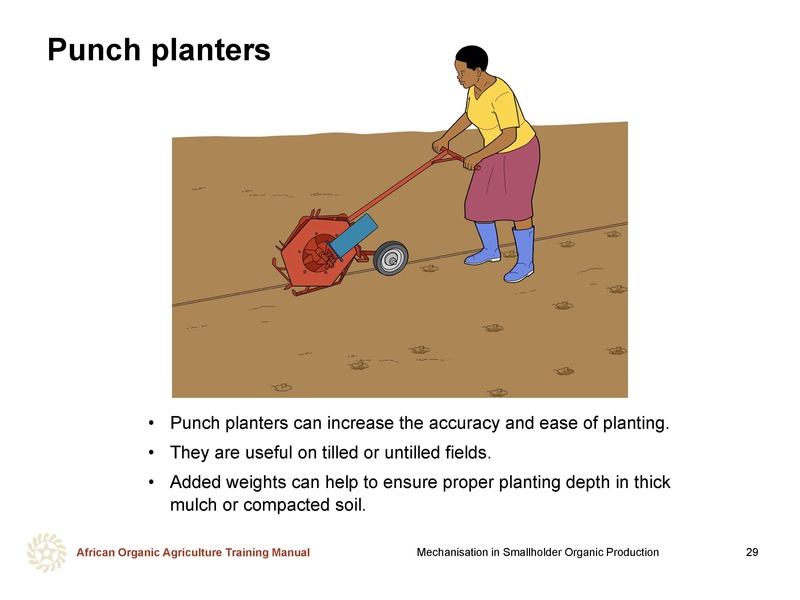
Punch planters
A punch planter is another hand tool that can increase the accuracy and ease of planting. These tools are useful on tilled or untilled fields. Added weights can help to ensure proper planting depth in thick mulch or consolidated soil. Like jab planters, punch planters are often equipped with a fertiliser hopper most appropriate for commercial fertiliser. Equipment manufacturers claim that punch planters are the fastest method of planting by hand, and advertise a planting rate of 10 hours per hectare for one person.
Planting with draught animal power
When draught animals are available, multiple options exist for planting. Some are best suited for planting into cleared fields, while others can plant both into cleared fields and into mulch or residues in no-till fields.
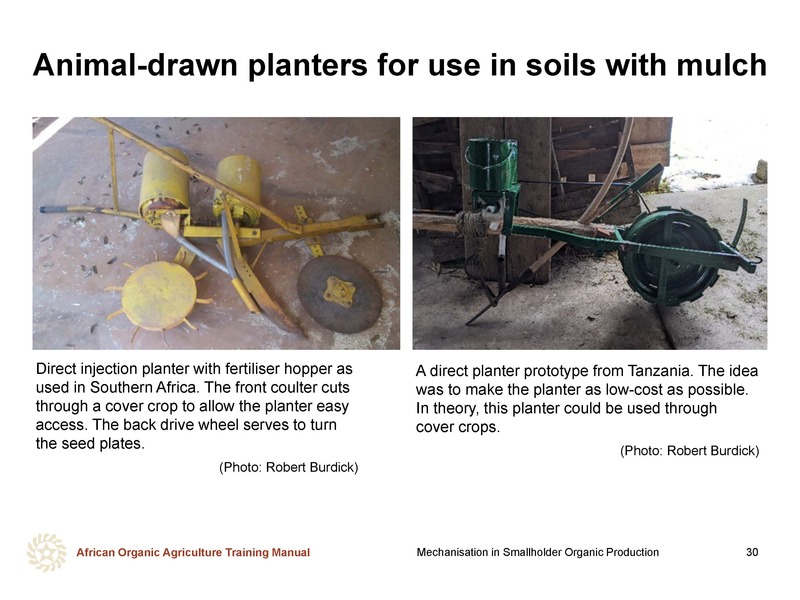
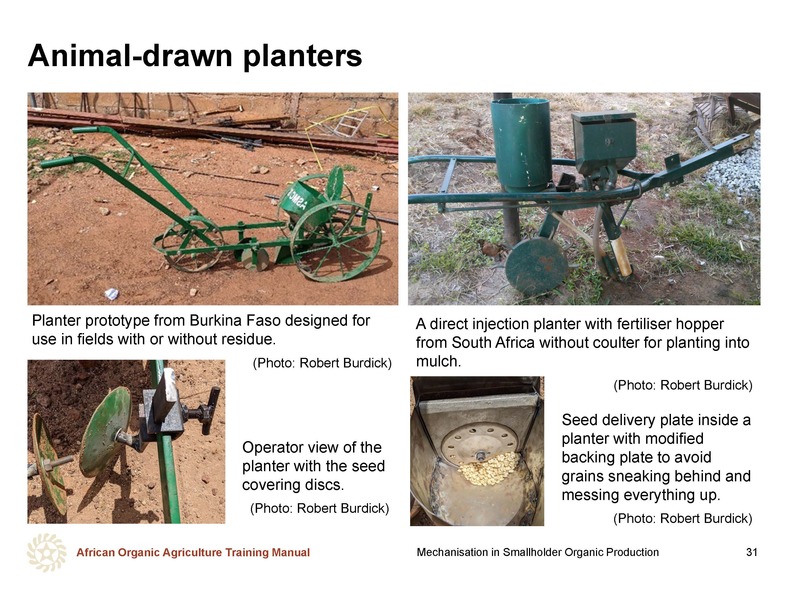
Planters that are best for mulches and residues usually have a front coulter wheel that slices or parts the mulch ahead of the planting apparatus. Many models with similar functions are made in various parts of Africa, and can usually be locally manufactured by artisans given a set of plans and/or training.
Similar models are available for cleared fields with no coulter on the front. These are simpler to produce but are less practical for farmers aspiring to no till, or planting into a mulch.
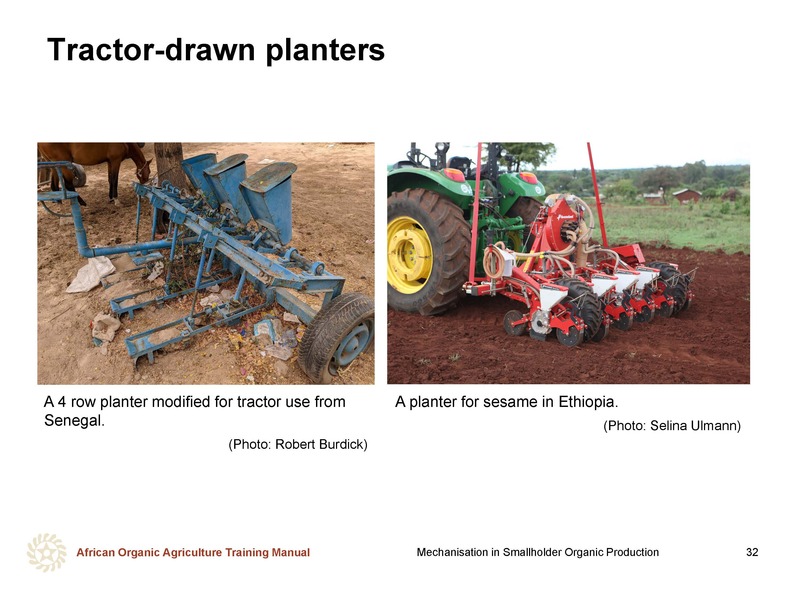
Tractor-drawn planting
Tractor-drawn planters are similar in design and function to draught animal-pulled equipment, with varying designs depending on whether it is best used on a cleared field or is able to plant through mulch or residue.
Planter mechanisation in Burkina Faso
On-farm innovation is a key component in the process of continuous improvement of farming systems. In Burkina Faso, advances in planter mechanisation facilitated seed placement, plant population, and crop rotations and helped build soil health. Farmers had incentives to innovate to improve their farming systems to provide food for their families, increase household income, and enhance soil fertility and productivity. Changes to intensive tillage and planting methods were understood to be crucial in building soil fertility.
A team comprised of engineers and practitioners worked closely with the local farming community to develop mechanisation for smallholder farmers compatible with local economic, social, and environmental conditions. The team developed an inexpensive, rugged, and functional planter for low-disturbance tillage and built and repaired it with local materials and knowledge.
Zone tillage and planting for soil health
The animal-drawn planter matched the low-disturbance tillage of the in-line subsoiler for zone tillage. Compared to a mouldboard plough, the in-line subsoiler enhances soil health by conserving soil moisture, reducing tillage intensity, and retaining a protective residue cover on the soil surface.
Maize planter for low-disturbance tillage
In early meetings, women reported that planting was one of their most difficult tasks. Maize is typically hand-planted by women and young girls using a short-handled hoe, placing two seeds every 16 inches. This spacing represents a comfortable action with the hoe and a small step between seed pockets. Two seeds per pocket assure the successful germination of at least one plant resulting in few skips within the row.
The team noticed that animal-drawn planters introduced to the area decades ago were widely rejected by farmers because of their high cost and poor performance. The success of the in-line subsoiler inspired several planter innovations to improve performance in minimally disturbed soil:
The team reduced the cost of the planter by 50 % by replacing the seed plate spiral bevel gear drive with an inexpensive, open spur gear drive built by local blacksmiths.
The team partnered with a training centre in Bobo Dioulasso to create planter seed plates to improve the fit and functionality for maize, sorghum, millet, and cowpea.
An innovative furrow opener was developed to slice through the minimally disturbed soil while reliably placing the seed at the correct depth.
The high crown sweeps used as furrow closers on the old-style planter with a set of small concave discs better suited to low-disturbance conservation tillage. The new discs covered the seed and rolled over the residue without plugging.
Finally, the width of the press wheel was reduced by 50 %. The old-style press wheel was suitable for ploughed, pulverised soil but did not provide sufficient localised pressure to firm the soil in the narrow tillage zone created by the in-line subsoiler.
The above features enabled the seeds to be placed at a uniform depth and spacing, ensuring that seeds germinated faster and more consistently. Experiments in farmer's fields showed that using the planter increased maize grain yield by 50 to 150 % compared to hand planting. Farmers who tested the planter with their maize crop for one to two years also mentioned that birds did not consume the planted seeds because they could not find them. Using the planter had the added advantage of reducing the need to plant twice – which was often required when planting by hand because of a low germination efficacy. Additionally, it enabled farmers to plant early before the rains.

Fertilisation on smallholder farms and mechanisation options for different settings
As discussed previously, organic agriculture relies on the application of organic fertilisers like compost to supply crop nutrients. Because these organic fertilisers require a large volume and are often unsuitable for a hopper on commercial jab planters or animal-drawn planters, compost is most commonly applied by hand. However, some simple tools can increase the efficiency of this task.
Fertiliser application by hand
Organic producers often apply fertiliser by hand. Implements such as a wheelbarrow and shovel are helpful, but any type of container used for carrying can move the compost.
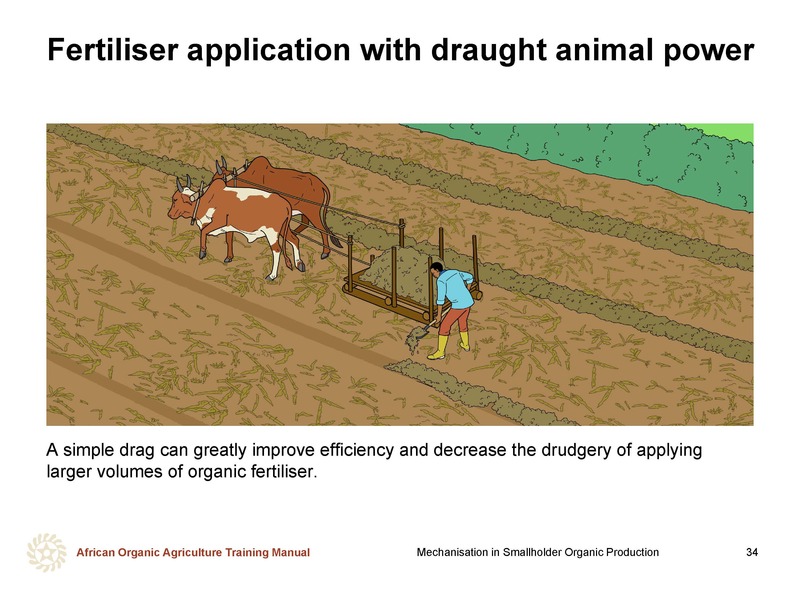
Fertiliser application with draught animal power
If draught power is available, a simple piece of equipment such as a sled or ‘drag’ can help with the distribution of compost or manure. The compost or manure can be piled on the sled, and while the animals pull the sled along the rows, as a person can walk beside using a shovel or bucket and apply it.
Mechanised application of bulk organic fertilisers is a challenge. Various organisations are working on options to solve this challenge. In the absence of suitable compost/manure spreaders, organic farmers must consider the time and effort for fertiliser application into their seasonal planning. This is a task whereby addition labour can be sought by the farmers depending on the urgency of the operations.
Soil cover, weed control and associated mechanisation options
Keeping the soil covered between the growing seasons (cover cropping or mulching), or using various strategies to keep soil covered during the growing season (intercropping, relay cropping, or mulching) are a key part of weed management (and soil fertility as well as pest and disease management too) in organic farming. Because no herbicides are used, preventing weeds from emerging in the first place is an important step. Organic farmers commonly use crop rotation and application of well-cured compost and other inputs to help avoid bringing weed seeds into the field in the first place.
As mentioned previously, the idea of maintaining soil cover with live plants or mulch to suppress weeds is relatively simple, but the actual timing, choice of crops, field preparation, etc. is quite complex and variable with the region, rainfall, soil type, and needs of the farmer. These agronomic concepts are not covered in detail in this manual.
Mechanical weeding
Even with soil cover strategies, some mechanical weeding is necessary in most farming systems. Farmers benefit from an awareness of mechanical weed management techniques to enhance other strategies.
Mechanical weed control is the most common and effective method of direct weed control for organic farmers. It is used for the initial land preparation and during the later stages of the crop growth. When weeds have been ‘allowed’ to develop deep and extensive root systems, they can only be controlled through mechanical methods.
Mechanical weed control involves weeding the entire field or being limited to selective inter-row or intra-row weeding. Whichever tools are used, weeding should be done when weeds are small, and certainly before they flower and produce seeds. The weather and soil conditions while weeding significantly influence the tool's efficacy or method used (e.g. mechanical weeding is less effective when soils are wet during or after weeding operations).
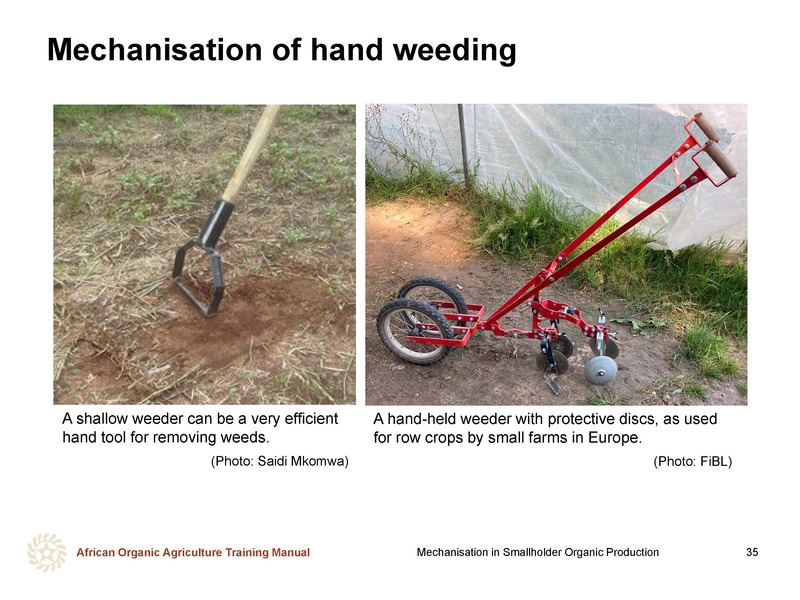
Weeding by hand
Hand weeding can be the most labour-intensive method of weeding, but simple tools can ease the burden.
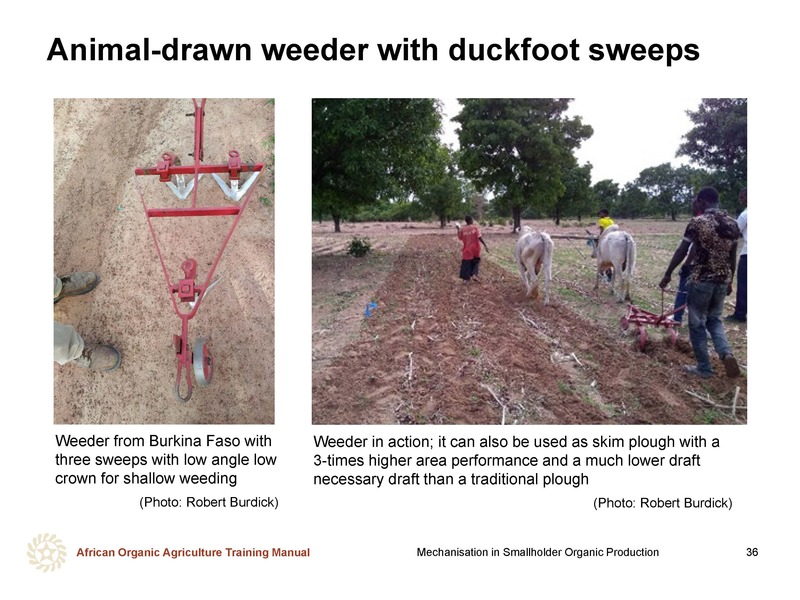
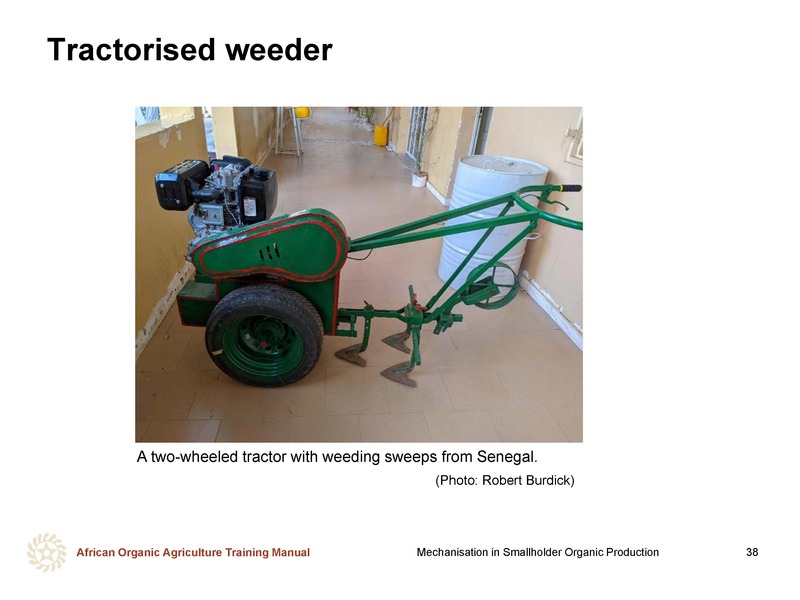
Weeding with draught animal power or tractorised power
With draught animal power or tractorised power, weeding can be more precise and timelier. Because no herbicides are used in organic farming, weeding must be carefully managed to avoid major weed problems. A comprehensive plan combining the correct equipment with the early and frequent use of that equipment can help to minimise weed pressure. Depending on the crops grown, soil type, equipment and labour available, and other factors, a ‘comprehensive weeding plan’ will be different for each farm. However, it is worth mentioning some specific equipment that can be a large help in weed control.
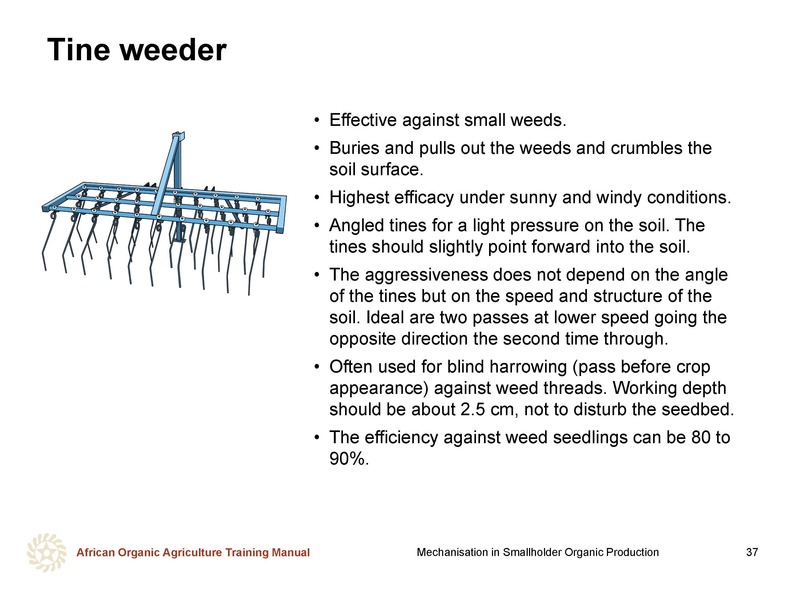
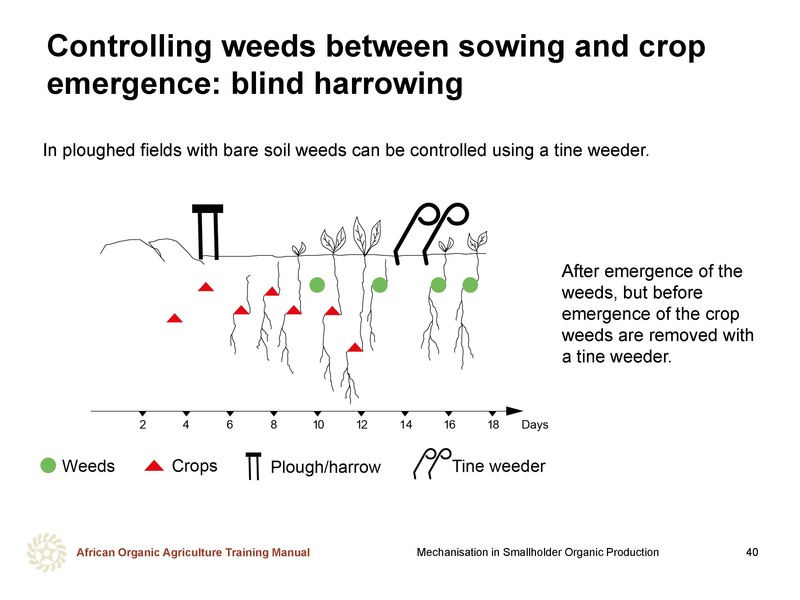
For example, with a tine weeder, a farmer can ‘blind harrow’, or run over the full width of the field to rid it of weeds before the crop emerges. This is done when the weeds are very small (e.g. 2 cm or less). The shallow action of the tine weeder uproots the weeds without disturbing the crop. Tine weeders have been developed to be pulled by both draught animals and tractors.
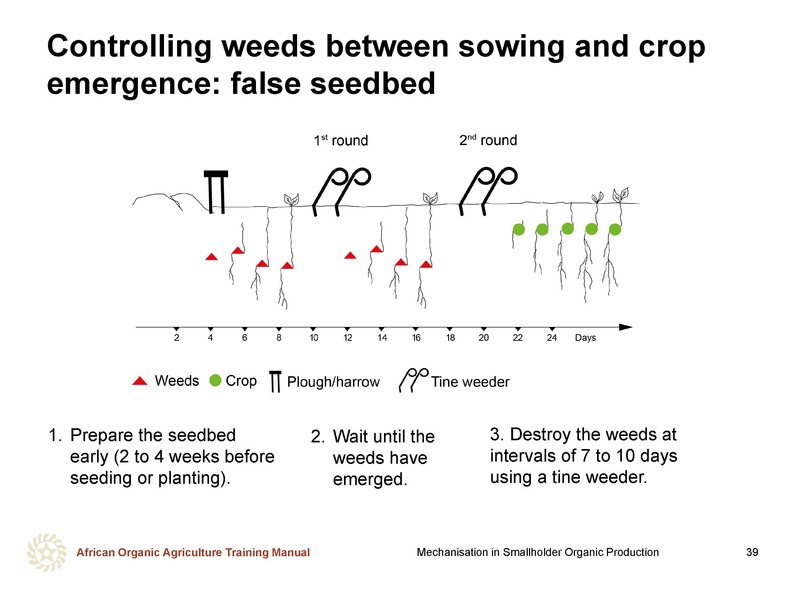
Creating a false seedbed to reduce hand and mechanical weeding
Another process is creating a ‘false seedbed’, whereby a seedbed is prepared early (2 to 4 weeks before normal planting) to leave sufficient time for two weeding operations before the crop is planted, thereby exhausting early weed pressure.
Harvesting and primary processing
This training manual focusses on field operations and touches to a very limited extent on harvest and postharvest mechanisation options. In view of the bottlenecks faced by smallholder farmers, especially women, in harvesting and cleaning small grains and legumes, even maize, a few examples of primary processing implements and machinery are presented here in the accompanying slides. These reduce drudgery and time spent by women in postharvest operations involving such crops and increase the attractiveness towards growing and utilising these nutritious crops.
 tap and then scroll down to the Add to Home Screen command.